Latest mountain bike news

Screenshot of the Singletracks website displaying options to download various file formats (GPX, Google Earth KML, Garmin Edge) for mountain bike trails, specifically for Blodgett in Colorado Springs, Colorado. The interface features a section with labeled download buttons and a map outline.
  6
A DVD case for a cycling workout titled "Cycling Pedaling Strength," featuring an image of a cyclist in action on the cover. Next to it, a black DVD disc is placed in a clear case. The disc is labeled "Singletrack MENDS."
A shiny bicycle cassette resting inside an open cardboard box, showcasing its intricate gear teeth and central sprocket. The box has a light brown color and is partially closed, with the cassette visible from above. The background is a dark surface, emphasizing the metallic shine of the cassette.
A red mountain bike displayed on a platform at an exhibition, with two people conversing in the background. The bike features thick tires and a minimalist frame design, alongside logos for Mavic and Adidas in the backdrop.
  3
We've been recommending the <a href="http://www.singletracks.com/mtbreviews/Garmin/Edge-305/195.html">Garmin Edge</a> series GPS for mountain bikers for about 6 months now and we're still loving it. The Edge gets great reception on the trail, it has  a simple interface, and it's fairly rugged.

Until recently, though, we had never tried loading a GPS route downloaded from the internet - and it turns out to be a pain in the ass if you don't know what you're doing. Fortunately we're here to help.

All of the GPS data on singletracks is now available for your Garmin Edge GPS (both the 205 and 305) with one click. Find the trail you want by clicking the "Trail Maps" link at the top of any page and choosing your state from the pull-down menu midway down the page. For this example we're using the <a href="http://www.singletracks.com/mountain-bike/trail-map.php?id=6&amp;view=topo">Blodgett trail data</a> (Colorado) which is available free of charge.

On the GPS data and trail map page click the "Garmin Training Center File" link above the map (shown here)

<img class="alignnone size-full wp-image-2917" title="garmin-training-center-file" src="https://images.singletracks.com/blog/wp-content/uploads/2007/10/garmin-training-center-file.jpg" alt="garmin-training-center-file" width="400" height="280" />

Now fire up your copy of the Garmin Edge Training Center software (free with your Garmin Edge GPS).  This tutorial covers the Windows version; stay tuned for a <a href="http://www.singletracks.com/blog/?p=525">Mac tutorial</a> on the same process.

From the menu choose File -&gt; Import History... and select the file you just downloaded (in this case it's called "Blodgett.tcx").

<img id="image506" src="https://images.singletracks.com/blog/wp-content/uploads/2007/10/import.jpg" alt="import.jpg" />

The trail will be added with today's date and should be at the top of your history list on the left. Select the trail in the left navigation area (you may need to expand the current week to see the trail) and right click on it. Choose "Create Course from Activity."

<img id="image507" src="https://images.singletracks.com/blog/wp-content/uploads/2007/10/createcourse.jpg" alt="createcourse.jpg" />

Now, switch over to course view by clicking the "Courses" button just below the menu bar. On the left you should see a new course called "New Course 1" and any previously saved courses you may have. Right click on the new course and choose "Edit Course." Create a name for your course (I called mine "Blodgett") and click "Ok" to save.

<img id="image510" src="https://images.singletracks.com/blog/wp-content/uploads/2007/10/editcourse2.jpg" alt="editcourse2.jpg" />

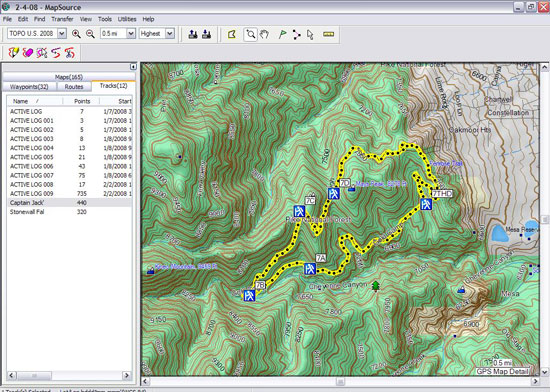
You should see a basic map and elevation profile of the trail in the preview window that will roughly match what you saw on singletracks. Ignore the speed and time data for your track - this is completely arbitrary for all trails you download from singletracks.

Now you're finally ready to send the trail to your GPS. Make sure your GPS is connected to your computer and with the course selected, choose File -&gt; Send to Device. This may take a few seconds depending on the length and detail of the trail you've selected.

<img id="image511" src="https://images.singletracks.com/blog/wp-content/uploads/2007/10/sendcourse.jpg" alt="sendcourse.jpg" />

After you hear your GPS beep it is safe to disconnect. Once disconnected, turn your Edge on to make sure the trail has been loaded. You can find your saved courses at any time (no GPS signal needed) by navigating to the Main Menu and choosing "Training," then "Courses."  Select your course (in this example, labeled "Blodgett") from the list and you can see several options:
<ul>
	<li>Do Course</li>
	<li>Edit Course</li>
	<li>Map</li>
	<li>Profile</li>
	<li>Delete Course</li>
</ul>
"Do Course" allows you to navigate the course just as it was submitted to singletracks. This gives you some good information like distance to course, navigation stats, and more. This will also help you stay on track but don't worry about trying to keep up with the pace - remember it's arbitrary! To stop following the course return to the Main Menu and select "Training," "Stop Course."

"Edit Course" lets you edit the name of your course, though I don't recommended it. Instead, do this on your computer before you send it to your GPS - it's much faster!

"Map" shows you an overall map of your course. Zoom in and out using the arrow controls on your Edge GPS.

"Profile" gives you the elevation profile for the trail. Zoom in and out to get a good view using the arrow controls.

"Delete Course" is self explanatory. While this deletes the course from your GPS it DOES NOT delete it from your Garmin Training Center computer software.

With a few simple steps you can download GPS trail data from the internet and send it to your Garmin Edge GPS device, giving you piece of mind and relevant data when riding an unfamiliar trail.
A group of people at a trade show examining a large, modern bicycle wheel displayed on a stand. The wheel features a sleek design with a carbon fiber look, and one person is interacting with it while others watch. The background includes additional cycling equipment and attendees engaged in conversation.
Mountain bike suspension fork displayed on a black wall. The fork features two silver aluminum stanchions with black and red branded lower legs. It includes adjustment knobs at the top and a sleek design suitable for off-road biking. A nearby sign provides additional information about the product.
A silver metal canister labeled "IMBAX" with a red "X" on top, accompanied by a circular disc with a red "X" and the word "MEET," and a circular stack of textured, replaceable inserts. The items are displayed on a white tablecloth.
  1
Interior view of a mountain bike hall of fame exhibit featuring bicycles mounted on the walls, historical photographs, and informational panels detailing inductees and the history of mountain biking.
Image of a mountain bike fork displayed against a yellow background, featuring black and red color accents. A product information card labeled "WOTAN" is attached to the fork.
A black Bell helmet displayed on a mannequin head, attached to a metal stand beside a table with promotional materials. The background is dark, and people can be seen in the distance.
A person holding a handheld GPS device in a display setting, with several similar devices showcased on a stand in the background. The display features a wooden backdrop and informational signs about the products.
  1
We've been recommending the <a href="http://www.singletracks.com/mtbreviews/Garmin/Edge-305/195.html">Garmin Edge</a> series GPS for mountain bikers for about 6 months now and we're still loving it. The Edge gets great reception on the trail, it has  a simple interface, and it's fairly rugged.

Until recently, though, we had never tried loading a GPS route downloaded from the internet - and it turns out to be a pain in the ass if you don't know what you're doing. Fortunately we're here to help.

All of the GPS data on singletracks is now available for your Garmin Edge GPS (both the 205 and 305) with one click. Find the trail you want by clicking the "Trail Maps" link at the top of any page and choosing your state from the pull-down menu midway down the page. For this example we're using the <a href="http://www.singletracks.com/mountain-bike/trail-map.php?id=6&amp;view=topo">Blodgett trail data</a> (Colorado) which is available free of charge.

On the GPS data and trail map page click the "Garmin Training Center File" link above the map (shown here)

<img class="alignnone size-full wp-image-2917" title="garmin-training-center-file" src="https://images.singletracks.com/blog/wp-content/uploads/2007/10/garmin-training-center-file.jpg" alt="garmin-training-center-file" width="400" height="280" />

Now fire up your copy of the Garmin Edge Training Center software (free with your Garmin Edge GPS).  This tutorial covers the Windows version; stay tuned for a <a href="http://www.singletracks.com/blog/?p=525">Mac tutorial</a> on the same process.

From the menu choose File -&gt; Import History... and select the file you just downloaded (in this case it's called "Blodgett.tcx").

<img id="image506" src="https://images.singletracks.com/blog/wp-content/uploads/2007/10/import.jpg" alt="import.jpg" />

The trail will be added with today's date and should be at the top of your history list on the left. Select the trail in the left navigation area (you may need to expand the current week to see the trail) and right click on it. Choose "Create Course from Activity."

<img id="image507" src="https://images.singletracks.com/blog/wp-content/uploads/2007/10/createcourse.jpg" alt="createcourse.jpg" />

Now, switch over to course view by clicking the "Courses" button just below the menu bar. On the left you should see a new course called "New Course 1" and any previously saved courses you may have. Right click on the new course and choose "Edit Course." Create a name for your course (I called mine "Blodgett") and click "Ok" to save.

<img id="image510" src="https://images.singletracks.com/blog/wp-content/uploads/2007/10/editcourse2.jpg" alt="editcourse2.jpg" />

You should see a basic map and elevation profile of the trail in the preview window that will roughly match what you saw on singletracks. Ignore the speed and time data for your track - this is completely arbitrary for all trails you download from singletracks.

Now you're finally ready to send the trail to your GPS. Make sure your GPS is connected to your computer and with the course selected, choose File -&gt; Send to Device. This may take a few seconds depending on the length and detail of the trail you've selected.

<img id="image511" src="https://images.singletracks.com/blog/wp-content/uploads/2007/10/sendcourse.jpg" alt="sendcourse.jpg" />

After you hear your GPS beep it is safe to disconnect. Once disconnected, turn your Edge on to make sure the trail has been loaded. You can find your saved courses at any time (no GPS signal needed) by navigating to the Main Menu and choosing "Training," then "Courses."  Select your course (in this example, labeled "Blodgett") from the list and you can see several options:
<ul>
	<li>Do Course</li>
	<li>Edit Course</li>
	<li>Map</li>
	<li>Profile</li>
	<li>Delete Course</li>
</ul>
"Do Course" allows you to navigate the course just as it was submitted to singletracks. This gives you some good information like distance to course, navigation stats, and more. This will also help you stay on track but don't worry about trying to keep up with the pace - remember it's arbitrary! To stop following the course return to the Main Menu and select "Training," "Stop Course."

"Edit Course" lets you edit the name of your course, though I don't recommended it. Instead, do this on your computer before you send it to your GPS - it's much faster!

"Map" shows you an overall map of your course. Zoom in and out using the arrow controls on your Edge GPS.

"Profile" gives you the elevation profile for the trail. Zoom in and out to get a good view using the arrow controls.

"Delete Course" is self explanatory. While this deletes the course from your GPS it DOES NOT delete it from your Garmin Training Center computer software.

With a few simple steps you can download GPS trail data from the internet and send it to your Garmin Edge GPS device, giving you piece of mind and relevant data when riding an unfamiliar trail.
A white mountain bike displayed at an event booth, featuring a sleek design, black tires, and a water bottle holder. The background includes promotional banners with cycling-related messages.
  2
A mounted display featuring a bicycle tire with a unique design, showcasing a combination of a traditional rubber tread and an inner structure for enhanced support. The display is set against a backdrop with text highlighting benefits such as improved traction, better cornering stability, and enhanced suspension.
Close-up view of a metal bike frame with visible components such as the crankset, chain, and gears. The image shows the intricate details of the mechanical parts, highlighting the craftsmanship and design of the bicycle. The background is dark, and there are tools and information displays nearby.
We've been recommending the <a href="http://www.singletracks.com/mtbreviews/Garmin/Edge-305/195.html">Garmin Edge</a> series GPS for mountain bikers for about 6 months now and we're still loving it. The Edge gets great reception on the trail, it has  a simple interface, and it's fairly rugged.

Until recently, though, we had never tried loading a GPS route downloaded from the internet - and it turns out to be a pain in the ass if you don't know what you're doing. Fortunately we're here to help.

All of the GPS data on singletracks is now available for your Garmin Edge GPS (both the 205 and 305) with one click. Find the trail you want by clicking the "Trail Maps" link at the top of any page and choosing your state from the pull-down menu midway down the page. For this example we're using the <a href="http://www.singletracks.com/mountain-bike/trail-map.php?id=6&amp;view=topo">Blodgett trail data</a> (Colorado) which is available free of charge.

On the GPS data and trail map page click the "Garmin Training Center File" link above the map (shown here)

<img class="alignnone size-full wp-image-2917" title="garmin-training-center-file" src="https://images.singletracks.com/blog/wp-content/uploads/2007/10/garmin-training-center-file.jpg" alt="garmin-training-center-file" width="400" height="280" />

Now fire up your copy of the Garmin Edge Training Center software (free with your Garmin Edge GPS).  This tutorial covers the Windows version; stay tuned for a <a href="http://www.singletracks.com/blog/?p=525">Mac tutorial</a> on the same process.

From the menu choose File -&gt; Import History... and select the file you just downloaded (in this case it's called "Blodgett.tcx").

<img id="image506" src="https://images.singletracks.com/blog/wp-content/uploads/2007/10/import.jpg" alt="import.jpg" />

The trail will be added with today's date and should be at the top of your history list on the left. Select the trail in the left navigation area (you may need to expand the current week to see the trail) and right click on it. Choose "Create Course from Activity."

<img id="image507" src="https://images.singletracks.com/blog/wp-content/uploads/2007/10/createcourse.jpg" alt="createcourse.jpg" />

Now, switch over to course view by clicking the "Courses" button just below the menu bar. On the left you should see a new course called "New Course 1" and any previously saved courses you may have. Right click on the new course and choose "Edit Course." Create a name for your course (I called mine "Blodgett") and click "Ok" to save.

<img id="image510" src="https://images.singletracks.com/blog/wp-content/uploads/2007/10/editcourse2.jpg" alt="editcourse2.jpg" />

You should see a basic map and elevation profile of the trail in the preview window that will roughly match what you saw on singletracks. Ignore the speed and time data for your track - this is completely arbitrary for all trails you download from singletracks.

Now you're finally ready to send the trail to your GPS. Make sure your GPS is connected to your computer and with the course selected, choose File -&gt; Send to Device. This may take a few seconds depending on the length and detail of the trail you've selected.

<img id="image511" src="https://images.singletracks.com/blog/wp-content/uploads/2007/10/sendcourse.jpg" alt="sendcourse.jpg" />

After you hear your GPS beep it is safe to disconnect. Once disconnected, turn your Edge on to make sure the trail has been loaded. You can find your saved courses at any time (no GPS signal needed) by navigating to the Main Menu and choosing "Training," then "Courses."  Select your course (in this example, labeled "Blodgett") from the list and you can see several options:
<ul>
	<li>Do Course</li>
	<li>Edit Course</li>
	<li>Map</li>
	<li>Profile</li>
	<li>Delete Course</li>
</ul>
"Do Course" allows you to navigate the course just as it was submitted to singletracks. This gives you some good information like distance to course, navigation stats, and more. This will also help you stay on track but don't worry about trying to keep up with the pace - remember it's arbitrary! To stop following the course return to the Main Menu and select "Training," "Stop Course."

"Edit Course" lets you edit the name of your course, though I don't recommended it. Instead, do this on your computer before you send it to your GPS - it's much faster!

"Map" shows you an overall map of your course. Zoom in and out using the arrow controls on your Edge GPS.

"Profile" gives you the elevation profile for the trail. Zoom in and out to get a good view using the arrow controls.

"Delete Course" is self explanatory. While this deletes the course from your GPS it DOES NOT delete it from your Garmin Training Center computer software.

With a few simple steps you can download GPS trail data from the internet and send it to your Garmin Edge GPS device, giving you piece of mind and relevant data when riding an unfamiliar trail.
A silver mountain bike with visible dirt on the tires is positioned next to a table covered with a fall-themed tablecloth. On the bike's frame rests an orange Halloween pumpkin helmet. In the background, another bike and a red bicycle frame can be seen.
We've been recommending the <a href="http://www.singletracks.com/mtbreviews/Garmin/Edge-305/195.html">Garmin Edge</a> series GPS for mountain bikers for about 6 months now and we're still loving it. The Edge gets great reception on the trail, it has  a simple interface, and it's fairly rugged.

Until recently, though, we had never tried loading a GPS route downloaded from the internet - and it turns out to be a pain in the ass if you don't know what you're doing. Fortunately we're here to help.

All of the GPS data on singletracks is now available for your Garmin Edge GPS (both the 205 and 305) with one click. Find the trail you want by clicking the "Trail Maps" link at the top of any page and choosing your state from the pull-down menu midway down the page. For this example we're using the <a href="http://www.singletracks.com/mountain-bike/trail-map.php?id=6&amp;view=topo">Blodgett trail data</a> (Colorado) which is available free of charge.

On the GPS data and trail map page click the "Garmin Training Center File" link above the map (shown here)

<img class="alignnone size-full wp-image-2917" title="garmin-training-center-file" src="https://images.singletracks.com/blog/wp-content/uploads/2007/10/garmin-training-center-file.jpg" alt="garmin-training-center-file" width="400" height="280" />

Now fire up your copy of the Garmin Edge Training Center software (free with your Garmin Edge GPS).  This tutorial covers the Windows version; stay tuned for a <a href="http://www.singletracks.com/blog/?p=525">Mac tutorial</a> on the same process.

From the menu choose File -&gt; Import History... and select the file you just downloaded (in this case it's called "Blodgett.tcx").

<img id="image506" src="https://images.singletracks.com/blog/wp-content/uploads/2007/10/import.jpg" alt="import.jpg" />

The trail will be added with today's date and should be at the top of your history list on the left. Select the trail in the left navigation area (you may need to expand the current week to see the trail) and right click on it. Choose "Create Course from Activity."

<img id="image507" src="https://images.singletracks.com/blog/wp-content/uploads/2007/10/createcourse.jpg" alt="createcourse.jpg" />

Now, switch over to course view by clicking the "Courses" button just below the menu bar. On the left you should see a new course called "New Course 1" and any previously saved courses you may have. Right click on the new course and choose "Edit Course." Create a name for your course (I called mine "Blodgett") and click "Ok" to save.

<img id="image510" src="https://images.singletracks.com/blog/wp-content/uploads/2007/10/editcourse2.jpg" alt="editcourse2.jpg" />

You should see a basic map and elevation profile of the trail in the preview window that will roughly match what you saw on singletracks. Ignore the speed and time data for your track - this is completely arbitrary for all trails you download from singletracks.

Now you're finally ready to send the trail to your GPS. Make sure your GPS is connected to your computer and with the course selected, choose File -&gt; Send to Device. This may take a few seconds depending on the length and detail of the trail you've selected.

<img id="image511" src="https://images.singletracks.com/blog/wp-content/uploads/2007/10/sendcourse.jpg" alt="sendcourse.jpg" />

After you hear your GPS beep it is safe to disconnect. Once disconnected, turn your Edge on to make sure the trail has been loaded. You can find your saved courses at any time (no GPS signal needed) by navigating to the Main Menu and choosing "Training," then "Courses."  Select your course (in this example, labeled "Blodgett") from the list and you can see several options:
<ul>
	<li>Do Course</li>
	<li>Edit Course</li>
	<li>Map</li>
	<li>Profile</li>
	<li>Delete Course</li>
</ul>
"Do Course" allows you to navigate the course just as it was submitted to singletracks. This gives you some good information like distance to course, navigation stats, and more. This will also help you stay on track but don't worry about trying to keep up with the pace - remember it's arbitrary! To stop following the course return to the Main Menu and select "Training," "Stop Course."

"Edit Course" lets you edit the name of your course, though I don't recommended it. Instead, do this on your computer before you send it to your GPS - it's much faster!

"Map" shows you an overall map of your course. Zoom in and out using the arrow controls on your Edge GPS.

"Profile" gives you the elevation profile for the trail. Zoom in and out to get a good view using the arrow controls.

"Delete Course" is self explanatory. While this deletes the course from your GPS it DOES NOT delete it from your Garmin Training Center computer software.

With a few simple steps you can download GPS trail data from the internet and send it to your Garmin Edge GPS device, giving you piece of mind and relevant data when riding an unfamiliar trail.
Logo of Interbike, a trade show for the bicycle industry, featuring the word "interbike" in bold, white letters on a dark textured background.
We've been recommending the <a href="http://www.singletracks.com/mtbreviews/Garmin/Edge-305/195.html">Garmin Edge</a> series GPS for mountain bikers for about 6 months now and we're still loving it. The Edge gets great reception on the trail, it has  a simple interface, and it's fairly rugged.

Until recently, though, we had never tried loading a GPS route downloaded from the internet - and it turns out to be a pain in the ass if you don't know what you're doing. Fortunately we're here to help.

All of the GPS data on singletracks is now available for your Garmin Edge GPS (both the 205 and 305) with one click. Find the trail you want by clicking the "Trail Maps" link at the top of any page and choosing your state from the pull-down menu midway down the page. For this example we're using the <a href="http://www.singletracks.com/mountain-bike/trail-map.php?id=6&amp;view=topo">Blodgett trail data</a> (Colorado) which is available free of charge.

On the GPS data and trail map page click the "Garmin Training Center File" link above the map (shown here)

<img class="alignnone size-full wp-image-2917" title="garmin-training-center-file" src="https://images.singletracks.com/blog/wp-content/uploads/2007/10/garmin-training-center-file.jpg" alt="garmin-training-center-file" width="400" height="280" />

Now fire up your copy of the Garmin Edge Training Center software (free with your Garmin Edge GPS).  This tutorial covers the Windows version; stay tuned for a <a href="http://www.singletracks.com/blog/?p=525">Mac tutorial</a> on the same process.

From the menu choose File -&gt; Import History... and select the file you just downloaded (in this case it's called "Blodgett.tcx").

<img id="image506" src="https://images.singletracks.com/blog/wp-content/uploads/2007/10/import.jpg" alt="import.jpg" />

The trail will be added with today's date and should be at the top of your history list on the left. Select the trail in the left navigation area (you may need to expand the current week to see the trail) and right click on it. Choose "Create Course from Activity."

<img id="image507" src="https://images.singletracks.com/blog/wp-content/uploads/2007/10/createcourse.jpg" alt="createcourse.jpg" />

Now, switch over to course view by clicking the "Courses" button just below the menu bar. On the left you should see a new course called "New Course 1" and any previously saved courses you may have. Right click on the new course and choose "Edit Course." Create a name for your course (I called mine "Blodgett") and click "Ok" to save.

<img id="image510" src="https://images.singletracks.com/blog/wp-content/uploads/2007/10/editcourse2.jpg" alt="editcourse2.jpg" />

You should see a basic map and elevation profile of the trail in the preview window that will roughly match what you saw on singletracks. Ignore the speed and time data for your track - this is completely arbitrary for all trails you download from singletracks.

Now you're finally ready to send the trail to your GPS. Make sure your GPS is connected to your computer and with the course selected, choose File -&gt; Send to Device. This may take a few seconds depending on the length and detail of the trail you've selected.

<img id="image511" src="https://images.singletracks.com/blog/wp-content/uploads/2007/10/sendcourse.jpg" alt="sendcourse.jpg" />

After you hear your GPS beep it is safe to disconnect. Once disconnected, turn your Edge on to make sure the trail has been loaded. You can find your saved courses at any time (no GPS signal needed) by navigating to the Main Menu and choosing "Training," then "Courses."  Select your course (in this example, labeled "Blodgett") from the list and you can see several options:
<ul>
	<li>Do Course</li>
	<li>Edit Course</li>
	<li>Map</li>
	<li>Profile</li>
	<li>Delete Course</li>
</ul>
"Do Course" allows you to navigate the course just as it was submitted to singletracks. This gives you some good information like distance to course, navigation stats, and more. This will also help you stay on track but don't worry about trying to keep up with the pace - remember it's arbitrary! To stop following the course return to the Main Menu and select "Training," "Stop Course."

"Edit Course" lets you edit the name of your course, though I don't recommended it. Instead, do this on your computer before you send it to your GPS - it's much faster!

"Map" shows you an overall map of your course. Zoom in and out using the arrow controls on your Edge GPS.

"Profile" gives you the elevation profile for the trail. Zoom in and out to get a good view using the arrow controls.

"Delete Course" is self explanatory. While this deletes the course from your GPS it DOES NOT delete it from your Garmin Training Center computer software.

With a few simple steps you can download GPS trail data from the internet and send it to your Garmin Edge GPS device, giving you piece of mind and relevant data when riding an unfamiliar trail.
We've been recommending the <a href="http://www.singletracks.com/mtbreviews/Garmin/Edge-305/195.html">Garmin Edge</a> series GPS for mountain bikers for about 6 months now and we're still loving it. The Edge gets great reception on the trail, it has  a simple interface, and it's fairly rugged.

Until recently, though, we had never tried loading a GPS route downloaded from the internet - and it turns out to be a pain in the ass if you don't know what you're doing. Fortunately we're here to help.

All of the GPS data on singletracks is now available for your Garmin Edge GPS (both the 205 and 305) with one click. Find the trail you want by clicking the "Trail Maps" link at the top of any page and choosing your state from the pull-down menu midway down the page. For this example we're using the <a href="http://www.singletracks.com/mountain-bike/trail-map.php?id=6&amp;view=topo">Blodgett trail data</a> (Colorado) which is available free of charge.

On the GPS data and trail map page click the "Garmin Training Center File" link above the map (shown here)

<img class="alignnone size-full wp-image-2917" title="garmin-training-center-file" src="https://images.singletracks.com/blog/wp-content/uploads/2007/10/garmin-training-center-file.jpg" alt="garmin-training-center-file" width="400" height="280" />

Now fire up your copy of the Garmin Edge Training Center software (free with your Garmin Edge GPS).  This tutorial covers the Windows version; stay tuned for a <a href="http://www.singletracks.com/blog/?p=525">Mac tutorial</a> on the same process.

From the menu choose File -&gt; Import History... and select the file you just downloaded (in this case it's called "Blodgett.tcx").

<img id="image506" src="https://images.singletracks.com/blog/wp-content/uploads/2007/10/import.jpg" alt="import.jpg" />

The trail will be added with today's date and should be at the top of your history list on the left. Select the trail in the left navigation area (you may need to expand the current week to see the trail) and right click on it. Choose "Create Course from Activity."

<img id="image507" src="https://images.singletracks.com/blog/wp-content/uploads/2007/10/createcourse.jpg" alt="createcourse.jpg" />

Now, switch over to course view by clicking the "Courses" button just below the menu bar. On the left you should see a new course called "New Course 1" and any previously saved courses you may have. Right click on the new course and choose "Edit Course." Create a name for your course (I called mine "Blodgett") and click "Ok" to save.

<img id="image510" src="https://images.singletracks.com/blog/wp-content/uploads/2007/10/editcourse2.jpg" alt="editcourse2.jpg" />

You should see a basic map and elevation profile of the trail in the preview window that will roughly match what you saw on singletracks. Ignore the speed and time data for your track - this is completely arbitrary for all trails you download from singletracks.

Now you're finally ready to send the trail to your GPS. Make sure your GPS is connected to your computer and with the course selected, choose File -&gt; Send to Device. This may take a few seconds depending on the length and detail of the trail you've selected.

<img id="image511" src="https://images.singletracks.com/blog/wp-content/uploads/2007/10/sendcourse.jpg" alt="sendcourse.jpg" />

After you hear your GPS beep it is safe to disconnect. Once disconnected, turn your Edge on to make sure the trail has been loaded. You can find your saved courses at any time (no GPS signal needed) by navigating to the Main Menu and choosing "Training," then "Courses."  Select your course (in this example, labeled "Blodgett") from the list and you can see several options:
<ul>
	<li>Do Course</li>
	<li>Edit Course</li>
	<li>Map</li>
	<li>Profile</li>
	<li>Delete Course</li>
</ul>
"Do Course" allows you to navigate the course just as it was submitted to singletracks. This gives you some good information like distance to course, navigation stats, and more. This will also help you stay on track but don't worry about trying to keep up with the pace - remember it's arbitrary! To stop following the course return to the Main Menu and select "Training," "Stop Course."

"Edit Course" lets you edit the name of your course, though I don't recommended it. Instead, do this on your computer before you send it to your GPS - it's much faster!

"Map" shows you an overall map of your course. Zoom in and out using the arrow controls on your Edge GPS.

"Profile" gives you the elevation profile for the trail. Zoom in and out to get a good view using the arrow controls.

"Delete Course" is self explanatory. While this deletes the course from your GPS it DOES NOT delete it from your Garmin Training Center computer software.

With a few simple steps you can download GPS trail data from the internet and send it to your Garmin Edge GPS device, giving you piece of mind and relevant data when riding an unfamiliar trail.
We've been recommending the <a href="http://www.singletracks.com/mtbreviews/Garmin/Edge-305/195.html">Garmin Edge</a> series GPS for mountain bikers for about 6 months now and we're still loving it. The Edge gets great reception on the trail, it has  a simple interface, and it's fairly rugged.

Until recently, though, we had never tried loading a GPS route downloaded from the internet - and it turns out to be a pain in the ass if you don't know what you're doing. Fortunately we're here to help.

All of the GPS data on singletracks is now available for your Garmin Edge GPS (both the 205 and 305) with one click. Find the trail you want by clicking the "Trail Maps" link at the top of any page and choosing your state from the pull-down menu midway down the page. For this example we're using the <a href="http://www.singletracks.com/mountain-bike/trail-map.php?id=6&amp;view=topo">Blodgett trail data</a> (Colorado) which is available free of charge.

On the GPS data and trail map page click the "Garmin Training Center File" link above the map (shown here)

<img class="alignnone size-full wp-image-2917" title="garmin-training-center-file" src="https://images.singletracks.com/blog/wp-content/uploads/2007/10/garmin-training-center-file.jpg" alt="garmin-training-center-file" width="400" height="280" />

Now fire up your copy of the Garmin Edge Training Center software (free with your Garmin Edge GPS).  This tutorial covers the Windows version; stay tuned for a <a href="http://www.singletracks.com/blog/?p=525">Mac tutorial</a> on the same process.

From the menu choose File -&gt; Import History... and select the file you just downloaded (in this case it's called "Blodgett.tcx").

<img id="image506" src="https://images.singletracks.com/blog/wp-content/uploads/2007/10/import.jpg" alt="import.jpg" />

The trail will be added with today's date and should be at the top of your history list on the left. Select the trail in the left navigation area (you may need to expand the current week to see the trail) and right click on it. Choose "Create Course from Activity."

<img id="image507" src="https://images.singletracks.com/blog/wp-content/uploads/2007/10/createcourse.jpg" alt="createcourse.jpg" />

Now, switch over to course view by clicking the "Courses" button just below the menu bar. On the left you should see a new course called "New Course 1" and any previously saved courses you may have. Right click on the new course and choose "Edit Course." Create a name for your course (I called mine "Blodgett") and click "Ok" to save.

<img id="image510" src="https://images.singletracks.com/blog/wp-content/uploads/2007/10/editcourse2.jpg" alt="editcourse2.jpg" />

You should see a basic map and elevation profile of the trail in the preview window that will roughly match what you saw on singletracks. Ignore the speed and time data for your track - this is completely arbitrary for all trails you download from singletracks.

Now you're finally ready to send the trail to your GPS. Make sure your GPS is connected to your computer and with the course selected, choose File -&gt; Send to Device. This may take a few seconds depending on the length and detail of the trail you've selected.

<img id="image511" src="https://images.singletracks.com/blog/wp-content/uploads/2007/10/sendcourse.jpg" alt="sendcourse.jpg" />

After you hear your GPS beep it is safe to disconnect. Once disconnected, turn your Edge on to make sure the trail has been loaded. You can find your saved courses at any time (no GPS signal needed) by navigating to the Main Menu and choosing "Training," then "Courses."  Select your course (in this example, labeled "Blodgett") from the list and you can see several options:
<ul>
	<li>Do Course</li>
	<li>Edit Course</li>
	<li>Map</li>
	<li>Profile</li>
	<li>Delete Course</li>
</ul>
"Do Course" allows you to navigate the course just as it was submitted to singletracks. This gives you some good information like distance to course, navigation stats, and more. This will also help you stay on track but don't worry about trying to keep up with the pace - remember it's arbitrary! To stop following the course return to the Main Menu and select "Training," "Stop Course."

"Edit Course" lets you edit the name of your course, though I don't recommended it. Instead, do this on your computer before you send it to your GPS - it's much faster!

"Map" shows you an overall map of your course. Zoom in and out using the arrow controls on your Edge GPS.

"Profile" gives you the elevation profile for the trail. Zoom in and out to get a good view using the arrow controls.

"Delete Course" is self explanatory. While this deletes the course from your GPS it DOES NOT delete it from your Garmin Training Center computer software.

With a few simple steps you can download GPS trail data from the internet and send it to your Garmin Edge GPS device, giving you piece of mind and relevant data when riding an unfamiliar trail.
A Garmin Edge 305 bike computer displaying metrics such as time (02:16:46), speed (38.6 km/h), total distance (64.6 km), elevation (364 m), and heart rate (139 bpm) on a dark screen with a gray casing.
  1
**Alt Text:** A chart outlining a trail difficulty rating system, including categories for trail width, tread surface, average trail grade, maximum trail grade, and natural obstacles. The system ranges from easiest (white circle) to extremely difficult (double black diamond), with specific criteria for each rating level.
We've been recommending the <a href="http://www.singletracks.com/mtbreviews/Garmin/Edge-305/195.html">Garmin Edge</a> series GPS for mountain bikers for about 6 months now and we're still loving it. The Edge gets great reception on the trail, it has  a simple interface, and it's fairly rugged.

Until recently, though, we had never tried loading a GPS route downloaded from the internet - and it turns out to be a pain in the ass if you don't know what you're doing. Fortunately we're here to help.

All of the GPS data on singletracks is now available for your Garmin Edge GPS (both the 205 and 305) with one click. Find the trail you want by clicking the "Trail Maps" link at the top of any page and choosing your state from the pull-down menu midway down the page. For this example we're using the <a href="http://www.singletracks.com/mountain-bike/trail-map.php?id=6&amp;view=topo">Blodgett trail data</a> (Colorado) which is available free of charge.

On the GPS data and trail map page click the "Garmin Training Center File" link above the map (shown here)

<img class="alignnone size-full wp-image-2917" title="garmin-training-center-file" src="https://images.singletracks.com/blog/wp-content/uploads/2007/10/garmin-training-center-file.jpg" alt="garmin-training-center-file" width="400" height="280" />

Now fire up your copy of the Garmin Edge Training Center software (free with your Garmin Edge GPS).  This tutorial covers the Windows version; stay tuned for a <a href="http://www.singletracks.com/blog/?p=525">Mac tutorial</a> on the same process.

From the menu choose File -&gt; Import History... and select the file you just downloaded (in this case it's called "Blodgett.tcx").

<img id="image506" src="https://images.singletracks.com/blog/wp-content/uploads/2007/10/import.jpg" alt="import.jpg" />

The trail will be added with today's date and should be at the top of your history list on the left. Select the trail in the left navigation area (you may need to expand the current week to see the trail) and right click on it. Choose "Create Course from Activity."

<img id="image507" src="https://images.singletracks.com/blog/wp-content/uploads/2007/10/createcourse.jpg" alt="createcourse.jpg" />

Now, switch over to course view by clicking the "Courses" button just below the menu bar. On the left you should see a new course called "New Course 1" and any previously saved courses you may have. Right click on the new course and choose "Edit Course." Create a name for your course (I called mine "Blodgett") and click "Ok" to save.

<img id="image510" src="https://images.singletracks.com/blog/wp-content/uploads/2007/10/editcourse2.jpg" alt="editcourse2.jpg" />

You should see a basic map and elevation profile of the trail in the preview window that will roughly match what you saw on singletracks. Ignore the speed and time data for your track - this is completely arbitrary for all trails you download from singletracks.

Now you're finally ready to send the trail to your GPS. Make sure your GPS is connected to your computer and with the course selected, choose File -&gt; Send to Device. This may take a few seconds depending on the length and detail of the trail you've selected.

<img id="image511" src="https://images.singletracks.com/blog/wp-content/uploads/2007/10/sendcourse.jpg" alt="sendcourse.jpg" />

After you hear your GPS beep it is safe to disconnect. Once disconnected, turn your Edge on to make sure the trail has been loaded. You can find your saved courses at any time (no GPS signal needed) by navigating to the Main Menu and choosing "Training," then "Courses."  Select your course (in this example, labeled "Blodgett") from the list and you can see several options:
<ul>
	<li>Do Course</li>
	<li>Edit Course</li>
	<li>Map</li>
	<li>Profile</li>
	<li>Delete Course</li>
</ul>
"Do Course" allows you to navigate the course just as it was submitted to singletracks. This gives you some good information like distance to course, navigation stats, and more. This will also help you stay on track but don't worry about trying to keep up with the pace - remember it's arbitrary! To stop following the course return to the Main Menu and select "Training," "Stop Course."

"Edit Course" lets you edit the name of your course, though I don't recommended it. Instead, do this on your computer before you send it to your GPS - it's much faster!

"Map" shows you an overall map of your course. Zoom in and out using the arrow controls on your Edge GPS.

"Profile" gives you the elevation profile for the trail. Zoom in and out to get a good view using the arrow controls.

"Delete Course" is self explanatory. While this deletes the course from your GPS it DOES NOT delete it from your Garmin Training Center computer software.

With a few simple steps you can download GPS trail data from the internet and send it to your Garmin Edge GPS device, giving you piece of mind and relevant data when riding an unfamiliar trail.
  1
We've been recommending the <a href="http://www.singletracks.com/mtbreviews/Garmin/Edge-305/195.html">Garmin Edge</a> series GPS for mountain bikers for about 6 months now and we're still loving it. The Edge gets great reception on the trail, it has  a simple interface, and it's fairly rugged.

Until recently, though, we had never tried loading a GPS route downloaded from the internet - and it turns out to be a pain in the ass if you don't know what you're doing. Fortunately we're here to help.

All of the GPS data on singletracks is now available for your Garmin Edge GPS (both the 205 and 305) with one click. Find the trail you want by clicking the "Trail Maps" link at the top of any page and choosing your state from the pull-down menu midway down the page. For this example we're using the <a href="http://www.singletracks.com/mountain-bike/trail-map.php?id=6&amp;view=topo">Blodgett trail data</a> (Colorado) which is available free of charge.

On the GPS data and trail map page click the "Garmin Training Center File" link above the map (shown here)

<img class="alignnone size-full wp-image-2917" title="garmin-training-center-file" src="https://images.singletracks.com/blog/wp-content/uploads/2007/10/garmin-training-center-file.jpg" alt="garmin-training-center-file" width="400" height="280" />

Now fire up your copy of the Garmin Edge Training Center software (free with your Garmin Edge GPS).  This tutorial covers the Windows version; stay tuned for a <a href="http://www.singletracks.com/blog/?p=525">Mac tutorial</a> on the same process.

From the menu choose File -&gt; Import History... and select the file you just downloaded (in this case it's called "Blodgett.tcx").

<img id="image506" src="https://images.singletracks.com/blog/wp-content/uploads/2007/10/import.jpg" alt="import.jpg" />

The trail will be added with today's date and should be at the top of your history list on the left. Select the trail in the left navigation area (you may need to expand the current week to see the trail) and right click on it. Choose "Create Course from Activity."

<img id="image507" src="https://images.singletracks.com/blog/wp-content/uploads/2007/10/createcourse.jpg" alt="createcourse.jpg" />

Now, switch over to course view by clicking the "Courses" button just below the menu bar. On the left you should see a new course called "New Course 1" and any previously saved courses you may have. Right click on the new course and choose "Edit Course." Create a name for your course (I called mine "Blodgett") and click "Ok" to save.

<img id="image510" src="https://images.singletracks.com/blog/wp-content/uploads/2007/10/editcourse2.jpg" alt="editcourse2.jpg" />

You should see a basic map and elevation profile of the trail in the preview window that will roughly match what you saw on singletracks. Ignore the speed and time data for your track - this is completely arbitrary for all trails you download from singletracks.

Now you're finally ready to send the trail to your GPS. Make sure your GPS is connected to your computer and with the course selected, choose File -&gt; Send to Device. This may take a few seconds depending on the length and detail of the trail you've selected.

<img id="image511" src="https://images.singletracks.com/blog/wp-content/uploads/2007/10/sendcourse.jpg" alt="sendcourse.jpg" />

After you hear your GPS beep it is safe to disconnect. Once disconnected, turn your Edge on to make sure the trail has been loaded. You can find your saved courses at any time (no GPS signal needed) by navigating to the Main Menu and choosing "Training," then "Courses."  Select your course (in this example, labeled "Blodgett") from the list and you can see several options:
<ul>
	<li>Do Course</li>
	<li>Edit Course</li>
	<li>Map</li>
	<li>Profile</li>
	<li>Delete Course</li>
</ul>
"Do Course" allows you to navigate the course just as it was submitted to singletracks. This gives you some good information like distance to course, navigation stats, and more. This will also help you stay on track but don't worry about trying to keep up with the pace - remember it's arbitrary! To stop following the course return to the Main Menu and select "Training," "Stop Course."

"Edit Course" lets you edit the name of your course, though I don't recommended it. Instead, do this on your computer before you send it to your GPS - it's much faster!

"Map" shows you an overall map of your course. Zoom in and out using the arrow controls on your Edge GPS.

"Profile" gives you the elevation profile for the trail. Zoom in and out to get a good view using the arrow controls.

"Delete Course" is self explanatory. While this deletes the course from your GPS it DOES NOT delete it from your Garmin Training Center computer software.

With a few simple steps you can download GPS trail data from the internet and send it to your Garmin Edge GPS device, giving you piece of mind and relevant data when riding an unfamiliar trail.
We've been recommending the <a href="http://www.singletracks.com/mtbreviews/Garmin/Edge-305/195.html">Garmin Edge</a> series GPS for mountain bikers for about 6 months now and we're still loving it. The Edge gets great reception on the trail, it has  a simple interface, and it's fairly rugged.

Until recently, though, we had never tried loading a GPS route downloaded from the internet - and it turns out to be a pain in the ass if you don't know what you're doing. Fortunately we're here to help.

All of the GPS data on singletracks is now available for your Garmin Edge GPS (both the 205 and 305) with one click. Find the trail you want by clicking the "Trail Maps" link at the top of any page and choosing your state from the pull-down menu midway down the page. For this example we're using the <a href="http://www.singletracks.com/mountain-bike/trail-map.php?id=6&amp;view=topo">Blodgett trail data</a> (Colorado) which is available free of charge.

On the GPS data and trail map page click the "Garmin Training Center File" link above the map (shown here)

<img class="alignnone size-full wp-image-2917" title="garmin-training-center-file" src="https://images.singletracks.com/blog/wp-content/uploads/2007/10/garmin-training-center-file.jpg" alt="garmin-training-center-file" width="400" height="280" />

Now fire up your copy of the Garmin Edge Training Center software (free with your Garmin Edge GPS).  This tutorial covers the Windows version; stay tuned for a <a href="http://www.singletracks.com/blog/?p=525">Mac tutorial</a> on the same process.

From the menu choose File -&gt; Import History... and select the file you just downloaded (in this case it's called "Blodgett.tcx").

<img id="image506" src="https://images.singletracks.com/blog/wp-content/uploads/2007/10/import.jpg" alt="import.jpg" />

The trail will be added with today's date and should be at the top of your history list on the left. Select the trail in the left navigation area (you may need to expand the current week to see the trail) and right click on it. Choose "Create Course from Activity."

<img id="image507" src="https://images.singletracks.com/blog/wp-content/uploads/2007/10/createcourse.jpg" alt="createcourse.jpg" />

Now, switch over to course view by clicking the "Courses" button just below the menu bar. On the left you should see a new course called "New Course 1" and any previously saved courses you may have. Right click on the new course and choose "Edit Course." Create a name for your course (I called mine "Blodgett") and click "Ok" to save.

<img id="image510" src="https://images.singletracks.com/blog/wp-content/uploads/2007/10/editcourse2.jpg" alt="editcourse2.jpg" />

You should see a basic map and elevation profile of the trail in the preview window that will roughly match what you saw on singletracks. Ignore the speed and time data for your track - this is completely arbitrary for all trails you download from singletracks.

Now you're finally ready to send the trail to your GPS. Make sure your GPS is connected to your computer and with the course selected, choose File -&gt; Send to Device. This may take a few seconds depending on the length and detail of the trail you've selected.

<img id="image511" src="https://images.singletracks.com/blog/wp-content/uploads/2007/10/sendcourse.jpg" alt="sendcourse.jpg" />

After you hear your GPS beep it is safe to disconnect. Once disconnected, turn your Edge on to make sure the trail has been loaded. You can find your saved courses at any time (no GPS signal needed) by navigating to the Main Menu and choosing "Training," then "Courses."  Select your course (in this example, labeled "Blodgett") from the list and you can see several options:
<ul>
	<li>Do Course</li>
	<li>Edit Course</li>
	<li>Map</li>
	<li>Profile</li>
	<li>Delete Course</li>
</ul>
"Do Course" allows you to navigate the course just as it was submitted to singletracks. This gives you some good information like distance to course, navigation stats, and more. This will also help you stay on track but don't worry about trying to keep up with the pace - remember it's arbitrary! To stop following the course return to the Main Menu and select "Training," "Stop Course."

"Edit Course" lets you edit the name of your course, though I don't recommended it. Instead, do this on your computer before you send it to your GPS - it's much faster!

"Map" shows you an overall map of your course. Zoom in and out using the arrow controls on your Edge GPS.

"Profile" gives you the elevation profile for the trail. Zoom in and out to get a good view using the arrow controls.

"Delete Course" is self explanatory. While this deletes the course from your GPS it DOES NOT delete it from your Garmin Training Center computer software.

With a few simple steps you can download GPS trail data from the internet and send it to your Garmin Edge GPS device, giving you piece of mind and relevant data when riding an unfamiliar trail.
  1
We've been recommending the <a href="http://www.singletracks.com/mtbreviews/Garmin/Edge-305/195.html">Garmin Edge</a> series GPS for mountain bikers for about 6 months now and we're still loving it. The Edge gets great reception on the trail, it has  a simple interface, and it's fairly rugged.

Until recently, though, we had never tried loading a GPS route downloaded from the internet - and it turns out to be a pain in the ass if you don't know what you're doing. Fortunately we're here to help.

All of the GPS data on singletracks is now available for your Garmin Edge GPS (both the 205 and 305) with one click. Find the trail you want by clicking the "Trail Maps" link at the top of any page and choosing your state from the pull-down menu midway down the page. For this example we're using the <a href="http://www.singletracks.com/mountain-bike/trail-map.php?id=6&amp;view=topo">Blodgett trail data</a> (Colorado) which is available free of charge.

On the GPS data and trail map page click the "Garmin Training Center File" link above the map (shown here)

<img class="alignnone size-full wp-image-2917" title="garmin-training-center-file" src="https://images.singletracks.com/blog/wp-content/uploads/2007/10/garmin-training-center-file.jpg" alt="garmin-training-center-file" width="400" height="280" />

Now fire up your copy of the Garmin Edge Training Center software (free with your Garmin Edge GPS).  This tutorial covers the Windows version; stay tuned for a <a href="http://www.singletracks.com/blog/?p=525">Mac tutorial</a> on the same process.

From the menu choose File -&gt; Import History... and select the file you just downloaded (in this case it's called "Blodgett.tcx").

<img id="image506" src="https://images.singletracks.com/blog/wp-content/uploads/2007/10/import.jpg" alt="import.jpg" />

The trail will be added with today's date and should be at the top of your history list on the left. Select the trail in the left navigation area (you may need to expand the current week to see the trail) and right click on it. Choose "Create Course from Activity."

<img id="image507" src="https://images.singletracks.com/blog/wp-content/uploads/2007/10/createcourse.jpg" alt="createcourse.jpg" />

Now, switch over to course view by clicking the "Courses" button just below the menu bar. On the left you should see a new course called "New Course 1" and any previously saved courses you may have. Right click on the new course and choose "Edit Course." Create a name for your course (I called mine "Blodgett") and click "Ok" to save.

<img id="image510" src="https://images.singletracks.com/blog/wp-content/uploads/2007/10/editcourse2.jpg" alt="editcourse2.jpg" />

You should see a basic map and elevation profile of the trail in the preview window that will roughly match what you saw on singletracks. Ignore the speed and time data for your track - this is completely arbitrary for all trails you download from singletracks.

Now you're finally ready to send the trail to your GPS. Make sure your GPS is connected to your computer and with the course selected, choose File -&gt; Send to Device. This may take a few seconds depending on the length and detail of the trail you've selected.

<img id="image511" src="https://images.singletracks.com/blog/wp-content/uploads/2007/10/sendcourse.jpg" alt="sendcourse.jpg" />

After you hear your GPS beep it is safe to disconnect. Once disconnected, turn your Edge on to make sure the trail has been loaded. You can find your saved courses at any time (no GPS signal needed) by navigating to the Main Menu and choosing "Training," then "Courses."  Select your course (in this example, labeled "Blodgett") from the list and you can see several options:
<ul>
	<li>Do Course</li>
	<li>Edit Course</li>
	<li>Map</li>
	<li>Profile</li>
	<li>Delete Course</li>
</ul>
"Do Course" allows you to navigate the course just as it was submitted to singletracks. This gives you some good information like distance to course, navigation stats, and more. This will also help you stay on track but don't worry about trying to keep up with the pace - remember it's arbitrary! To stop following the course return to the Main Menu and select "Training," "Stop Course."

"Edit Course" lets you edit the name of your course, though I don't recommended it. Instead, do this on your computer before you send it to your GPS - it's much faster!

"Map" shows you an overall map of your course. Zoom in and out using the arrow controls on your Edge GPS.

"Profile" gives you the elevation profile for the trail. Zoom in and out to get a good view using the arrow controls.

"Delete Course" is self explanatory. While this deletes the course from your GPS it DOES NOT delete it from your Garmin Training Center computer software.

With a few simple steps you can download GPS trail data from the internet and send it to your Garmin Edge GPS device, giving you piece of mind and relevant data when riding an unfamiliar trail.
We've been recommending the <a href="http://www.singletracks.com/mtbreviews/Garmin/Edge-305/195.html">Garmin Edge</a> series GPS for mountain bikers for about 6 months now and we're still loving it. The Edge gets great reception on the trail, it has  a simple interface, and it's fairly rugged.

Until recently, though, we had never tried loading a GPS route downloaded from the internet - and it turns out to be a pain in the ass if you don't know what you're doing. Fortunately we're here to help.

All of the GPS data on singletracks is now available for your Garmin Edge GPS (both the 205 and 305) with one click. Find the trail you want by clicking the "Trail Maps" link at the top of any page and choosing your state from the pull-down menu midway down the page. For this example we're using the <a href="http://www.singletracks.com/mountain-bike/trail-map.php?id=6&amp;view=topo">Blodgett trail data</a> (Colorado) which is available free of charge.

On the GPS data and trail map page click the "Garmin Training Center File" link above the map (shown here)

<img class="alignnone size-full wp-image-2917" title="garmin-training-center-file" src="https://images.singletracks.com/blog/wp-content/uploads/2007/10/garmin-training-center-file.jpg" alt="garmin-training-center-file" width="400" height="280" />

Now fire up your copy of the Garmin Edge Training Center software (free with your Garmin Edge GPS).  This tutorial covers the Windows version; stay tuned for a <a href="http://www.singletracks.com/blog/?p=525">Mac tutorial</a> on the same process.

From the menu choose File -&gt; Import History... and select the file you just downloaded (in this case it's called "Blodgett.tcx").

<img id="image506" src="https://images.singletracks.com/blog/wp-content/uploads/2007/10/import.jpg" alt="import.jpg" />

The trail will be added with today's date and should be at the top of your history list on the left. Select the trail in the left navigation area (you may need to expand the current week to see the trail) and right click on it. Choose "Create Course from Activity."

<img id="image507" src="https://images.singletracks.com/blog/wp-content/uploads/2007/10/createcourse.jpg" alt="createcourse.jpg" />

Now, switch over to course view by clicking the "Courses" button just below the menu bar. On the left you should see a new course called "New Course 1" and any previously saved courses you may have. Right click on the new course and choose "Edit Course." Create a name for your course (I called mine "Blodgett") and click "Ok" to save.

<img id="image510" src="https://images.singletracks.com/blog/wp-content/uploads/2007/10/editcourse2.jpg" alt="editcourse2.jpg" />

You should see a basic map and elevation profile of the trail in the preview window that will roughly match what you saw on singletracks. Ignore the speed and time data for your track - this is completely arbitrary for all trails you download from singletracks.

Now you're finally ready to send the trail to your GPS. Make sure your GPS is connected to your computer and with the course selected, choose File -&gt; Send to Device. This may take a few seconds depending on the length and detail of the trail you've selected.

<img id="image511" src="https://images.singletracks.com/blog/wp-content/uploads/2007/10/sendcourse.jpg" alt="sendcourse.jpg" />

After you hear your GPS beep it is safe to disconnect. Once disconnected, turn your Edge on to make sure the trail has been loaded. You can find your saved courses at any time (no GPS signal needed) by navigating to the Main Menu and choosing "Training," then "Courses."  Select your course (in this example, labeled "Blodgett") from the list and you can see several options:
<ul>
	<li>Do Course</li>
	<li>Edit Course</li>
	<li>Map</li>
	<li>Profile</li>
	<li>Delete Course</li>
</ul>
"Do Course" allows you to navigate the course just as it was submitted to singletracks. This gives you some good information like distance to course, navigation stats, and more. This will also help you stay on track but don't worry about trying to keep up with the pace - remember it's arbitrary! To stop following the course return to the Main Menu and select "Training," "Stop Course."

"Edit Course" lets you edit the name of your course, though I don't recommended it. Instead, do this on your computer before you send it to your GPS - it's much faster!

"Map" shows you an overall map of your course. Zoom in and out using the arrow controls on your Edge GPS.

"Profile" gives you the elevation profile for the trail. Zoom in and out to get a good view using the arrow controls.

"Delete Course" is self explanatory. While this deletes the course from your GPS it DOES NOT delete it from your Garmin Training Center computer software.

With a few simple steps you can download GPS trail data from the internet and send it to your Garmin Edge GPS device, giving you piece of mind and relevant data when riding an unfamiliar trail.
  1
We've been recommending the <a href="http://www.singletracks.com/mtbreviews/Garmin/Edge-305/195.html">Garmin Edge</a> series GPS for mountain bikers for about 6 months now and we're still loving it. The Edge gets great reception on the trail, it has  a simple interface, and it's fairly rugged.

Until recently, though, we had never tried loading a GPS route downloaded from the internet - and it turns out to be a pain in the ass if you don't know what you're doing. Fortunately we're here to help.

All of the GPS data on singletracks is now available for your Garmin Edge GPS (both the 205 and 305) with one click. Find the trail you want by clicking the "Trail Maps" link at the top of any page and choosing your state from the pull-down menu midway down the page. For this example we're using the <a href="http://www.singletracks.com/mountain-bike/trail-map.php?id=6&amp;view=topo">Blodgett trail data</a> (Colorado) which is available free of charge.

On the GPS data and trail map page click the "Garmin Training Center File" link above the map (shown here)

<img class="alignnone size-full wp-image-2917" title="garmin-training-center-file" src="https://images.singletracks.com/blog/wp-content/uploads/2007/10/garmin-training-center-file.jpg" alt="garmin-training-center-file" width="400" height="280" />

Now fire up your copy of the Garmin Edge Training Center software (free with your Garmin Edge GPS).  This tutorial covers the Windows version; stay tuned for a <a href="http://www.singletracks.com/blog/?p=525">Mac tutorial</a> on the same process.

From the menu choose File -&gt; Import History... and select the file you just downloaded (in this case it's called "Blodgett.tcx").

<img id="image506" src="https://images.singletracks.com/blog/wp-content/uploads/2007/10/import.jpg" alt="import.jpg" />

The trail will be added with today's date and should be at the top of your history list on the left. Select the trail in the left navigation area (you may need to expand the current week to see the trail) and right click on it. Choose "Create Course from Activity."

<img id="image507" src="https://images.singletracks.com/blog/wp-content/uploads/2007/10/createcourse.jpg" alt="createcourse.jpg" />

Now, switch over to course view by clicking the "Courses" button just below the menu bar. On the left you should see a new course called "New Course 1" and any previously saved courses you may have. Right click on the new course and choose "Edit Course." Create a name for your course (I called mine "Blodgett") and click "Ok" to save.

<img id="image510" src="https://images.singletracks.com/blog/wp-content/uploads/2007/10/editcourse2.jpg" alt="editcourse2.jpg" />

You should see a basic map and elevation profile of the trail in the preview window that will roughly match what you saw on singletracks. Ignore the speed and time data for your track - this is completely arbitrary for all trails you download from singletracks.

Now you're finally ready to send the trail to your GPS. Make sure your GPS is connected to your computer and with the course selected, choose File -&gt; Send to Device. This may take a few seconds depending on the length and detail of the trail you've selected.

<img id="image511" src="https://images.singletracks.com/blog/wp-content/uploads/2007/10/sendcourse.jpg" alt="sendcourse.jpg" />

After you hear your GPS beep it is safe to disconnect. Once disconnected, turn your Edge on to make sure the trail has been loaded. You can find your saved courses at any time (no GPS signal needed) by navigating to the Main Menu and choosing "Training," then "Courses."  Select your course (in this example, labeled "Blodgett") from the list and you can see several options:
<ul>
	<li>Do Course</li>
	<li>Edit Course</li>
	<li>Map</li>
	<li>Profile</li>
	<li>Delete Course</li>
</ul>
"Do Course" allows you to navigate the course just as it was submitted to singletracks. This gives you some good information like distance to course, navigation stats, and more. This will also help you stay on track but don't worry about trying to keep up with the pace - remember it's arbitrary! To stop following the course return to the Main Menu and select "Training," "Stop Course."

"Edit Course" lets you edit the name of your course, though I don't recommended it. Instead, do this on your computer before you send it to your GPS - it's much faster!

"Map" shows you an overall map of your course. Zoom in and out using the arrow controls on your Edge GPS.

"Profile" gives you the elevation profile for the trail. Zoom in and out to get a good view using the arrow controls.

"Delete Course" is self explanatory. While this deletes the course from your GPS it DOES NOT delete it from your Garmin Training Center computer software.

With a few simple steps you can download GPS trail data from the internet and send it to your Garmin Edge GPS device, giving you piece of mind and relevant data when riding an unfamiliar trail.
A person wearing a cycling helmet and sunglasses sits on a mountain bike on a dirt trail surrounded by lush greenery. Another mountain bike is parked nearby, and a bike saddle hangs from a tree branch in the background.
We've been recommending the <a href="http://www.singletracks.com/mtbreviews/Garmin/Edge-305/195.html">Garmin Edge</a> series GPS for mountain bikers for about 6 months now and we're still loving it. The Edge gets great reception on the trail, it has  a simple interface, and it's fairly rugged.

Until recently, though, we had never tried loading a GPS route downloaded from the internet - and it turns out to be a pain in the ass if you don't know what you're doing. Fortunately we're here to help.

All of the GPS data on singletracks is now available for your Garmin Edge GPS (both the 205 and 305) with one click. Find the trail you want by clicking the "Trail Maps" link at the top of any page and choosing your state from the pull-down menu midway down the page. For this example we're using the <a href="http://www.singletracks.com/mountain-bike/trail-map.php?id=6&amp;view=topo">Blodgett trail data</a> (Colorado) which is available free of charge.

On the GPS data and trail map page click the "Garmin Training Center File" link above the map (shown here)

<img class="alignnone size-full wp-image-2917" title="garmin-training-center-file" src="https://images.singletracks.com/blog/wp-content/uploads/2007/10/garmin-training-center-file.jpg" alt="garmin-training-center-file" width="400" height="280" />

Now fire up your copy of the Garmin Edge Training Center software (free with your Garmin Edge GPS).  This tutorial covers the Windows version; stay tuned for a <a href="http://www.singletracks.com/blog/?p=525">Mac tutorial</a> on the same process.

From the menu choose File -&gt; Import History... and select the file you just downloaded (in this case it's called "Blodgett.tcx").

<img id="image506" src="https://images.singletracks.com/blog/wp-content/uploads/2007/10/import.jpg" alt="import.jpg" />

The trail will be added with today's date and should be at the top of your history list on the left. Select the trail in the left navigation area (you may need to expand the current week to see the trail) and right click on it. Choose "Create Course from Activity."

<img id="image507" src="https://images.singletracks.com/blog/wp-content/uploads/2007/10/createcourse.jpg" alt="createcourse.jpg" />

Now, switch over to course view by clicking the "Courses" button just below the menu bar. On the left you should see a new course called "New Course 1" and any previously saved courses you may have. Right click on the new course and choose "Edit Course." Create a name for your course (I called mine "Blodgett") and click "Ok" to save.

<img id="image510" src="https://images.singletracks.com/blog/wp-content/uploads/2007/10/editcourse2.jpg" alt="editcourse2.jpg" />

You should see a basic map and elevation profile of the trail in the preview window that will roughly match what you saw on singletracks. Ignore the speed and time data for your track - this is completely arbitrary for all trails you download from singletracks.

Now you're finally ready to send the trail to your GPS. Make sure your GPS is connected to your computer and with the course selected, choose File -&gt; Send to Device. This may take a few seconds depending on the length and detail of the trail you've selected.

<img id="image511" src="https://images.singletracks.com/blog/wp-content/uploads/2007/10/sendcourse.jpg" alt="sendcourse.jpg" />

After you hear your GPS beep it is safe to disconnect. Once disconnected, turn your Edge on to make sure the trail has been loaded. You can find your saved courses at any time (no GPS signal needed) by navigating to the Main Menu and choosing "Training," then "Courses."  Select your course (in this example, labeled "Blodgett") from the list and you can see several options:
<ul>
	<li>Do Course</li>
	<li>Edit Course</li>
	<li>Map</li>
	<li>Profile</li>
	<li>Delete Course</li>
</ul>
"Do Course" allows you to navigate the course just as it was submitted to singletracks. This gives you some good information like distance to course, navigation stats, and more. This will also help you stay on track but don't worry about trying to keep up with the pace - remember it's arbitrary! To stop following the course return to the Main Menu and select "Training," "Stop Course."

"Edit Course" lets you edit the name of your course, though I don't recommended it. Instead, do this on your computer before you send it to your GPS - it's much faster!

"Map" shows you an overall map of your course. Zoom in and out using the arrow controls on your Edge GPS.

"Profile" gives you the elevation profile for the trail. Zoom in and out to get a good view using the arrow controls.

"Delete Course" is self explanatory. While this deletes the course from your GPS it DOES NOT delete it from your Garmin Training Center computer software.

With a few simple steps you can download GPS trail data from the internet and send it to your Garmin Edge GPS device, giving you piece of mind and relevant data when riding an unfamiliar trail.
We've been recommending the <a href="http://www.singletracks.com/mtbreviews/Garmin/Edge-305/195.html">Garmin Edge</a> series GPS for mountain bikers for about 6 months now and we're still loving it. The Edge gets great reception on the trail, it has  a simple interface, and it's fairly rugged.

Until recently, though, we had never tried loading a GPS route downloaded from the internet - and it turns out to be a pain in the ass if you don't know what you're doing. Fortunately we're here to help.

All of the GPS data on singletracks is now available for your Garmin Edge GPS (both the 205 and 305) with one click. Find the trail you want by clicking the "Trail Maps" link at the top of any page and choosing your state from the pull-down menu midway down the page. For this example we're using the <a href="http://www.singletracks.com/mountain-bike/trail-map.php?id=6&amp;view=topo">Blodgett trail data</a> (Colorado) which is available free of charge.

On the GPS data and trail map page click the "Garmin Training Center File" link above the map (shown here)

<img class="alignnone size-full wp-image-2917" title="garmin-training-center-file" src="https://images.singletracks.com/blog/wp-content/uploads/2007/10/garmin-training-center-file.jpg" alt="garmin-training-center-file" width="400" height="280" />

Now fire up your copy of the Garmin Edge Training Center software (free with your Garmin Edge GPS).  This tutorial covers the Windows version; stay tuned for a <a href="http://www.singletracks.com/blog/?p=525">Mac tutorial</a> on the same process.

From the menu choose File -&gt; Import History... and select the file you just downloaded (in this case it's called "Blodgett.tcx").

<img id="image506" src="https://images.singletracks.com/blog/wp-content/uploads/2007/10/import.jpg" alt="import.jpg" />

The trail will be added with today's date and should be at the top of your history list on the left. Select the trail in the left navigation area (you may need to expand the current week to see the trail) and right click on it. Choose "Create Course from Activity."

<img id="image507" src="https://images.singletracks.com/blog/wp-content/uploads/2007/10/createcourse.jpg" alt="createcourse.jpg" />

Now, switch over to course view by clicking the "Courses" button just below the menu bar. On the left you should see a new course called "New Course 1" and any previously saved courses you may have. Right click on the new course and choose "Edit Course." Create a name for your course (I called mine "Blodgett") and click "Ok" to save.

<img id="image510" src="https://images.singletracks.com/blog/wp-content/uploads/2007/10/editcourse2.jpg" alt="editcourse2.jpg" />

You should see a basic map and elevation profile of the trail in the preview window that will roughly match what you saw on singletracks. Ignore the speed and time data for your track - this is completely arbitrary for all trails you download from singletracks.

Now you're finally ready to send the trail to your GPS. Make sure your GPS is connected to your computer and with the course selected, choose File -&gt; Send to Device. This may take a few seconds depending on the length and detail of the trail you've selected.

<img id="image511" src="https://images.singletracks.com/blog/wp-content/uploads/2007/10/sendcourse.jpg" alt="sendcourse.jpg" />

After you hear your GPS beep it is safe to disconnect. Once disconnected, turn your Edge on to make sure the trail has been loaded. You can find your saved courses at any time (no GPS signal needed) by navigating to the Main Menu and choosing "Training," then "Courses."  Select your course (in this example, labeled "Blodgett") from the list and you can see several options:
<ul>
	<li>Do Course</li>
	<li>Edit Course</li>
	<li>Map</li>
	<li>Profile</li>
	<li>Delete Course</li>
</ul>
"Do Course" allows you to navigate the course just as it was submitted to singletracks. This gives you some good information like distance to course, navigation stats, and more. This will also help you stay on track but don't worry about trying to keep up with the pace - remember it's arbitrary! To stop following the course return to the Main Menu and select "Training," "Stop Course."

"Edit Course" lets you edit the name of your course, though I don't recommended it. Instead, do this on your computer before you send it to your GPS - it's much faster!

"Map" shows you an overall map of your course. Zoom in and out using the arrow controls on your Edge GPS.

"Profile" gives you the elevation profile for the trail. Zoom in and out to get a good view using the arrow controls.

"Delete Course" is self explanatory. While this deletes the course from your GPS it DOES NOT delete it from your Garmin Training Center computer software.

With a few simple steps you can download GPS trail data from the internet and send it to your Garmin Edge GPS device, giving you piece of mind and relevant data when riding an unfamiliar trail.
  1
We've been recommending the <a href="http://www.singletracks.com/mtbreviews/Garmin/Edge-305/195.html">Garmin Edge</a> series GPS for mountain bikers for about 6 months now and we're still loving it. The Edge gets great reception on the trail, it has  a simple interface, and it's fairly rugged.

Until recently, though, we had never tried loading a GPS route downloaded from the internet - and it turns out to be a pain in the ass if you don't know what you're doing. Fortunately we're here to help.

All of the GPS data on singletracks is now available for your Garmin Edge GPS (both the 205 and 305) with one click. Find the trail you want by clicking the "Trail Maps" link at the top of any page and choosing your state from the pull-down menu midway down the page. For this example we're using the <a href="http://www.singletracks.com/mountain-bike/trail-map.php?id=6&amp;view=topo">Blodgett trail data</a> (Colorado) which is available free of charge.

On the GPS data and trail map page click the "Garmin Training Center File" link above the map (shown here)

<img class="alignnone size-full wp-image-2917" title="garmin-training-center-file" src="https://images.singletracks.com/blog/wp-content/uploads/2007/10/garmin-training-center-file.jpg" alt="garmin-training-center-file" width="400" height="280" />

Now fire up your copy of the Garmin Edge Training Center software (free with your Garmin Edge GPS).  This tutorial covers the Windows version; stay tuned for a <a href="http://www.singletracks.com/blog/?p=525">Mac tutorial</a> on the same process.

From the menu choose File -&gt; Import History... and select the file you just downloaded (in this case it's called "Blodgett.tcx").

<img id="image506" src="https://images.singletracks.com/blog/wp-content/uploads/2007/10/import.jpg" alt="import.jpg" />

The trail will be added with today's date and should be at the top of your history list on the left. Select the trail in the left navigation area (you may need to expand the current week to see the trail) and right click on it. Choose "Create Course from Activity."

<img id="image507" src="https://images.singletracks.com/blog/wp-content/uploads/2007/10/createcourse.jpg" alt="createcourse.jpg" />

Now, switch over to course view by clicking the "Courses" button just below the menu bar. On the left you should see a new course called "New Course 1" and any previously saved courses you may have. Right click on the new course and choose "Edit Course." Create a name for your course (I called mine "Blodgett") and click "Ok" to save.

<img id="image510" src="https://images.singletracks.com/blog/wp-content/uploads/2007/10/editcourse2.jpg" alt="editcourse2.jpg" />

You should see a basic map and elevation profile of the trail in the preview window that will roughly match what you saw on singletracks. Ignore the speed and time data for your track - this is completely arbitrary for all trails you download from singletracks.

Now you're finally ready to send the trail to your GPS. Make sure your GPS is connected to your computer and with the course selected, choose File -&gt; Send to Device. This may take a few seconds depending on the length and detail of the trail you've selected.

<img id="image511" src="https://images.singletracks.com/blog/wp-content/uploads/2007/10/sendcourse.jpg" alt="sendcourse.jpg" />

After you hear your GPS beep it is safe to disconnect. Once disconnected, turn your Edge on to make sure the trail has been loaded. You can find your saved courses at any time (no GPS signal needed) by navigating to the Main Menu and choosing "Training," then "Courses."  Select your course (in this example, labeled "Blodgett") from the list and you can see several options:
<ul>
	<li>Do Course</li>
	<li>Edit Course</li>
	<li>Map</li>
	<li>Profile</li>
	<li>Delete Course</li>
</ul>
"Do Course" allows you to navigate the course just as it was submitted to singletracks. This gives you some good information like distance to course, navigation stats, and more. This will also help you stay on track but don't worry about trying to keep up with the pace - remember it's arbitrary! To stop following the course return to the Main Menu and select "Training," "Stop Course."

"Edit Course" lets you edit the name of your course, though I don't recommended it. Instead, do this on your computer before you send it to your GPS - it's much faster!

"Map" shows you an overall map of your course. Zoom in and out using the arrow controls on your Edge GPS.

"Profile" gives you the elevation profile for the trail. Zoom in and out to get a good view using the arrow controls.

"Delete Course" is self explanatory. While this deletes the course from your GPS it DOES NOT delete it from your Garmin Training Center computer software.

With a few simple steps you can download GPS trail data from the internet and send it to your Garmin Edge GPS device, giving you piece of mind and relevant data when riding an unfamiliar trail.
A rocky landscape featuring a smooth granite surface with patches of green vegetation around the edges. In the foreground, a large log is positioned on the rock, and a faint path winds across the terrain leading into the background, where lush trees are visible. Overcast skies create a soft, muted light in the scene.
  1
We've been recommending the <a href="http://www.singletracks.com/mtbreviews/Garmin/Edge-305/195.html">Garmin Edge</a> series GPS for mountain bikers for about 6 months now and we're still loving it. The Edge gets great reception on the trail, it has  a simple interface, and it's fairly rugged.

Until recently, though, we had never tried loading a GPS route downloaded from the internet - and it turns out to be a pain in the ass if you don't know what you're doing. Fortunately we're here to help.

All of the GPS data on singletracks is now available for your Garmin Edge GPS (both the 205 and 305) with one click. Find the trail you want by clicking the "Trail Maps" link at the top of any page and choosing your state from the pull-down menu midway down the page. For this example we're using the <a href="http://www.singletracks.com/mountain-bike/trail-map.php?id=6&amp;view=topo">Blodgett trail data</a> (Colorado) which is available free of charge.

On the GPS data and trail map page click the "Garmin Training Center File" link above the map (shown here)

<img class="alignnone size-full wp-image-2917" title="garmin-training-center-file" src="https://images.singletracks.com/blog/wp-content/uploads/2007/10/garmin-training-center-file.jpg" alt="garmin-training-center-file" width="400" height="280" />

Now fire up your copy of the Garmin Edge Training Center software (free with your Garmin Edge GPS).  This tutorial covers the Windows version; stay tuned for a <a href="http://www.singletracks.com/blog/?p=525">Mac tutorial</a> on the same process.

From the menu choose File -&gt; Import History... and select the file you just downloaded (in this case it's called "Blodgett.tcx").

<img id="image506" src="https://images.singletracks.com/blog/wp-content/uploads/2007/10/import.jpg" alt="import.jpg" />

The trail will be added with today's date and should be at the top of your history list on the left. Select the trail in the left navigation area (you may need to expand the current week to see the trail) and right click on it. Choose "Create Course from Activity."

<img id="image507" src="https://images.singletracks.com/blog/wp-content/uploads/2007/10/createcourse.jpg" alt="createcourse.jpg" />

Now, switch over to course view by clicking the "Courses" button just below the menu bar. On the left you should see a new course called "New Course 1" and any previously saved courses you may have. Right click on the new course and choose "Edit Course." Create a name for your course (I called mine "Blodgett") and click "Ok" to save.

<img id="image510" src="https://images.singletracks.com/blog/wp-content/uploads/2007/10/editcourse2.jpg" alt="editcourse2.jpg" />

You should see a basic map and elevation profile of the trail in the preview window that will roughly match what you saw on singletracks. Ignore the speed and time data for your track - this is completely arbitrary for all trails you download from singletracks.

Now you're finally ready to send the trail to your GPS. Make sure your GPS is connected to your computer and with the course selected, choose File -&gt; Send to Device. This may take a few seconds depending on the length and detail of the trail you've selected.

<img id="image511" src="https://images.singletracks.com/blog/wp-content/uploads/2007/10/sendcourse.jpg" alt="sendcourse.jpg" />

After you hear your GPS beep it is safe to disconnect. Once disconnected, turn your Edge on to make sure the trail has been loaded. You can find your saved courses at any time (no GPS signal needed) by navigating to the Main Menu and choosing "Training," then "Courses."  Select your course (in this example, labeled "Blodgett") from the list and you can see several options:
<ul>
	<li>Do Course</li>
	<li>Edit Course</li>
	<li>Map</li>
	<li>Profile</li>
	<li>Delete Course</li>
</ul>
"Do Course" allows you to navigate the course just as it was submitted to singletracks. This gives you some good information like distance to course, navigation stats, and more. This will also help you stay on track but don't worry about trying to keep up with the pace - remember it's arbitrary! To stop following the course return to the Main Menu and select "Training," "Stop Course."

"Edit Course" lets you edit the name of your course, though I don't recommended it. Instead, do this on your computer before you send it to your GPS - it's much faster!

"Map" shows you an overall map of your course. Zoom in and out using the arrow controls on your Edge GPS.

"Profile" gives you the elevation profile for the trail. Zoom in and out to get a good view using the arrow controls.

"Delete Course" is self explanatory. While this deletes the course from your GPS it DOES NOT delete it from your Garmin Training Center computer software.

With a few simple steps you can download GPS trail data from the internet and send it to your Garmin Edge GPS device, giving you piece of mind and relevant data when riding an unfamiliar trail.
We've been recommending the <a href="http://www.singletracks.com/mtbreviews/Garmin/Edge-305/195.html">Garmin Edge</a> series GPS for mountain bikers for about 6 months now and we're still loving it. The Edge gets great reception on the trail, it has  a simple interface, and it's fairly rugged.

Until recently, though, we had never tried loading a GPS route downloaded from the internet - and it turns out to be a pain in the ass if you don't know what you're doing. Fortunately we're here to help.

All of the GPS data on singletracks is now available for your Garmin Edge GPS (both the 205 and 305) with one click. Find the trail you want by clicking the "Trail Maps" link at the top of any page and choosing your state from the pull-down menu midway down the page. For this example we're using the <a href="http://www.singletracks.com/mountain-bike/trail-map.php?id=6&amp;view=topo">Blodgett trail data</a> (Colorado) which is available free of charge.

On the GPS data and trail map page click the "Garmin Training Center File" link above the map (shown here)

<img class="alignnone size-full wp-image-2917" title="garmin-training-center-file" src="https://images.singletracks.com/blog/wp-content/uploads/2007/10/garmin-training-center-file.jpg" alt="garmin-training-center-file" width="400" height="280" />

Now fire up your copy of the Garmin Edge Training Center software (free with your Garmin Edge GPS).  This tutorial covers the Windows version; stay tuned for a <a href="http://www.singletracks.com/blog/?p=525">Mac tutorial</a> on the same process.

From the menu choose File -&gt; Import History... and select the file you just downloaded (in this case it's called "Blodgett.tcx").

<img id="image506" src="https://images.singletracks.com/blog/wp-content/uploads/2007/10/import.jpg" alt="import.jpg" />

The trail will be added with today's date and should be at the top of your history list on the left. Select the trail in the left navigation area (you may need to expand the current week to see the trail) and right click on it. Choose "Create Course from Activity."

<img id="image507" src="https://images.singletracks.com/blog/wp-content/uploads/2007/10/createcourse.jpg" alt="createcourse.jpg" />

Now, switch over to course view by clicking the "Courses" button just below the menu bar. On the left you should see a new course called "New Course 1" and any previously saved courses you may have. Right click on the new course and choose "Edit Course." Create a name for your course (I called mine "Blodgett") and click "Ok" to save.

<img id="image510" src="https://images.singletracks.com/blog/wp-content/uploads/2007/10/editcourse2.jpg" alt="editcourse2.jpg" />

You should see a basic map and elevation profile of the trail in the preview window that will roughly match what you saw on singletracks. Ignore the speed and time data for your track - this is completely arbitrary for all trails you download from singletracks.

Now you're finally ready to send the trail to your GPS. Make sure your GPS is connected to your computer and with the course selected, choose File -&gt; Send to Device. This may take a few seconds depending on the length and detail of the trail you've selected.

<img id="image511" src="https://images.singletracks.com/blog/wp-content/uploads/2007/10/sendcourse.jpg" alt="sendcourse.jpg" />

After you hear your GPS beep it is safe to disconnect. Once disconnected, turn your Edge on to make sure the trail has been loaded. You can find your saved courses at any time (no GPS signal needed) by navigating to the Main Menu and choosing "Training," then "Courses."  Select your course (in this example, labeled "Blodgett") from the list and you can see several options:
<ul>
	<li>Do Course</li>
	<li>Edit Course</li>
	<li>Map</li>
	<li>Profile</li>
	<li>Delete Course</li>
</ul>
"Do Course" allows you to navigate the course just as it was submitted to singletracks. This gives you some good information like distance to course, navigation stats, and more. This will also help you stay on track but don't worry about trying to keep up with the pace - remember it's arbitrary! To stop following the course return to the Main Menu and select "Training," "Stop Course."

"Edit Course" lets you edit the name of your course, though I don't recommended it. Instead, do this on your computer before you send it to your GPS - it's much faster!

"Map" shows you an overall map of your course. Zoom in and out using the arrow controls on your Edge GPS.

"Profile" gives you the elevation profile for the trail. Zoom in and out to get a good view using the arrow controls.

"Delete Course" is self explanatory. While this deletes the course from your GPS it DOES NOT delete it from your Garmin Training Center computer software.

With a few simple steps you can download GPS trail data from the internet and send it to your Garmin Edge GPS device, giving you piece of mind and relevant data when riding an unfamiliar trail.
We've been recommending the <a href="http://www.singletracks.com/mtbreviews/Garmin/Edge-305/195.html">Garmin Edge</a> series GPS for mountain bikers for about 6 months now and we're still loving it. The Edge gets great reception on the trail, it has  a simple interface, and it's fairly rugged.

Until recently, though, we had never tried loading a GPS route downloaded from the internet - and it turns out to be a pain in the ass if you don't know what you're doing. Fortunately we're here to help.

All of the GPS data on singletracks is now available for your Garmin Edge GPS (both the 205 and 305) with one click. Find the trail you want by clicking the "Trail Maps" link at the top of any page and choosing your state from the pull-down menu midway down the page. For this example we're using the <a href="http://www.singletracks.com/mountain-bike/trail-map.php?id=6&amp;view=topo">Blodgett trail data</a> (Colorado) which is available free of charge.

On the GPS data and trail map page click the "Garmin Training Center File" link above the map (shown here)

<img class="alignnone size-full wp-image-2917" title="garmin-training-center-file" src="https://images.singletracks.com/blog/wp-content/uploads/2007/10/garmin-training-center-file.jpg" alt="garmin-training-center-file" width="400" height="280" />

Now fire up your copy of the Garmin Edge Training Center software (free with your Garmin Edge GPS).  This tutorial covers the Windows version; stay tuned for a <a href="http://www.singletracks.com/blog/?p=525">Mac tutorial</a> on the same process.

From the menu choose File -&gt; Import History... and select the file you just downloaded (in this case it's called "Blodgett.tcx").

<img id="image506" src="https://images.singletracks.com/blog/wp-content/uploads/2007/10/import.jpg" alt="import.jpg" />

The trail will be added with today's date and should be at the top of your history list on the left. Select the trail in the left navigation area (you may need to expand the current week to see the trail) and right click on it. Choose "Create Course from Activity."

<img id="image507" src="https://images.singletracks.com/blog/wp-content/uploads/2007/10/createcourse.jpg" alt="createcourse.jpg" />

Now, switch over to course view by clicking the "Courses" button just below the menu bar. On the left you should see a new course called "New Course 1" and any previously saved courses you may have. Right click on the new course and choose "Edit Course." Create a name for your course (I called mine "Blodgett") and click "Ok" to save.

<img id="image510" src="https://images.singletracks.com/blog/wp-content/uploads/2007/10/editcourse2.jpg" alt="editcourse2.jpg" />

You should see a basic map and elevation profile of the trail in the preview window that will roughly match what you saw on singletracks. Ignore the speed and time data for your track - this is completely arbitrary for all trails you download from singletracks.

Now you're finally ready to send the trail to your GPS. Make sure your GPS is connected to your computer and with the course selected, choose File -&gt; Send to Device. This may take a few seconds depending on the length and detail of the trail you've selected.

<img id="image511" src="https://images.singletracks.com/blog/wp-content/uploads/2007/10/sendcourse.jpg" alt="sendcourse.jpg" />

After you hear your GPS beep it is safe to disconnect. Once disconnected, turn your Edge on to make sure the trail has been loaded. You can find your saved courses at any time (no GPS signal needed) by navigating to the Main Menu and choosing "Training," then "Courses."  Select your course (in this example, labeled "Blodgett") from the list and you can see several options:
<ul>
	<li>Do Course</li>
	<li>Edit Course</li>
	<li>Map</li>
	<li>Profile</li>
	<li>Delete Course</li>
</ul>
"Do Course" allows you to navigate the course just as it was submitted to singletracks. This gives you some good information like distance to course, navigation stats, and more. This will also help you stay on track but don't worry about trying to keep up with the pace - remember it's arbitrary! To stop following the course return to the Main Menu and select "Training," "Stop Course."

"Edit Course" lets you edit the name of your course, though I don't recommended it. Instead, do this on your computer before you send it to your GPS - it's much faster!

"Map" shows you an overall map of your course. Zoom in and out using the arrow controls on your Edge GPS.

"Profile" gives you the elevation profile for the trail. Zoom in and out to get a good view using the arrow controls.

"Delete Course" is self explanatory. While this deletes the course from your GPS it DOES NOT delete it from your Garmin Training Center computer software.

With a few simple steps you can download GPS trail data from the internet and send it to your Garmin Edge GPS device, giving you piece of mind and relevant data when riding an unfamiliar trail.
We've been recommending the <a href="http://www.singletracks.com/mtbreviews/Garmin/Edge-305/195.html">Garmin Edge</a> series GPS for mountain bikers for about 6 months now and we're still loving it. The Edge gets great reception on the trail, it has  a simple interface, and it's fairly rugged.

Until recently, though, we had never tried loading a GPS route downloaded from the internet - and it turns out to be a pain in the ass if you don't know what you're doing. Fortunately we're here to help.

All of the GPS data on singletracks is now available for your Garmin Edge GPS (both the 205 and 305) with one click. Find the trail you want by clicking the "Trail Maps" link at the top of any page and choosing your state from the pull-down menu midway down the page. For this example we're using the <a href="http://www.singletracks.com/mountain-bike/trail-map.php?id=6&amp;view=topo">Blodgett trail data</a> (Colorado) which is available free of charge.

On the GPS data and trail map page click the "Garmin Training Center File" link above the map (shown here)

<img class="alignnone size-full wp-image-2917" title="garmin-training-center-file" src="https://images.singletracks.com/blog/wp-content/uploads/2007/10/garmin-training-center-file.jpg" alt="garmin-training-center-file" width="400" height="280" />

Now fire up your copy of the Garmin Edge Training Center software (free with your Garmin Edge GPS).  This tutorial covers the Windows version; stay tuned for a <a href="http://www.singletracks.com/blog/?p=525">Mac tutorial</a> on the same process.

From the menu choose File -&gt; Import History... and select the file you just downloaded (in this case it's called "Blodgett.tcx").

<img id="image506" src="https://images.singletracks.com/blog/wp-content/uploads/2007/10/import.jpg" alt="import.jpg" />

The trail will be added with today's date and should be at the top of your history list on the left. Select the trail in the left navigation area (you may need to expand the current week to see the trail) and right click on it. Choose "Create Course from Activity."

<img id="image507" src="https://images.singletracks.com/blog/wp-content/uploads/2007/10/createcourse.jpg" alt="createcourse.jpg" />

Now, switch over to course view by clicking the "Courses" button just below the menu bar. On the left you should see a new course called "New Course 1" and any previously saved courses you may have. Right click on the new course and choose "Edit Course." Create a name for your course (I called mine "Blodgett") and click "Ok" to save.

<img id="image510" src="https://images.singletracks.com/blog/wp-content/uploads/2007/10/editcourse2.jpg" alt="editcourse2.jpg" />

You should see a basic map and elevation profile of the trail in the preview window that will roughly match what you saw on singletracks. Ignore the speed and time data for your track - this is completely arbitrary for all trails you download from singletracks.

Now you're finally ready to send the trail to your GPS. Make sure your GPS is connected to your computer and with the course selected, choose File -&gt; Send to Device. This may take a few seconds depending on the length and detail of the trail you've selected.

<img id="image511" src="https://images.singletracks.com/blog/wp-content/uploads/2007/10/sendcourse.jpg" alt="sendcourse.jpg" />

After you hear your GPS beep it is safe to disconnect. Once disconnected, turn your Edge on to make sure the trail has been loaded. You can find your saved courses at any time (no GPS signal needed) by navigating to the Main Menu and choosing "Training," then "Courses."  Select your course (in this example, labeled "Blodgett") from the list and you can see several options:
<ul>
	<li>Do Course</li>
	<li>Edit Course</li>
	<li>Map</li>
	<li>Profile</li>
	<li>Delete Course</li>
</ul>
"Do Course" allows you to navigate the course just as it was submitted to singletracks. This gives you some good information like distance to course, navigation stats, and more. This will also help you stay on track but don't worry about trying to keep up with the pace - remember it's arbitrary! To stop following the course return to the Main Menu and select "Training," "Stop Course."

"Edit Course" lets you edit the name of your course, though I don't recommended it. Instead, do this on your computer before you send it to your GPS - it's much faster!

"Map" shows you an overall map of your course. Zoom in and out using the arrow controls on your Edge GPS.

"Profile" gives you the elevation profile for the trail. Zoom in and out to get a good view using the arrow controls.

"Delete Course" is self explanatory. While this deletes the course from your GPS it DOES NOT delete it from your Garmin Training Center computer software.

With a few simple steps you can download GPS trail data from the internet and send it to your Garmin Edge GPS device, giving you piece of mind and relevant data when riding an unfamiliar trail.
  3
We've been recommending the <a href="http://www.singletracks.com/mtbreviews/Garmin/Edge-305/195.html">Garmin Edge</a> series GPS for mountain bikers for about 6 months now and we're still loving it. The Edge gets great reception on the trail, it has  a simple interface, and it's fairly rugged.

Until recently, though, we had never tried loading a GPS route downloaded from the internet - and it turns out to be a pain in the ass if you don't know what you're doing. Fortunately we're here to help.

All of the GPS data on singletracks is now available for your Garmin Edge GPS (both the 205 and 305) with one click. Find the trail you want by clicking the "Trail Maps" link at the top of any page and choosing your state from the pull-down menu midway down the page. For this example we're using the <a href="http://www.singletracks.com/mountain-bike/trail-map.php?id=6&amp;view=topo">Blodgett trail data</a> (Colorado) which is available free of charge.

On the GPS data and trail map page click the "Garmin Training Center File" link above the map (shown here)

<img class="alignnone size-full wp-image-2917" title="garmin-training-center-file" src="https://images.singletracks.com/blog/wp-content/uploads/2007/10/garmin-training-center-file.jpg" alt="garmin-training-center-file" width="400" height="280" />

Now fire up your copy of the Garmin Edge Training Center software (free with your Garmin Edge GPS).  This tutorial covers the Windows version; stay tuned for a <a href="http://www.singletracks.com/blog/?p=525">Mac tutorial</a> on the same process.

From the menu choose File -&gt; Import History... and select the file you just downloaded (in this case it's called "Blodgett.tcx").

<img id="image506" src="https://images.singletracks.com/blog/wp-content/uploads/2007/10/import.jpg" alt="import.jpg" />

The trail will be added with today's date and should be at the top of your history list on the left. Select the trail in the left navigation area (you may need to expand the current week to see the trail) and right click on it. Choose "Create Course from Activity."

<img id="image507" src="https://images.singletracks.com/blog/wp-content/uploads/2007/10/createcourse.jpg" alt="createcourse.jpg" />

Now, switch over to course view by clicking the "Courses" button just below the menu bar. On the left you should see a new course called "New Course 1" and any previously saved courses you may have. Right click on the new course and choose "Edit Course." Create a name for your course (I called mine "Blodgett") and click "Ok" to save.

<img id="image510" src="https://images.singletracks.com/blog/wp-content/uploads/2007/10/editcourse2.jpg" alt="editcourse2.jpg" />

You should see a basic map and elevation profile of the trail in the preview window that will roughly match what you saw on singletracks. Ignore the speed and time data for your track - this is completely arbitrary for all trails you download from singletracks.

Now you're finally ready to send the trail to your GPS. Make sure your GPS is connected to your computer and with the course selected, choose File -&gt; Send to Device. This may take a few seconds depending on the length and detail of the trail you've selected.

<img id="image511" src="https://images.singletracks.com/blog/wp-content/uploads/2007/10/sendcourse.jpg" alt="sendcourse.jpg" />

After you hear your GPS beep it is safe to disconnect. Once disconnected, turn your Edge on to make sure the trail has been loaded. You can find your saved courses at any time (no GPS signal needed) by navigating to the Main Menu and choosing "Training," then "Courses."  Select your course (in this example, labeled "Blodgett") from the list and you can see several options:
<ul>
	<li>Do Course</li>
	<li>Edit Course</li>
	<li>Map</li>
	<li>Profile</li>
	<li>Delete Course</li>
</ul>
"Do Course" allows you to navigate the course just as it was submitted to singletracks. This gives you some good information like distance to course, navigation stats, and more. This will also help you stay on track but don't worry about trying to keep up with the pace - remember it's arbitrary! To stop following the course return to the Main Menu and select "Training," "Stop Course."

"Edit Course" lets you edit the name of your course, though I don't recommended it. Instead, do this on your computer before you send it to your GPS - it's much faster!

"Map" shows you an overall map of your course. Zoom in and out using the arrow controls on your Edge GPS.

"Profile" gives you the elevation profile for the trail. Zoom in and out to get a good view using the arrow controls.

"Delete Course" is self explanatory. While this deletes the course from your GPS it DOES NOT delete it from your Garmin Training Center computer software.

With a few simple steps you can download GPS trail data from the internet and send it to your Garmin Edge GPS device, giving you piece of mind and relevant data when riding an unfamiliar trail.
  1
We've been recommending the <a href="http://www.singletracks.com/mtbreviews/Garmin/Edge-305/195.html">Garmin Edge</a> series GPS for mountain bikers for about 6 months now and we're still loving it. The Edge gets great reception on the trail, it has  a simple interface, and it's fairly rugged.

Until recently, though, we had never tried loading a GPS route downloaded from the internet - and it turns out to be a pain in the ass if you don't know what you're doing. Fortunately we're here to help.

All of the GPS data on singletracks is now available for your Garmin Edge GPS (both the 205 and 305) with one click. Find the trail you want by clicking the "Trail Maps" link at the top of any page and choosing your state from the pull-down menu midway down the page. For this example we're using the <a href="http://www.singletracks.com/mountain-bike/trail-map.php?id=6&amp;view=topo">Blodgett trail data</a> (Colorado) which is available free of charge.

On the GPS data and trail map page click the "Garmin Training Center File" link above the map (shown here)

<img class="alignnone size-full wp-image-2917" title="garmin-training-center-file" src="https://images.singletracks.com/blog/wp-content/uploads/2007/10/garmin-training-center-file.jpg" alt="garmin-training-center-file" width="400" height="280" />

Now fire up your copy of the Garmin Edge Training Center software (free with your Garmin Edge GPS).  This tutorial covers the Windows version; stay tuned for a <a href="http://www.singletracks.com/blog/?p=525">Mac tutorial</a> on the same process.

From the menu choose File -&gt; Import History... and select the file you just downloaded (in this case it's called "Blodgett.tcx").

<img id="image506" src="https://images.singletracks.com/blog/wp-content/uploads/2007/10/import.jpg" alt="import.jpg" />

The trail will be added with today's date and should be at the top of your history list on the left. Select the trail in the left navigation area (you may need to expand the current week to see the trail) and right click on it. Choose "Create Course from Activity."

<img id="image507" src="https://images.singletracks.com/blog/wp-content/uploads/2007/10/createcourse.jpg" alt="createcourse.jpg" />

Now, switch over to course view by clicking the "Courses" button just below the menu bar. On the left you should see a new course called "New Course 1" and any previously saved courses you may have. Right click on the new course and choose "Edit Course." Create a name for your course (I called mine "Blodgett") and click "Ok" to save.

<img id="image510" src="https://images.singletracks.com/blog/wp-content/uploads/2007/10/editcourse2.jpg" alt="editcourse2.jpg" />

You should see a basic map and elevation profile of the trail in the preview window that will roughly match what you saw on singletracks. Ignore the speed and time data for your track - this is completely arbitrary for all trails you download from singletracks.

Now you're finally ready to send the trail to your GPS. Make sure your GPS is connected to your computer and with the course selected, choose File -&gt; Send to Device. This may take a few seconds depending on the length and detail of the trail you've selected.

<img id="image511" src="https://images.singletracks.com/blog/wp-content/uploads/2007/10/sendcourse.jpg" alt="sendcourse.jpg" />

After you hear your GPS beep it is safe to disconnect. Once disconnected, turn your Edge on to make sure the trail has been loaded. You can find your saved courses at any time (no GPS signal needed) by navigating to the Main Menu and choosing "Training," then "Courses."  Select your course (in this example, labeled "Blodgett") from the list and you can see several options:
<ul>
	<li>Do Course</li>
	<li>Edit Course</li>
	<li>Map</li>
	<li>Profile</li>
	<li>Delete Course</li>
</ul>
"Do Course" allows you to navigate the course just as it was submitted to singletracks. This gives you some good information like distance to course, navigation stats, and more. This will also help you stay on track but don't worry about trying to keep up with the pace - remember it's arbitrary! To stop following the course return to the Main Menu and select "Training," "Stop Course."

"Edit Course" lets you edit the name of your course, though I don't recommended it. Instead, do this on your computer before you send it to your GPS - it's much faster!

"Map" shows you an overall map of your course. Zoom in and out using the arrow controls on your Edge GPS.

"Profile" gives you the elevation profile for the trail. Zoom in and out to get a good view using the arrow controls.

"Delete Course" is self explanatory. While this deletes the course from your GPS it DOES NOT delete it from your Garmin Training Center computer software.

With a few simple steps you can download GPS trail data from the internet and send it to your Garmin Edge GPS device, giving you piece of mind and relevant data when riding an unfamiliar trail.
We've been recommending the <a href="http://www.singletracks.com/mtbreviews/Garmin/Edge-305/195.html">Garmin Edge</a> series GPS for mountain bikers for about 6 months now and we're still loving it. The Edge gets great reception on the trail, it has  a simple interface, and it's fairly rugged.

Until recently, though, we had never tried loading a GPS route downloaded from the internet - and it turns out to be a pain in the ass if you don't know what you're doing. Fortunately we're here to help.

All of the GPS data on singletracks is now available for your Garmin Edge GPS (both the 205 and 305) with one click. Find the trail you want by clicking the "Trail Maps" link at the top of any page and choosing your state from the pull-down menu midway down the page. For this example we're using the <a href="http://www.singletracks.com/mountain-bike/trail-map.php?id=6&amp;view=topo">Blodgett trail data</a> (Colorado) which is available free of charge.

On the GPS data and trail map page click the "Garmin Training Center File" link above the map (shown here)

<img class="alignnone size-full wp-image-2917" title="garmin-training-center-file" src="https://images.singletracks.com/blog/wp-content/uploads/2007/10/garmin-training-center-file.jpg" alt="garmin-training-center-file" width="400" height="280" />

Now fire up your copy of the Garmin Edge Training Center software (free with your Garmin Edge GPS).  This tutorial covers the Windows version; stay tuned for a <a href="http://www.singletracks.com/blog/?p=525">Mac tutorial</a> on the same process.

From the menu choose File -&gt; Import History... and select the file you just downloaded (in this case it's called "Blodgett.tcx").

<img id="image506" src="https://images.singletracks.com/blog/wp-content/uploads/2007/10/import.jpg" alt="import.jpg" />

The trail will be added with today's date and should be at the top of your history list on the left. Select the trail in the left navigation area (you may need to expand the current week to see the trail) and right click on it. Choose "Create Course from Activity."

<img id="image507" src="https://images.singletracks.com/blog/wp-content/uploads/2007/10/createcourse.jpg" alt="createcourse.jpg" />

Now, switch over to course view by clicking the "Courses" button just below the menu bar. On the left you should see a new course called "New Course 1" and any previously saved courses you may have. Right click on the new course and choose "Edit Course." Create a name for your course (I called mine "Blodgett") and click "Ok" to save.

<img id="image510" src="https://images.singletracks.com/blog/wp-content/uploads/2007/10/editcourse2.jpg" alt="editcourse2.jpg" />

You should see a basic map and elevation profile of the trail in the preview window that will roughly match what you saw on singletracks. Ignore the speed and time data for your track - this is completely arbitrary for all trails you download from singletracks.

Now you're finally ready to send the trail to your GPS. Make sure your GPS is connected to your computer and with the course selected, choose File -&gt; Send to Device. This may take a few seconds depending on the length and detail of the trail you've selected.

<img id="image511" src="https://images.singletracks.com/blog/wp-content/uploads/2007/10/sendcourse.jpg" alt="sendcourse.jpg" />

After you hear your GPS beep it is safe to disconnect. Once disconnected, turn your Edge on to make sure the trail has been loaded. You can find your saved courses at any time (no GPS signal needed) by navigating to the Main Menu and choosing "Training," then "Courses."  Select your course (in this example, labeled "Blodgett") from the list and you can see several options:
<ul>
	<li>Do Course</li>
	<li>Edit Course</li>
	<li>Map</li>
	<li>Profile</li>
	<li>Delete Course</li>
</ul>
"Do Course" allows you to navigate the course just as it was submitted to singletracks. This gives you some good information like distance to course, navigation stats, and more. This will also help you stay on track but don't worry about trying to keep up with the pace - remember it's arbitrary! To stop following the course return to the Main Menu and select "Training," "Stop Course."

"Edit Course" lets you edit the name of your course, though I don't recommended it. Instead, do this on your computer before you send it to your GPS - it's much faster!

"Map" shows you an overall map of your course. Zoom in and out using the arrow controls on your Edge GPS.

"Profile" gives you the elevation profile for the trail. Zoom in and out to get a good view using the arrow controls.

"Delete Course" is self explanatory. While this deletes the course from your GPS it DOES NOT delete it from your Garmin Training Center computer software.

With a few simple steps you can download GPS trail data from the internet and send it to your Garmin Edge GPS device, giving you piece of mind and relevant data when riding an unfamiliar trail.
We've been recommending the <a href="http://www.singletracks.com/mtbreviews/Garmin/Edge-305/195.html">Garmin Edge</a> series GPS for mountain bikers for about 6 months now and we're still loving it. The Edge gets great reception on the trail, it has  a simple interface, and it's fairly rugged.

Until recently, though, we had never tried loading a GPS route downloaded from the internet - and it turns out to be a pain in the ass if you don't know what you're doing. Fortunately we're here to help.

All of the GPS data on singletracks is now available for your Garmin Edge GPS (both the 205 and 305) with one click. Find the trail you want by clicking the "Trail Maps" link at the top of any page and choosing your state from the pull-down menu midway down the page. For this example we're using the <a href="http://www.singletracks.com/mountain-bike/trail-map.php?id=6&amp;view=topo">Blodgett trail data</a> (Colorado) which is available free of charge.

On the GPS data and trail map page click the "Garmin Training Center File" link above the map (shown here)

<img class="alignnone size-full wp-image-2917" title="garmin-training-center-file" src="https://images.singletracks.com/blog/wp-content/uploads/2007/10/garmin-training-center-file.jpg" alt="garmin-training-center-file" width="400" height="280" />

Now fire up your copy of the Garmin Edge Training Center software (free with your Garmin Edge GPS).  This tutorial covers the Windows version; stay tuned for a <a href="http://www.singletracks.com/blog/?p=525">Mac tutorial</a> on the same process.

From the menu choose File -&gt; Import History... and select the file you just downloaded (in this case it's called "Blodgett.tcx").

<img id="image506" src="https://images.singletracks.com/blog/wp-content/uploads/2007/10/import.jpg" alt="import.jpg" />

The trail will be added with today's date and should be at the top of your history list on the left. Select the trail in the left navigation area (you may need to expand the current week to see the trail) and right click on it. Choose "Create Course from Activity."

<img id="image507" src="https://images.singletracks.com/blog/wp-content/uploads/2007/10/createcourse.jpg" alt="createcourse.jpg" />

Now, switch over to course view by clicking the "Courses" button just below the menu bar. On the left you should see a new course called "New Course 1" and any previously saved courses you may have. Right click on the new course and choose "Edit Course." Create a name for your course (I called mine "Blodgett") and click "Ok" to save.

<img id="image510" src="https://images.singletracks.com/blog/wp-content/uploads/2007/10/editcourse2.jpg" alt="editcourse2.jpg" />

You should see a basic map and elevation profile of the trail in the preview window that will roughly match what you saw on singletracks. Ignore the speed and time data for your track - this is completely arbitrary for all trails you download from singletracks.

Now you're finally ready to send the trail to your GPS. Make sure your GPS is connected to your computer and with the course selected, choose File -&gt; Send to Device. This may take a few seconds depending on the length and detail of the trail you've selected.

<img id="image511" src="https://images.singletracks.com/blog/wp-content/uploads/2007/10/sendcourse.jpg" alt="sendcourse.jpg" />

After you hear your GPS beep it is safe to disconnect. Once disconnected, turn your Edge on to make sure the trail has been loaded. You can find your saved courses at any time (no GPS signal needed) by navigating to the Main Menu and choosing "Training," then "Courses."  Select your course (in this example, labeled "Blodgett") from the list and you can see several options:
<ul>
	<li>Do Course</li>
	<li>Edit Course</li>
	<li>Map</li>
	<li>Profile</li>
	<li>Delete Course</li>
</ul>
"Do Course" allows you to navigate the course just as it was submitted to singletracks. This gives you some good information like distance to course, navigation stats, and more. This will also help you stay on track but don't worry about trying to keep up with the pace - remember it's arbitrary! To stop following the course return to the Main Menu and select "Training," "Stop Course."

"Edit Course" lets you edit the name of your course, though I don't recommended it. Instead, do this on your computer before you send it to your GPS - it's much faster!

"Map" shows you an overall map of your course. Zoom in and out using the arrow controls on your Edge GPS.

"Profile" gives you the elevation profile for the trail. Zoom in and out to get a good view using the arrow controls.

"Delete Course" is self explanatory. While this deletes the course from your GPS it DOES NOT delete it from your Garmin Training Center computer software.

With a few simple steps you can download GPS trail data from the internet and send it to your Garmin Edge GPS device, giving you piece of mind and relevant data when riding an unfamiliar trail.
  1
We've been recommending the <a href="http://www.singletracks.com/mtbreviews/Garmin/Edge-305/195.html">Garmin Edge</a> series GPS for mountain bikers for about 6 months now and we're still loving it. The Edge gets great reception on the trail, it has  a simple interface, and it's fairly rugged.

Until recently, though, we had never tried loading a GPS route downloaded from the internet - and it turns out to be a pain in the ass if you don't know what you're doing. Fortunately we're here to help.

All of the GPS data on singletracks is now available for your Garmin Edge GPS (both the 205 and 305) with one click. Find the trail you want by clicking the "Trail Maps" link at the top of any page and choosing your state from the pull-down menu midway down the page. For this example we're using the <a href="http://www.singletracks.com/mountain-bike/trail-map.php?id=6&amp;view=topo">Blodgett trail data</a> (Colorado) which is available free of charge.

On the GPS data and trail map page click the "Garmin Training Center File" link above the map (shown here)

<img class="alignnone size-full wp-image-2917" title="garmin-training-center-file" src="https://images.singletracks.com/blog/wp-content/uploads/2007/10/garmin-training-center-file.jpg" alt="garmin-training-center-file" width="400" height="280" />

Now fire up your copy of the Garmin Edge Training Center software (free with your Garmin Edge GPS).  This tutorial covers the Windows version; stay tuned for a <a href="http://www.singletracks.com/blog/?p=525">Mac tutorial</a> on the same process.

From the menu choose File -&gt; Import History... and select the file you just downloaded (in this case it's called "Blodgett.tcx").

<img id="image506" src="https://images.singletracks.com/blog/wp-content/uploads/2007/10/import.jpg" alt="import.jpg" />

The trail will be added with today's date and should be at the top of your history list on the left. Select the trail in the left navigation area (you may need to expand the current week to see the trail) and right click on it. Choose "Create Course from Activity."

<img id="image507" src="https://images.singletracks.com/blog/wp-content/uploads/2007/10/createcourse.jpg" alt="createcourse.jpg" />

Now, switch over to course view by clicking the "Courses" button just below the menu bar. On the left you should see a new course called "New Course 1" and any previously saved courses you may have. Right click on the new course and choose "Edit Course." Create a name for your course (I called mine "Blodgett") and click "Ok" to save.

<img id="image510" src="https://images.singletracks.com/blog/wp-content/uploads/2007/10/editcourse2.jpg" alt="editcourse2.jpg" />

You should see a basic map and elevation profile of the trail in the preview window that will roughly match what you saw on singletracks. Ignore the speed and time data for your track - this is completely arbitrary for all trails you download from singletracks.

Now you're finally ready to send the trail to your GPS. Make sure your GPS is connected to your computer and with the course selected, choose File -&gt; Send to Device. This may take a few seconds depending on the length and detail of the trail you've selected.

<img id="image511" src="https://images.singletracks.com/blog/wp-content/uploads/2007/10/sendcourse.jpg" alt="sendcourse.jpg" />

After you hear your GPS beep it is safe to disconnect. Once disconnected, turn your Edge on to make sure the trail has been loaded. You can find your saved courses at any time (no GPS signal needed) by navigating to the Main Menu and choosing "Training," then "Courses."  Select your course (in this example, labeled "Blodgett") from the list and you can see several options:
<ul>
	<li>Do Course</li>
	<li>Edit Course</li>
	<li>Map</li>
	<li>Profile</li>
	<li>Delete Course</li>
</ul>
"Do Course" allows you to navigate the course just as it was submitted to singletracks. This gives you some good information like distance to course, navigation stats, and more. This will also help you stay on track but don't worry about trying to keep up with the pace - remember it's arbitrary! To stop following the course return to the Main Menu and select "Training," "Stop Course."

"Edit Course" lets you edit the name of your course, though I don't recommended it. Instead, do this on your computer before you send it to your GPS - it's much faster!

"Map" shows you an overall map of your course. Zoom in and out using the arrow controls on your Edge GPS.

"Profile" gives you the elevation profile for the trail. Zoom in and out to get a good view using the arrow controls.

"Delete Course" is self explanatory. While this deletes the course from your GPS it DOES NOT delete it from your Garmin Training Center computer software.

With a few simple steps you can download GPS trail data from the internet and send it to your Garmin Edge GPS device, giving you piece of mind and relevant data when riding an unfamiliar trail.
  1
We've been recommending the <a href="http://www.singletracks.com/mtbreviews/Garmin/Edge-305/195.html">Garmin Edge</a> series GPS for mountain bikers for about 6 months now and we're still loving it. The Edge gets great reception on the trail, it has  a simple interface, and it's fairly rugged.

Until recently, though, we had never tried loading a GPS route downloaded from the internet - and it turns out to be a pain in the ass if you don't know what you're doing. Fortunately we're here to help.

All of the GPS data on singletracks is now available for your Garmin Edge GPS (both the 205 and 305) with one click. Find the trail you want by clicking the "Trail Maps" link at the top of any page and choosing your state from the pull-down menu midway down the page. For this example we're using the <a href="http://www.singletracks.com/mountain-bike/trail-map.php?id=6&amp;view=topo">Blodgett trail data</a> (Colorado) which is available free of charge.

On the GPS data and trail map page click the "Garmin Training Center File" link above the map (shown here)

<img class="alignnone size-full wp-image-2917" title="garmin-training-center-file" src="https://images.singletracks.com/blog/wp-content/uploads/2007/10/garmin-training-center-file.jpg" alt="garmin-training-center-file" width="400" height="280" />

Now fire up your copy of the Garmin Edge Training Center software (free with your Garmin Edge GPS).  This tutorial covers the Windows version; stay tuned for a <a href="http://www.singletracks.com/blog/?p=525">Mac tutorial</a> on the same process.

From the menu choose File -&gt; Import History... and select the file you just downloaded (in this case it's called "Blodgett.tcx").

<img id="image506" src="https://images.singletracks.com/blog/wp-content/uploads/2007/10/import.jpg" alt="import.jpg" />

The trail will be added with today's date and should be at the top of your history list on the left. Select the trail in the left navigation area (you may need to expand the current week to see the trail) and right click on it. Choose "Create Course from Activity."

<img id="image507" src="https://images.singletracks.com/blog/wp-content/uploads/2007/10/createcourse.jpg" alt="createcourse.jpg" />

Now, switch over to course view by clicking the "Courses" button just below the menu bar. On the left you should see a new course called "New Course 1" and any previously saved courses you may have. Right click on the new course and choose "Edit Course." Create a name for your course (I called mine "Blodgett") and click "Ok" to save.

<img id="image510" src="https://images.singletracks.com/blog/wp-content/uploads/2007/10/editcourse2.jpg" alt="editcourse2.jpg" />

You should see a basic map and elevation profile of the trail in the preview window that will roughly match what you saw on singletracks. Ignore the speed and time data for your track - this is completely arbitrary for all trails you download from singletracks.

Now you're finally ready to send the trail to your GPS. Make sure your GPS is connected to your computer and with the course selected, choose File -&gt; Send to Device. This may take a few seconds depending on the length and detail of the trail you've selected.

<img id="image511" src="https://images.singletracks.com/blog/wp-content/uploads/2007/10/sendcourse.jpg" alt="sendcourse.jpg" />

After you hear your GPS beep it is safe to disconnect. Once disconnected, turn your Edge on to make sure the trail has been loaded. You can find your saved courses at any time (no GPS signal needed) by navigating to the Main Menu and choosing "Training," then "Courses."  Select your course (in this example, labeled "Blodgett") from the list and you can see several options:
<ul>
	<li>Do Course</li>
	<li>Edit Course</li>
	<li>Map</li>
	<li>Profile</li>
	<li>Delete Course</li>
</ul>
"Do Course" allows you to navigate the course just as it was submitted to singletracks. This gives you some good information like distance to course, navigation stats, and more. This will also help you stay on track but don't worry about trying to keep up with the pace - remember it's arbitrary! To stop following the course return to the Main Menu and select "Training," "Stop Course."

"Edit Course" lets you edit the name of your course, though I don't recommended it. Instead, do this on your computer before you send it to your GPS - it's much faster!

"Map" shows you an overall map of your course. Zoom in and out using the arrow controls on your Edge GPS.

"Profile" gives you the elevation profile for the trail. Zoom in and out to get a good view using the arrow controls.

"Delete Course" is self explanatory. While this deletes the course from your GPS it DOES NOT delete it from your Garmin Training Center computer software.

With a few simple steps you can download GPS trail data from the internet and send it to your Garmin Edge GPS device, giving you piece of mind and relevant data when riding an unfamiliar trail.
  1
A black and blue CamelBak backpack designed for outdoor activities, featuring a hydration reservoir and a drinking tube, padded shoulder straps, and multiple compartments for gear storage.
  1