

E-Bikes are RAD. I said what I said. If you haven’t yet joined the pedal assist party, it’s worth trying. Contrary to many Facebook group debates, e-mountain bikes still provide plenty of fitness, and they are extremely fun. The only difference is you get to ride more miles with more smiles in the same amount of time as a motorless bike, with less risk of heart explosion. Read: the effort you exert is up to you and the power outputs you choose. If you ride the middle output for the entire ride, your heart rate is likely to remain consistent, you’ll take fewer oxygen breaks, and still work your muscles. If your power output is at the lowest setting, your muscles will have to work harder and in turn your heart rate will increase.
When you decide to jump on the motor bandwagon, there are a few things to consider as far as handling and fitness are concerned. First and foremost, it is paramount that you have dialed bike handling skills before riding an e-bike. Many skills translate, however with the added weight of an eMTB the timing of the skills and the skills themselves require different types of strength and a bit of finesse in order to make rides that much more enjoyable. Cross training your muscles is a great first step. For those who are eMTB curious or have made the leap, here are a couple suggestions for preparing the mind and body to handle the added weight, speed, and ability of a motor assist mountain bike.
Climbing technique

Climbing on an e-MTB is generally easier than a motorless bike due to the motor’s assistance. The weight isn’t as much of a consideration uphill. Smooth, sustained climbs can be tackled using almost every mode on an e-bike. Fire roads, for example, often boring and arduous “necessary evil” climbs can be hastened significantly by switching to “boost” or “ludicrous” mode (*Mode names vary based on bike brand). If there are no large obstacles, you can likely remain seated for the steepest of climbs. The traction comes from a consistent pedal cadence and a balanced body over the bike in relation to the terrain.
If the road is steeper, for instance, you will need to move your body into a seated, crouched climb; butt forward on the seat, chest lowered toward the handlebars and arms at a “W” with elbows near your sides. Like the basic laws of physics imply, with every action there is a reaction and on a motor-assisted e-bike, that reaction is often feeling like you’re thrown back as the motor lurches forward. In fact, in some instances you’re likely to find yourself “hanging on.” If you’re in the highest assist mode, minor body position adjustments will do the trick. Setting the bike to the highest assist mode, is an option, but not necessary. If your goal is to increase your cardiovascular work, then setting the power mode to the lowest or middle assist modes will allow you to control your effort and bonus: you’ll save battery life too.
Not all climbs are created equal. Loose, rocky uphills, or more technical trail sections make the weight more noticeable and require riders to understand the power modes available for use and how the power output will translate to traction, or lack thereof. Consider this scenario: you’re climbing up a moderately rocky singletrack or doubletrack in Eco or Trail Mode (easiest to middle assist), so far so good. You then notice a large, steep stack of dusty rocks ahead. There is a discernible “line” in the feature, but it’s not easy.
Your first instinct may be to add the most power because more speed equals more momentum and you can just motor up the stack, right? Wrong. You come to the feature in full assist mode and you stand to pedal, what happens next? You might make it, but you might be either too far forward or too far back and you’ll stall or fall. It’s not that you can’t make it up these types of obstacles in high assist mode, it just might not be the most successful or efficient.
When it comes to technical obstacles body position and power output are paramount. If the power output is high and you’re standing to pedal, your center of mass must be, well, centered, in order to keep your weight on both tires. The amount of power your legs have in a standing climb is already a lot, so effectively you’re creating double the power from body and bike. Most motors engage with the slightest pedal pressure with all the power of the mode setting. If your body isn’t balanced correctly, this might result in too much power to sustain traction along your intended line choice. In order to finesse technical obstacles, it can be beneficial to lower the power output and rely on your legs and bike handling skills to assist in the climb. You may find that even in that standing position, you’re less forward than you would be a normal bike. Remember the motor is there to assist you, not propel you.
Exercises to aid in climbing
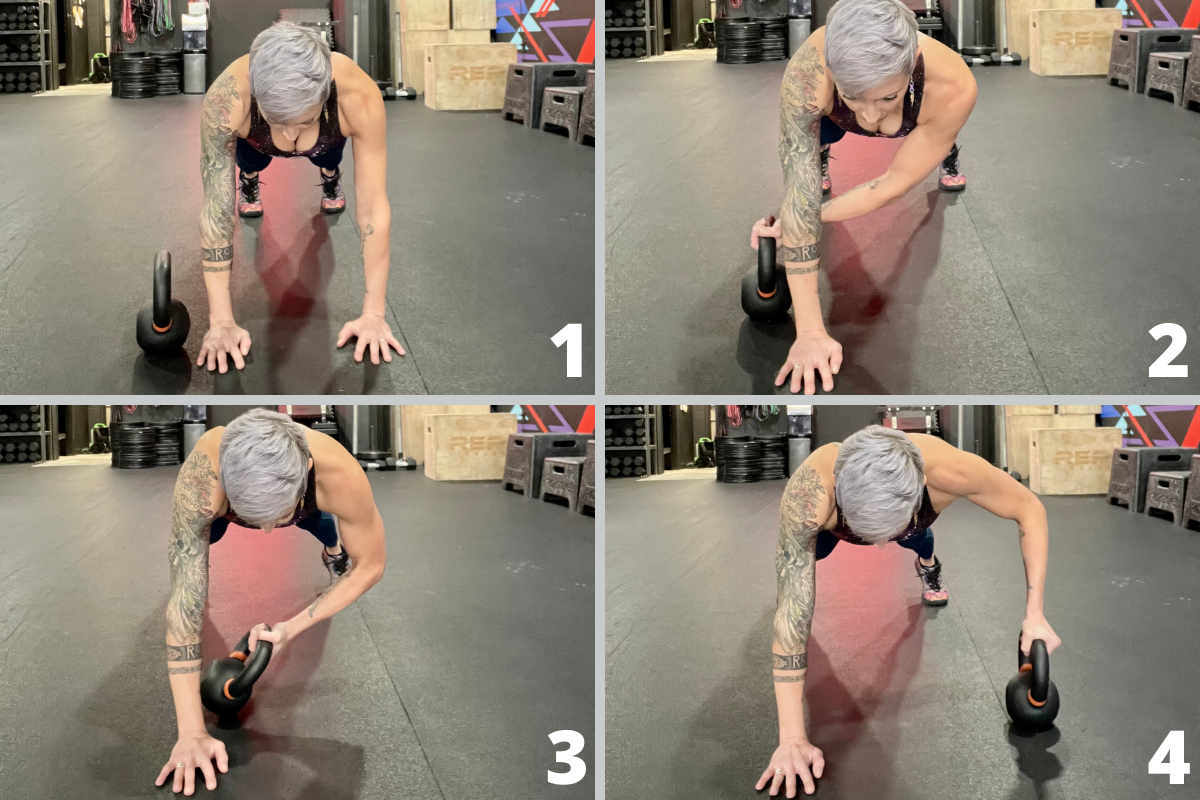
Plank drag throughs
When riding an e-bike uphill you’ll find that as soon as you apply pressure to your pedals the bike jolts forward. If you’re not firmly gripping the handlebars and leaning forward slightly you’re liable to go backwards as the bike goes forward. Plank drag throughs are a full body exercise, but specifically help create stability in the erector spinae, abdominals and obliques, as well as the upper back, lats, and glutes. Core is an important component in adjusting body position on the bike and back strength is useful for pulling.
To perform a plank drag through you must first find a kettlebell, weight, sandbag, or something heavy that can be dragged across the floor. Start facing the ground in a high plank position: hands and wrists directly below shoulders, body in a straight line, hips level, core tight (pull belly button toward spine), legs and glutes engaged (flexed). This is your starting position. Place your weight to the left side of your body in line with your chest. While holding the perfect plank reach your right hand underneath your body, grab the weight, and drag it to the right just to the outside of your body. Repeat the same movement with your left arm, dragging from right to left. Complete 16 drags for 3-4 sets.
Dive bombers

Dive bombers are also a full body exercise, specifically targeting the core, chest, and shoulders. To perform a dive bomber, start in a plank and push back into a modified downward dog position. With your body facing the floor, shift your stomach toward your thighs, lift hips high, and straighten your legs and arms, pressing your armpits toward the floor. You should look like a human teepee. Be sure that your feet are wider than hip width apart and your hands slightly wider than shoulder width apart to help maintain balance. This is your starting position. Slowly bend your elbows and lower your forehead toward the floor in between your hands. Try to maintain your teepee position for as long as possible. Continue to lower your forehead toward the ground and “scoop” your body past your hands, starting with forehead, nose, chin, neckline, chest, and finally stomach. You should now be in a modified cobra position, body hovering above the ground, arms straight below shoulders, chin up and gaze toward the ceiling. You can reverse this move back through your hands, but that’s pretty difficult. Instead, shift your body back into a plank and then back into the modified downward dog. Repeat the movement for 10-12 repetitions for 3-4 sets.
Descending technique

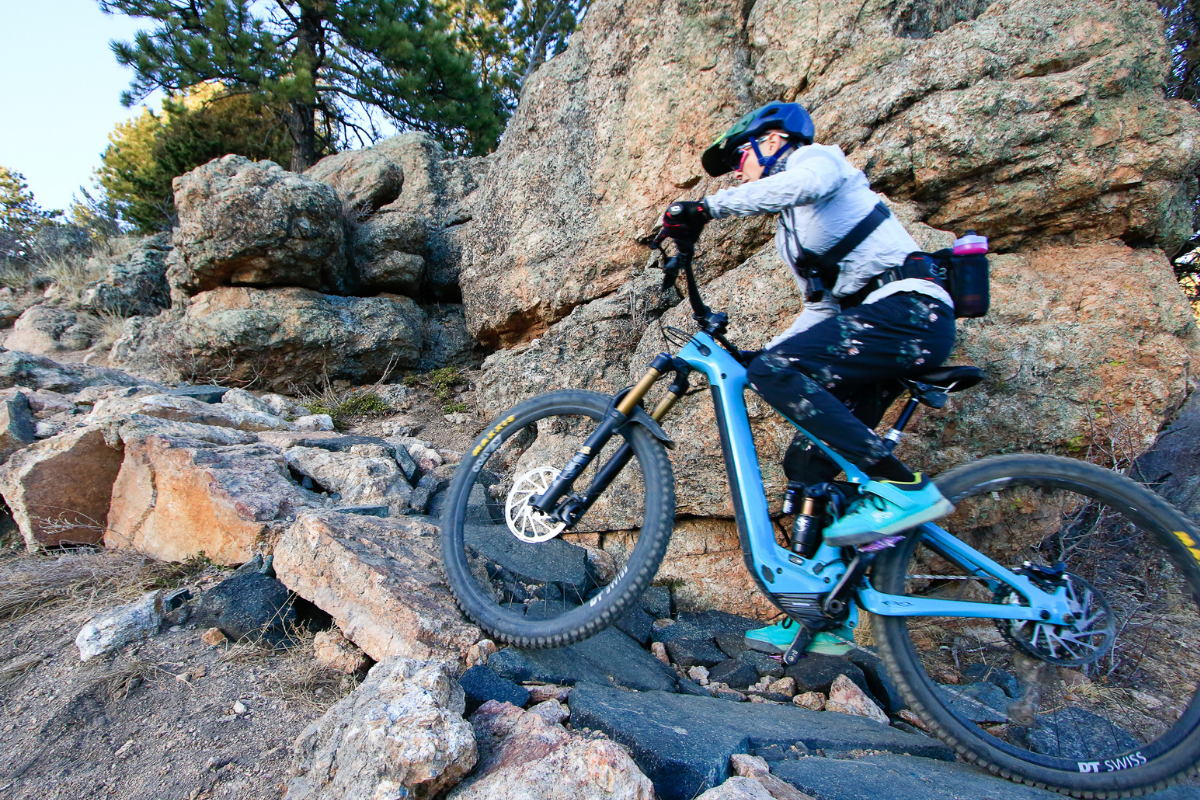
Descending on an e-bike is more difficult than a regular bike due to the extra weight. Electric mountain bikes require extra strength and stamina descending, especially down chunky, rocky, rooty, and unpredictable terrain. Unlike the uphill, you are typically not using pedal assist when descending, unless of course you’re pedaling and going less than 20mph. Full size eMTBs hover in the 45-55lb range and as a lighter rider, I really feel that going downhill.
As with a regular bike, it is important to keep your feet “heavy” on the pedals as you encounter obstacles on the trail. Your body position should be balanced and stable in the “attack” or “ready” position as you move the bike forward/backward and side to side. Leg and core strength are extremely useful in maintaining a balanced position as the bike moves underneath you. Back and shoulder strength are important for controlling the weight of the bike as it bounces off obstacles, especially in quickly changing terrain and at high speeds.
Jumping eMTBs is a little more difficult as well. Generally speaking, jumping a heavy bike that does not have a throttle is hard. They have a bit of a lag time and are more sluggish at the lip. If you’re on trail, this may not feel like the case as the weight of the bike propels you into a jump. At a downhill park or at a jump park, it is necessary to utilize the pump even more than on a regular bike in order to get the proper pop off the jump. This requires full body strength, more specifically glute and leg strength.
Exercises to aid in descending
Stationary lunges
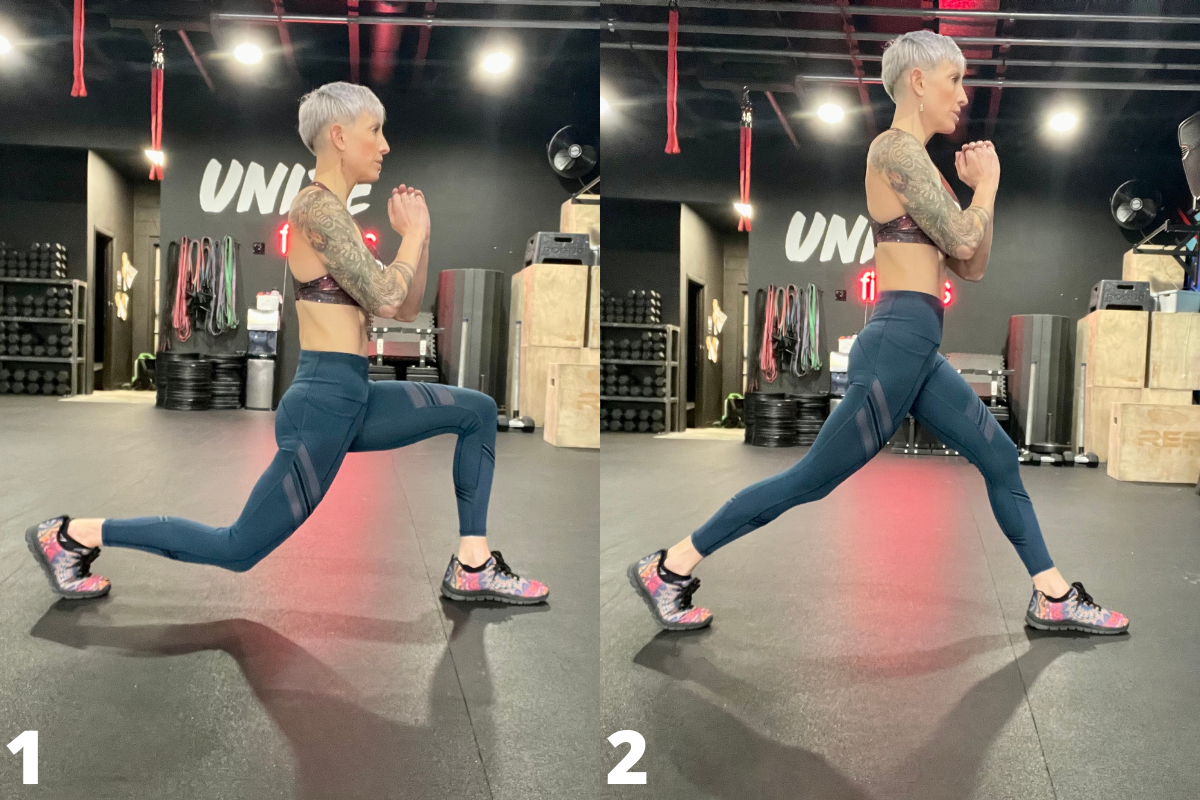
Lunges are a unilateral exercise; a single-leg movement that activate your stabilizing muscles to develop balance, coordination, and stability. Working one leg at a time causes your body to be less stable, which forces your spine and core to work harder to balance. As you descend on a bike, you have a bracing leg. Some people are able to use either leg as their bracing leg, though many people have a dominate forward foot. Lunges help balance strength in both legs so you can alternate your forward foot. Stationary lunges target your glutes, quadriceps, and hamstrings as you put most of your weight on your front leg and use your back leg to balance, stabilize, and support your entire body.
To perform a stationary lunge, start in a standing position and take a moderate step forward. Move your hips down toward the floor. Your front leg should be at a 90° angle, with your ankle directly below your knee. If it’s not, adjust it. Your back leg should be slightly bent with toes tucked and knee hovering above the floor. It is important to keep an upright position here, with your head roughly in line with your hips. This is your starting position. From this position, press through your front heel until your front leg is straight or has a slight bend. Your back leg will remain bent with toes tucked even at the top position. Repeat this movement, sinking down into a lunge and up for 12-15 times on each leg, for 3-4 sets.
Band pull aparts

Band pull aparts use a scapular retraction to activate muscles throughout the upper back including the rhomboids, trapezius, and rear deltoids. They are useful in developing shoulder and mid-back strength, both of which are important when charging a heavy e-bike downhill. Shoulder strength and stability provide a base of support in the “ready” or “attack” position and is necessary to keep your body position balanced. Mid back strength helps to move the bike fore/aft and side to side without losing form or control.
To perform a band pull apart you must first acquire a band. Any type of easy resistance band will do. Roll your shoulders down and back, keep your head up, chest up. Stretch your arms in front of your body and inline with your shoulders. Grab the band and adjust the resistance so there is a little tightness between hands. This is your starting position. Think about your back first and squeeze your shoulder blades together, then pull your hands and the band apart to your sides (still in line with shoulders) into a “T” position. If you cannot pull the band apart with straight arms, adjust the starting position with less tightness to start. Reverse the movement, moving hands back to the front and repeat the movement for 10-12 repetitions for 3-4 sets.
Technique + strength = eMTB success
These quick techniques and fitness tips will help you along the journey of learning the many handling nuances to consider when riding an eMTB. Even if you’re not considering a ride on “the dark side,” these exercises will make you strong for regular riding as well. Plan to make cross training part of your year ’round habits and visit Singletracks’ YouTube Channel for more training tips.
What differences in handling have you noticed on e-bikes and how do you train for them?


6 Comments
Jan 26, 2022
Jan 28, 2022
Jan 27, 2022
An extra 10kg or so centred between the cranks makes for a more stable platform descending.
Plus a great bike to learn to jump on for the same reason.
Jan 28, 2022
Jan 29, 2022
Jan 27, 2022
You are better off with your weight a bit further back as the bike balances differently. The extra 10kg between the cranks keeps the front end from lifting as much so you can get more body weight over the back wheel to improve traction and just keep the cadence up to apply smooth power.
Been on a Kenevo since November 2017.
Went E exclusively for a few years, now 50/50 with a mullet Status 160.
Enjoying chilling and just sessioning stuff on the Status for shorter rides. Ebike rides just always end up intense, like DH the entire ride and you can't hold back.
Three big surprises owning the Kenevo.
Fitness improved as did core and upper body strength. You ride more often, on days you otherwise wouldn't.
Skills improved. More descents per ride.
Some of the best times have been 1-2 hour rides in the bush with a Shotgun seat for my two girls from 3yo. Helped them heaps learning bike skills on the bike with me which have translated to my 6yo on her 20". And we use a tow rope for big climbs so my 6yo can enjoy more trails on her 20" while my 3yo is up front on the Shotgun.