
Living in Portland, Oregon, required learning a few different cycling skills, and the most immediate one was how to inspect, clean, and swap cartridge bearings. Trails west of the Cascades are muddy 9 months out of the year, which for daily riders means a couple new bottom brackets, 1-2 sets of headest bearings, and 2-4 or more full hub overhauls annually. It’s no wonder Chris King’s cartridge bearings are some of the best in the world. The testing conditions are primo.
If your hub bearings feel slow, chunky, gritty, or generally not smooth, it’s time to change them. You can purchase most bearing sizes at your local bike shop for $5-7, making this a fairly inexpensive repair. Alternatively, you could replace your bearings with a higher-quality pair, like those from Hope, Phil Wood, Chris King, and other brands. I have one wheelset with Phil Wood Bearings installed that has remained smooth for three years now.
Below I will go through the process of replacing the bearings in your front hub. Successive articles will cover service procedures for bottom brackets, headsets, and rear hub bearings, most of which will use similar tools and methods.
Not all hub internals are designed identically. This article focuses on the most common style. If at any point in this repair you notice that your hub is configured differently, check the manufacturer’s website for more specific details. Some front hubs use an axle spacer that goes through the inner race of both bearings. We will cover that in a future article on replacing rear wheel bearings, as the procedure is the same.
Let’s begin.

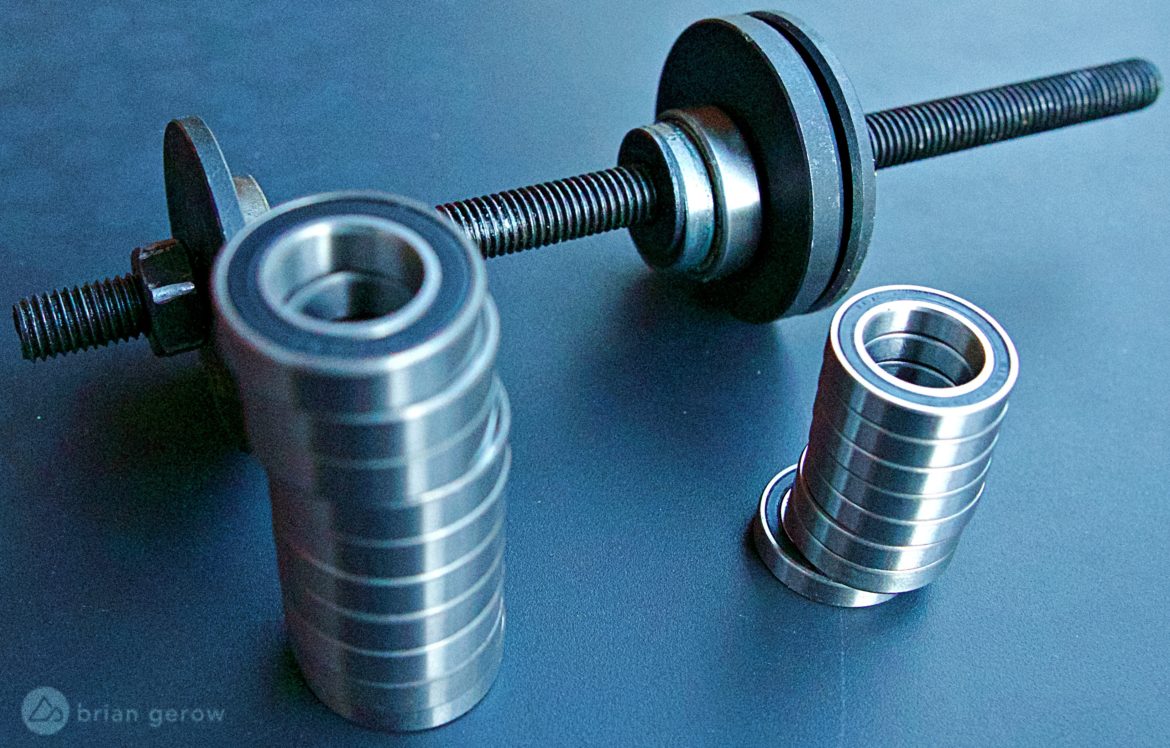
The elements of a cartridge bearing are fairly simple. The outer race fits tightly against the inside of the hub-shell, providing a track for the ball bearings to roll along. The inner race sits directly against the through-axle and provides the inner track for the bearings to roll along. The ball bearings all roll between the two races in a heavy grease, and the plastic shields on either side are designed to keep the grease in and water or debris out. The bearings in this photo are two of the most common sizes for bike wheels: 6802 and 6902.


The photo above show how things look inside many modern front hubs. The only parts of this assembly that touch the hub shell are the outer races of the bearings. These are the two 6802 bearings I will press into my Pancenti front hub. The metal tube, also called an axle spacer, goes inside the hub, and is the same diameter as the inner bearing races. It sits against the races to provide support against flexing forces on the axle. Without the axle spacer, the inner and outer race could separate under heavy turning or jarring pressure, allowing all of the ball bearings to fall out.
Step one
Remove the axle endcaps. Depending on your specific hub there may be slightly different steps to this process. Some hubs, like those from White Industries, have bearing preload adjusters that will need to be removed. If the axle endcaps of your hub don’t simply pull off, consult the manufacturer’s website to find out how to remove them.
Step two
Bearing identification. Once you can see the bearings, clean them so you can read the bearing ID code to make sure you have the proper size replacement bearings. Poorly performing bearings are better than no bearings at all.
Step three
Move the axle spacer. Remember the inner axle spacer that sits between the two inner races? There is space between the axle spacer and the inner hub shell. You need to push that spacer to one side, toward the hub shell, to reveal the inner race of both bearings. Insert your pinky finger, or the blade of your screwdriver, into the hub, and push the axle spacer to one side.

Step four
Remove the old bearings. Slide your screwdriver through the hub at an angle until the blade rests flat against the inner race of the bearing on the opposite side. Tap gently on the screwdriver handle to knock the bearing free. Keep the screwdriver blade on the race so it doesn’t scratch or mar the axle spacer. You may have to tap on one side, then move the axle spacer and tap on another point along the bearing’s inner race to coax the bearing out. Once you get one bearing free, pull the inner axle spacer out and set it aside. Do not throw away the used bearings, you will use them later.

If the bearing is truly kaput it might fall apart while you are tapping it out, leaving the outer race stuck in the hub. If this happens you can tap the outer race out the same way you did the inner one, taking care not to scratch the inner hub shell. Gouges in the inner hub shell can make it difficult to press in new bearings and may compromise the hub in other ways. There are specific tools for extracting bearings if you prefer a more professional removal procedure that negates the risk of scratching the hub shell and its guts.
Step five
With both bearings removed, clean the inside of the hub with isopropyl alcohol or a similarly fast drying cleaner, then grease the bearing seat inside of the hub.

Step six
Prepare the press. Slide the bearing press through the hub with the new bearing on it, and determine how many spacers you will need to fully seat the bearing without the outermost washer bottoming out on the hub shell. I have had good luck using old bearings in place of the drifts to space out the press and to apply even pressure to the bearing as it is pressed in. Space the bearing press properly, using spent bearings or a drift, to provide plenty of room to press the bearing into the hub.
![]()
Step seven
Press one of the new bearings in. Always press bearings one at a time, so you can make sure they go in straight. A bearing press is a threaded rod with nuts on either side that you tighten to push the bearings into the hub. You can use a professional version with bearing drifts that guide the bearings into the hub shell in an equal and precise manner.


Slowly turn the nuts on either side of the press, checking with every turn that the bearing is going in straight. You will know the bearing is firmly seated when it stops against the inside of the hub shell. Back the press out and move to the other side.
Step eight
Press the second bearing. Insert the axle spacer, then load the bearing press in the same manner as the previous side. Press in the second bearing. If you forget to insert the axle spacer, you will have to remove one of the bearings and insert it. It’s not a piece you want to go without.
Step nine
Now it’s time for the finishing touches. With both bearings fully pressed in, apply some grease to the outside of each bearing to create an extra moisture barrier, and press the end caps back in place.
Step ten
Time to ride! Put your wheel in and go enjoy your smooth rolling front end.

There are endless nuances and tips to this process. I actually had a college roommate who pressed all of his bearings with a framing hammer and the corner of a 2 x 4 that he nicknamed “The Board of Destiny.”
What are your tricks or suggestion for making this process go smoothly, or prolonging the life of your bearings? Do you know of high-quality bearings that last longer than most? Please share your tips in the comments below.


2 Comments
Nov 5, 2019
Nov 5, 2019