

In October we wrote about the announcement of a new camera from a company called Rylo which promised smooth, stabilized video, even when filming in rough terrain. I was skeptical about the claims, but excited at the same time. So over the last several weeks I’ve been testing the Rylo for myself to see how well it works for mountain biking, and overall I’m pretty impressed.
The Rylo camera
I don’t personally geek out over camera stats, but I know they’re important to a lot of people so here they are:
- 4K video @ 30fps
- Dual lenses (front and back)
- 208° field of view (7mm equivalent)
- f/2.8 fixed aperture
- 6K panorama capture capability
- 60 minute record time
- Rechargeable battery
- 108 grams
- 16Gb microSD included; expandable to 128Gb
The Rylo is roughly the same height and thickness as a GoPro Hero6, but slightly wider. At 108g, it’s only a little lighter than the Hero6. An “adventure case” is available for purchase separately, and without it, the Rylo is not weatherproof.

The camera itself is pretty basic with two buttons (power on top, mode on the back), a door to access the battery and microSD card, a USB port, and two lenses, front and back. Rylo ships with a charge cable, sync cable, a protective pouch, and an “everyday case.” With the everyday case, the Rylo can be mounted to a bike or helmet using GoPro-compatible mounts. Just to be clear, the Rylo doesn’t ship with a helmet or bar mount; mountain bikers will need to purchase this separately, or use a mount from a camera they already own.


I found the Rylo to be easy to use in the field. In addition to the screen and a light indicating the camera status, the Rylo also beeps and vibrates to let you know what it’s up to. Mountain bikers inevitably end up with clips that begin with the wearer asking a friend, “Is it recording?” With the Rylo, I didn’t have to ask — it was usually clear what was happening. Still, I did end up with a few accidental, 2-second videos that were recorded when I wanted to turn the camera off (long button press) rather than begin a new recording (short press).

Mounting the Rylo is straightforward, but because it’s a 360-degree camera, this limits mounting choices. For example, a chest mount is possible and the camera can be used with just the front lens, but obviously none of the 360-degree features will be available. (More on those features later.)
On the trail
A short 360-degree clip from the Rylo. Drag within the video frame to change the perspective.
I chose to mount the Rylo on my mountain bike handlebars to maximize the 360-degree field of view, and also because it’s much easier to control in this position. This happens to be one of the trickiest spots for action cameras because the handlebars are just so dang bouncy and react to every bump in the trail.
Stabilization
The section of trail at the beginning of the clip has a ridiculous number of small, bumpy roots. Note how the brake cable at the bottom right bounces, but the footage remains relatively smooth. Also, watch how the trail turns into a full-on jungle around the 0:55 mark.
To get stable mountain bike footage, a gimbal is pretty much the only way to go, but gimbals are expensive, bulky, and balky. I tried the Rylo in a number of lighting conditions (daylight, dusk, night) and trail conditions (smooth, bumpy), and found the footage came out quite stable, though not as smooth as it would have with a gimbal.
For daylight footage, I’d estimate the Rylo smoothed things out about 80% as well as a gimbal. The footage was never perfect, but on the whole it is entirely watchable.
The Rylo going fast at night. Not bad.
In lower light conditions, the Rylo footage wasn’t nearly as stable, and I suspect that’s because the stabilization algorithms have less information to work with. The footage was also more grainy than daytime recordings. Again, I would say the footage is watchable, though small doses are probably best.
Sound
Riding the rare, double-wide mountain bike teeter totter. Holding hands.
Rylo says their camera uses something called “3D positional audio” which sounds really fancy but still suffers from picking up way too much wind noise at high speed. Really this comes down to physics, and it’s why TV news crews use those seemingly ridiculous wind screens on their microphones that look like fuzzy, dead rodents. As you can tell from the sample clips I included here, low speed messing around sounds fine, but POV can bring hurricane coverage to mind.
Mounting
I mounted the Rylo to my bike using cobbled-together GoPro hardware and everything worked fine. The everyday case — essentially the holder — stays tight and is easy to operate.
Fixed position
While some graininess is to be expected from a dusk shot like this, it’s quite noticeable in these fixed position shots.
A lot of us are getting back to shooting more fixed position, or at the very least off-the-bike videos with our cameras, mainly to overcome the shakiness and frankly boringness of POV footage. I shot a few videos of friends doing jumps from a fixed position and the result was a bit underwhelming. This is a POV camera first and foremost, but if you must use it from a fixed position, I suggest getting as close to the action as possible.
Back at home, in the editing bay

One of the things that makes the Rylo unique (or frustrating, depending on your workflow) is that all of the editing and even file transfer is done using a smartphone app. I suppose it’s possible to move footage from the camera directly onto a computer, but I wasn’t able to make it work. Rylo ships with a USB cable for charging the camera, and another cable that connects the camera to a phone. (In my case, that means an unusual male USB to male Lightning connection cable.)
Transferring files

Getting the “raw” video from the Rylo to a computer for editing or sharing is a two step process. Connect the camera to a smartphone, and click the share/save button. This saves the video to the phone’s camera roll, and from here it’s possible to transfer or share the video. Rylo gives the option to save the video as a regular HD video or as a 360-degree video. Editing and even playing 360-degree videos can be tricky, though YouTube handles these NBD.
I had a hard time getting videos onto my computer and the web because my phone storage is maxed out, leaving no room to save clips to the camera roll. It would be nice to be able to send a video directly from the Rylo app to say a computer running Airdrop, but for now, that doesn’t seem to be possible. I even tried connecting the camera to an iPad I knew had plenty of free storage space, but sadly the Rylo app is not available for iPad.
Of course it’s my own fault for having an old phone, and video files eat up storage space quickly. The included 16Gb memory card is small by most standards, but that’s potentially a lot of smartphone memory real estate, even for those with newer phones.
Editing
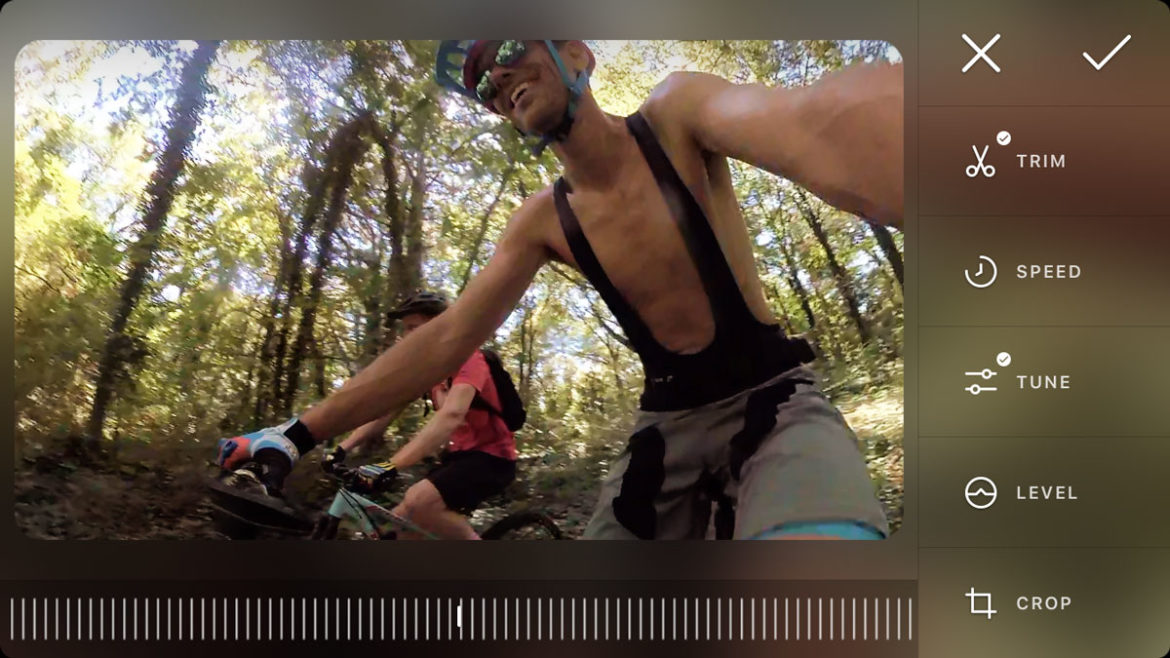
Everyone has their MTB video editing routine. For some, that means fancy software like Final Cut, while others don’t bother editing at all. I’m an iMovie man myself, so I don’t need a lot of features, but I do like to have the basics covered. The Rylo app delivers in this regard, serving up just what I need.

Of course the app offers the ability to trim, crop, and rotate clips. It’s also possible to speed up/slow down footage, though mountain bikers should never speed up footage because it’s cheating — ha! The app also has good controls for color-correction (tuning, as Rylo calls it). Over the years I’ve gained a lot of appreciation for video color-correction tools, which can usually take a video from meh to yeah! with a few tweaks.
The view/edit screen can also be used to add a picture-in-picture effect to show the front and rear cameras in a single, standard video (see the teeter totter clip above). In the edit phase, it’s also possible to choose the perspective, though that perspective stays fixed. There’s no way to effectively “pan” and vary the perspective which is sorta disappointing. Perhaps in a future app release, this will be possible. Update: It sounds like the “Look Here” feature allows the editor to pan multiple perspectives within the video.
Viewing

Of course the Rylo app can also be used for viewing videos, and I had a surprising amount of fun here. The videos look great on a phone — honestly much better than they do on a larger computer screen — so clearly Rylo has optimized their app and sharing tools to make smartphone viewing easy and enjoyable. I find I can watch my own, standard MTB footage a couple times before I get bored, but with the Rylo clips I found myself watching them over and over, switching perspectives, zooming in, etc. I have to say, the Rylo app borders on addictive.
Conclusion
The Rylo camera has a lot going for it, and those features don’t come cheap: $499 USD. That’s $100 more than a GoPro Hero6 Black, though perhaps a more apt comparison is the $699 GoPro Fusion 360-degree camera. Regardless, 360-degree cameras can be expensive. In my experience, however, the Rylo all but eliminates the need for a gimbal, which is an extra expense many mountain bikers incur.
My take? I had a lot of fun testing the camera and could see myself using it over more complicated set-ups. Half the fun of mountain biking is sharing and reliving experiences with friends, and the Rylo seems to be a good fit.


1 Comments
Aug 6, 2018
Regardless of what camera you get, the video is still not as good as the skill of the rider and editing afterwards.