

The freehub is a vital part of any mountain bike – it’s what turns drive from the cassette into drive at the tire and keeps the bike moving forward, while also allowing it to freewheel. The humble and often under-maintained freehub is what keeps your bike from being a fixie, and allows you to pedal on.
But a non-functioning freehub can literally leave you stranded. For that reason, it pays to take care of it, especially since the internal parts tend to be pretty tiny.
Can you service a freehub at home? Yes you can. Thankfully freehub maintenance and overhaul is relatively straightforward to DIY, usually with little need for any specialist tools.
How often should you service your freehub? As with anything, the more often you carry out preventative maintenance the better shape any component is going to be in long term, so this is something I personally like to do at least a couple of times a year, especially if I’m riding in the wet a lot. Regular maintenance means you’re less likely to break things or need to replace any parts, so make it part of your regular tear down and you’ll reap the benefits. Any time you remove the chain and cassette to clean them, just take ten extra minutes to service your freehub and you’ll be golden.
For this tutorial I’m going to focus on the more common freehub assemblies, but note that no two are identical, and while I’m an advocate of pulling things apart to see how they work, make sure you note how it came apart, and if you’re not 100% sure, it’s worth pulling up a user manual for your hub, if one is available.
Pawl hubs
First we’ll get into pawl-type freehubs, which are the most common, though there are a few different variations.

For any freehub service the first step is to remove the cassette using a chain whip and lockring tool. Here’s how to remove a cassette: With the wheel on the ground in front of you and the cassette facing out, hold the chain whip in your left hand pointing up slightly. Wrap the whip around the cassette to your right as you look down and place the lockring tool in your right hand and pointed up slightly. Push down on both at the same time to crack the lockring loose. Sometimes it can take a bit of force so don’t be afraid to use your entire bodyweight to do so. Once the ring is cracked loose, go ahead and fully spin the lock ring off and remove the cassette off. It’ll come off in pieces if you have a Shimano cassette, and if you have a SRAM XD type cassette it’ll come off as one unit.
How to remove a freehub
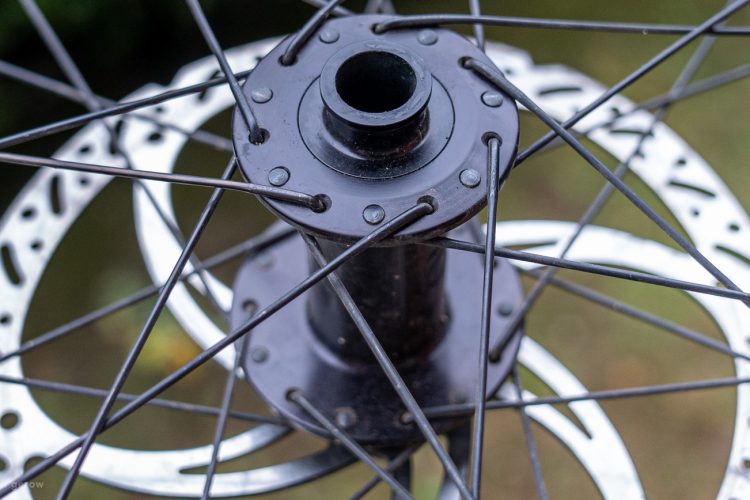
Once the cassette is off, next step is to remove the freehub. Most mid- to high-end freehubs literally push-fit onto the hub, being held on only by an O-ring on the end cap. If not, there will be flats on the outside of the end caps for a wrench, or on the inside for a hex key. If both end caps are perfectly smooth and round, it’s a safe assumption that they push on.
For a push-fit freehub, the first thing to try is just grab hold of the freehub body by hand and try to pull it off while turning slightly counter-clockwise. This often works, but if it’s on there tight, you’ll need to pull the end cap off first. Quite often you can pop it out just using the thru-axle from the frame levering it slightly, or by using non-marring pliers such as Knipex to grab it and pull it off. It can be a good idea to leave the thru axle inside the hub while doing this so as not to ovalize the end cap.
If this doesn’t work then the best thing is to use an expanding collet from a bearing extractor or similar to pull it off. Once off, the freehub body should just pull off unless it’s severely corroded. Be careful not to drop or lose any springs or pawls when the freehub body comes off. It’s worth doing this in a clean and tidy space just in case with nowhere for things to fall and get lost.


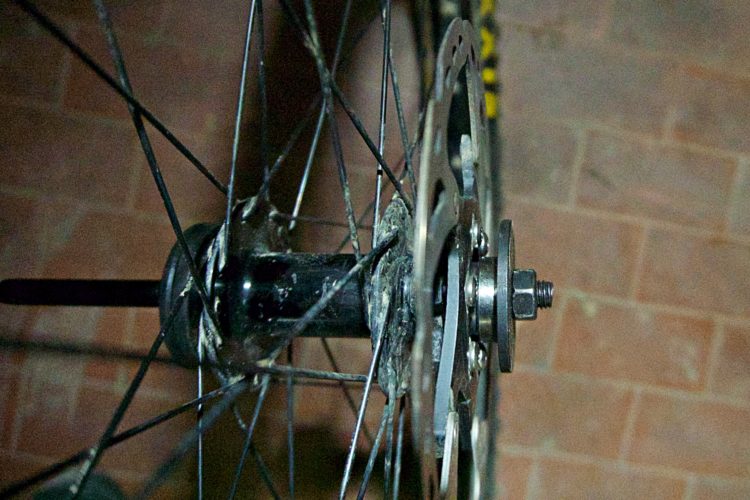
Some hubs may have threaded end caps that lock together similar to a cup and cone hub. Commonly these are found on lower-end bikes and are often manufactured by Formula and specced as OEM on a lot of entry level builds from brands including Commencal, Giant, Specialized, Santa Cruz, etc. The locking nuts are usually on the non-drive side and require some combination of 17/19mm cone wrenches to remove. Once removed the freehub and axle should pull out of the drive side. From here you can service the freehub. To remove the axle completely you’ll need a 12mm hex key and 17mm wrench to remove the drive-side nut and remove the freehub.

Once the freehub is removed, pay attention to the order and orientation of any parts that come off, including end caps, axle, seals and washers. Quite often there is a small washer between the freehub body and the drive-side hub shell bearing. Without this washer the hub can bind once fitted to the bike, so be sure to take note of it.
How to clean and grease a freehub
Now we can clean the ratchet system. Note the color of the grease; if it’s brown that means there’s dirt ingress which can lead to wear of the system. Inspect your pawls and drive ring to make sure they’re not overly worn or chipped. The pawls are the small moving teeth that engage with the teeth on the drive ring in the hub body. If your freehub is slipping and not engaging properly, it could be that it’s in need of a good clean, or it could be that the surfaces are worn and need replacing. If pawls are chipped or worn, it may be worth ordering replacement pawls and springs.
To clean the freehub, you have the option of simply spraying with degreaser/isopropyl alcohol, and cleaning things as they are if it doesn’t look bad. Or, you can fully strip all the pawls and springs out for a more thorough clean.


Often freehubs will have a retaining clip or similar to hold the pawls and springs in place, so first remove this, whatever it happens to be. On the Industry Nine hub pictured above it’s a metal circlip, and on the Stan’s Neo hub it’s a plastic washer that pops over a lip. Once removed, use a pick or needle-nose pliers to first pull out the pawls, then the springs. The spring sometimes can be a small coil spring, like in the I9 hub, or a leaf spring like in the Stan’s hub. When you pull them out, be careful not to lose them – they’re very important but like to disappear into the void.


Once the springs and pawls are out, use alcohol or degreaser and a rag to fully clean the pawls, springs, the drive ring in the hub, main seal, freehub body and anything else you pulled out. I like to use Q-tips to clean the notches in the freehub body where the springs live. Once cleaned, you can then re-grease and reassemble. The options for freehub oil/grease are endless, and oils can work for low-drag but will need reapplying more regularly while grease will last longer, and a decent waterproof grease should keep water at bay but may drag a little more.
I’ve had good luck with Dumonde Tech grease and oil, and I’m currently using Maxima Waterproof Grease. The key is to use it sparingly so the pawls don’t stick down, resulting in lack of drive. Apply a thin layer to all moving parts, ratchet ring etc. and reassemble. When fitting the pawls and springs, I like to go springs first, then use a small flat-blade screwdriver to hold them back while slotting the pawls in place.


Apply some grease to the bearing surfaces and axle and slide back together, remembering to fit any seals, washers/spacers in the correct order and orientation. To slot the freehub back in it can help to spin it backward while pushing it in, so the pawls drop in. If the pawls are stopping the freehub from pushing in I will sometimes loop a shift cable around the freehub body to push the pawls down while pushing the freehub body into the hub. Another trick I’ve seen is spinning the freehub body with a screwdriver next to it to push the pawls down as you push it in. You could also wrap an elastic band around the pawls and then use a pick to pull it out once the freehub is halfway in. Whatever works for you.

One in place, re-fit the end caps and you’re good to go. If you have thread-on end caps, be sure not to preload the bearings too tightly or the hub won’t spin properly. Thread the freehub on just snug enough and then lock the nuts together. The axle should spin smoothly with no play. Now refit your cassette and you’re good to go.
DT Swiss hub service
DT Swiss hubs utilize a couple of different drive systems. Older DT Swiss 370s can be found with a pawl type system that just uses one big wire spring to hold the pawls in place and can be serviced as above, but the newer 370s and all 350s and 240s use some variation of their star-ratchet technology. This is completely different to a pawl system and deserves a mention, since DT Swiss 350s are pretty ubiquitous. Note that the new Ratchet EXP system is almost identical to the ratchet system here, but the hub shell ratchet is fixed in place, with only one moving ratchet ring in the freehub body.


Disassembling the hub is the same as above – the end caps simply pull off and the freehub pulls off. This is where you’ll find out if you have a pawl system or star ratchet.

If star ratchet you’ll find two conical springs and two toothed rings that lock together. The rings are located in the hub shell and freehub body and float in and out with the springs pushing them together. When coasting the springs have enough give that the rings ratchet backward over each other. Pedaling forward forces the springs toward each other and the teeth lock together with 100% percent engagement. It’s this 100% engagement that makes these hubs extremely robust and reliable.


Note the way the hub came apart, assuming it was assembled correctly, referring to the images below for correct assembly. Again, service here is pretty simple, requiring nothing but a clean and regrease. Alcohol and a rag and/or Q-Tips is all you need. Clean all the surfaces, springs, ratchet rings, drive ring in hub shell and freehub, and regrease with your choice of grease or oil. DT Swiss uses their own ‘Special Grease’ for factory assembly that can be ordered online or most bike shops should have it. It’s my preference to use this whenever possible. Again use a thin coat of this on all parts before reassembling.


When assembling, pay special attention to the order and orientation of parts. First make sure to include the 12.7mm washer over the hub axle. Next, one spring goes in the hub shell and one in the freehub body, with the fat end going toward the bearing in each.
Now add the ratchet rings, with the smooth back side toward the spring. The teeth of the ratchet rings should lock together when assembled. It can be easier to slide both ratchet rings over the hub axle, and then fit the freehub. This should all push together with the freehub over the axle. If the freehub doesn’t want to push onto the axle the spacer inside the freehub body could be slipping down, in which case just poke your pinky through the outer freehub bearing to center the spacer and it should slide right on. Pop on the drive-side end cap, check that everything spins smoothly, and you’re all done.
As always, I hope this repair guide was useful, and if you’re not sure about something, please feel free to ask questions in the comments below and I’ll do my best to answer them for you. Good luck.


4 Comments
Jan 12, 2024
Jan 12, 2024
Jan 12, 2024
Jan 12, 2024