
Wheel truing is one of those tasks that is daunting to a lot of people – often viewed as some sort of dark art only to be mastered by beardy bike wizards that have spent years and years learning the craft. Thankfully, this isn’t actually the case, and anybody that can turn a wrench on their own bike can true a wheel.
Wheels are, at their most fundamental level, pretty basic. You have a hub in the middle, a rim on the outside, and spokes connecting the two that hold the hub up. The hub is held in place by spoke tension – the spokes on the bottom hold it up, and the spokes on top prevent the spokes below from compressing too much. The spokes also control the “true-ness” of the wheel, meaning how straight it is from side to side, which is known as lateral true, and how round the wheel is, known as radial true. The main thing that controls these factors is the spoke tension, and this is affected by the nipples. The spokes are essentially a bolt and the nipples are a nut — thread the nipple further onto the spoke and it pulls it tighter, back it off and it loosens.
Aside from getting deeper into the more beard-twiddling aspects of wheel-building techniques and other things, that’s the most basic breakdown of the way a bicycle wheel works, the fundamentals of which have not changed in hundreds of years. This is the beauty of the humble bicycle wheel. In its simplest form — a regular hub with J-bend spokes, threaded nipples, and a rim — there’s such a depth and breadth of knowledge spanning generations, and there are readily available spares anywhere you go. Happily, this also means that if you are methodical in your approach it’s quite difficult to mess up.

How to check a wheel
Truing wheels is something that a lot of people find difficult, or at least they imagine to be difficult. It’s also the element of a wheel that can be most visibly ‘wrong’, so to speak. It’s easy to spin a wheel and see if it has a wobble in it, and this is one of the quickest ways to check your wheel health. When you spin the wheel, it can be pretty obvious when it’s moving side to side. A millimeter or so is, in my opinion, pretty acceptable on a mountain bike wheel. Any wobble larger than this and you may want to consider truing your wheel. It’s worth checking also that the wobble is not in the tire casing, since this is fairly common and tire inserts such as Cush Core etc. can exaggerate any tire wobble. When the wheel is in a truing stand it’ll be fairly obvious whether the wobble is in the wheel or the tire.
The other way to check the health of your wheels, and arguably more important, is by checking your spoke tension. Since the tension in your spokes is what holds your wheels together and ultimately keeps your bike rolling, this is the more critical thing to look after, and it only takes a few more seconds. Starting at the valve, just grab each spoke and try to move it in the middle or pluck it like a guitar string until you’ve checked each one. This isn’t an accurate way to check spoke tensions, but if you have one or two spokes that are completely loose you’ll find them quickly this way. Once you’ve found some loose spokes it’s time to tension and true your wheel.

Why is wheel tensioning and truing important?
As I mentioned before, spoke tension is critical as this is what holds your entire wheel together. If spokes are not at correct or even tension, this puts more load onto some spokes than they’re meant to take, putting additional stress on them. Imagine a spoke that’s completely loose — that spoke is now unable to support the load of the hub, and it’s unable to support the opposite spoke. Both of those spokes will bend, and stress will concentrate at the threads and the J-bend, eventually snapping. Riding a wheel with loose or missing spokes will eventually end in lots of snapped spokes and a wheel that needs to be totally rebuilt. This is why it’s important to replace any broken spokes immediately, to prevent damage to other spokes.
Truing is important too as it keeps your wheels running straight and predictable on the trail. A big buckle will be something you can feel on faster trails and roads, and a big enough one has the potential for your tire to rub on your frame or fork and possibly even all the way through a carbon chainstay. Yes, it does happen. Truing a wheel isn’t as important as it once was. Back when we all used rim brakes and a slight buckle in the rim meant your brakes didn’t work properly or at all, it was important to keep your wheels true. These days we’re all running disc brakes and for the most part, having straight wheels isn’t all that important, which is great because it means we can focus on spoke tension instead, which is much more critical.

Wheel truing tools
Now that we’ve decided that it’s time to true a wheel, we’re going to need some tools. Depending on the level of precision you want to get into, you may want all or almost none of these tools. The only one that’s really 100% necessary is a spoke wrench.
- Spoke wrench: Most common square nipples use a size 0 spoke key. Check out this Park Tool guide for more information.
- Spoke tension meter: Arguably the most important tool after the spoke wrench. It is vital for accurately reading your spoke tensions and makes truing a wheel immeasurably easier. This Park Tool gauge is not the most accurate but works great.
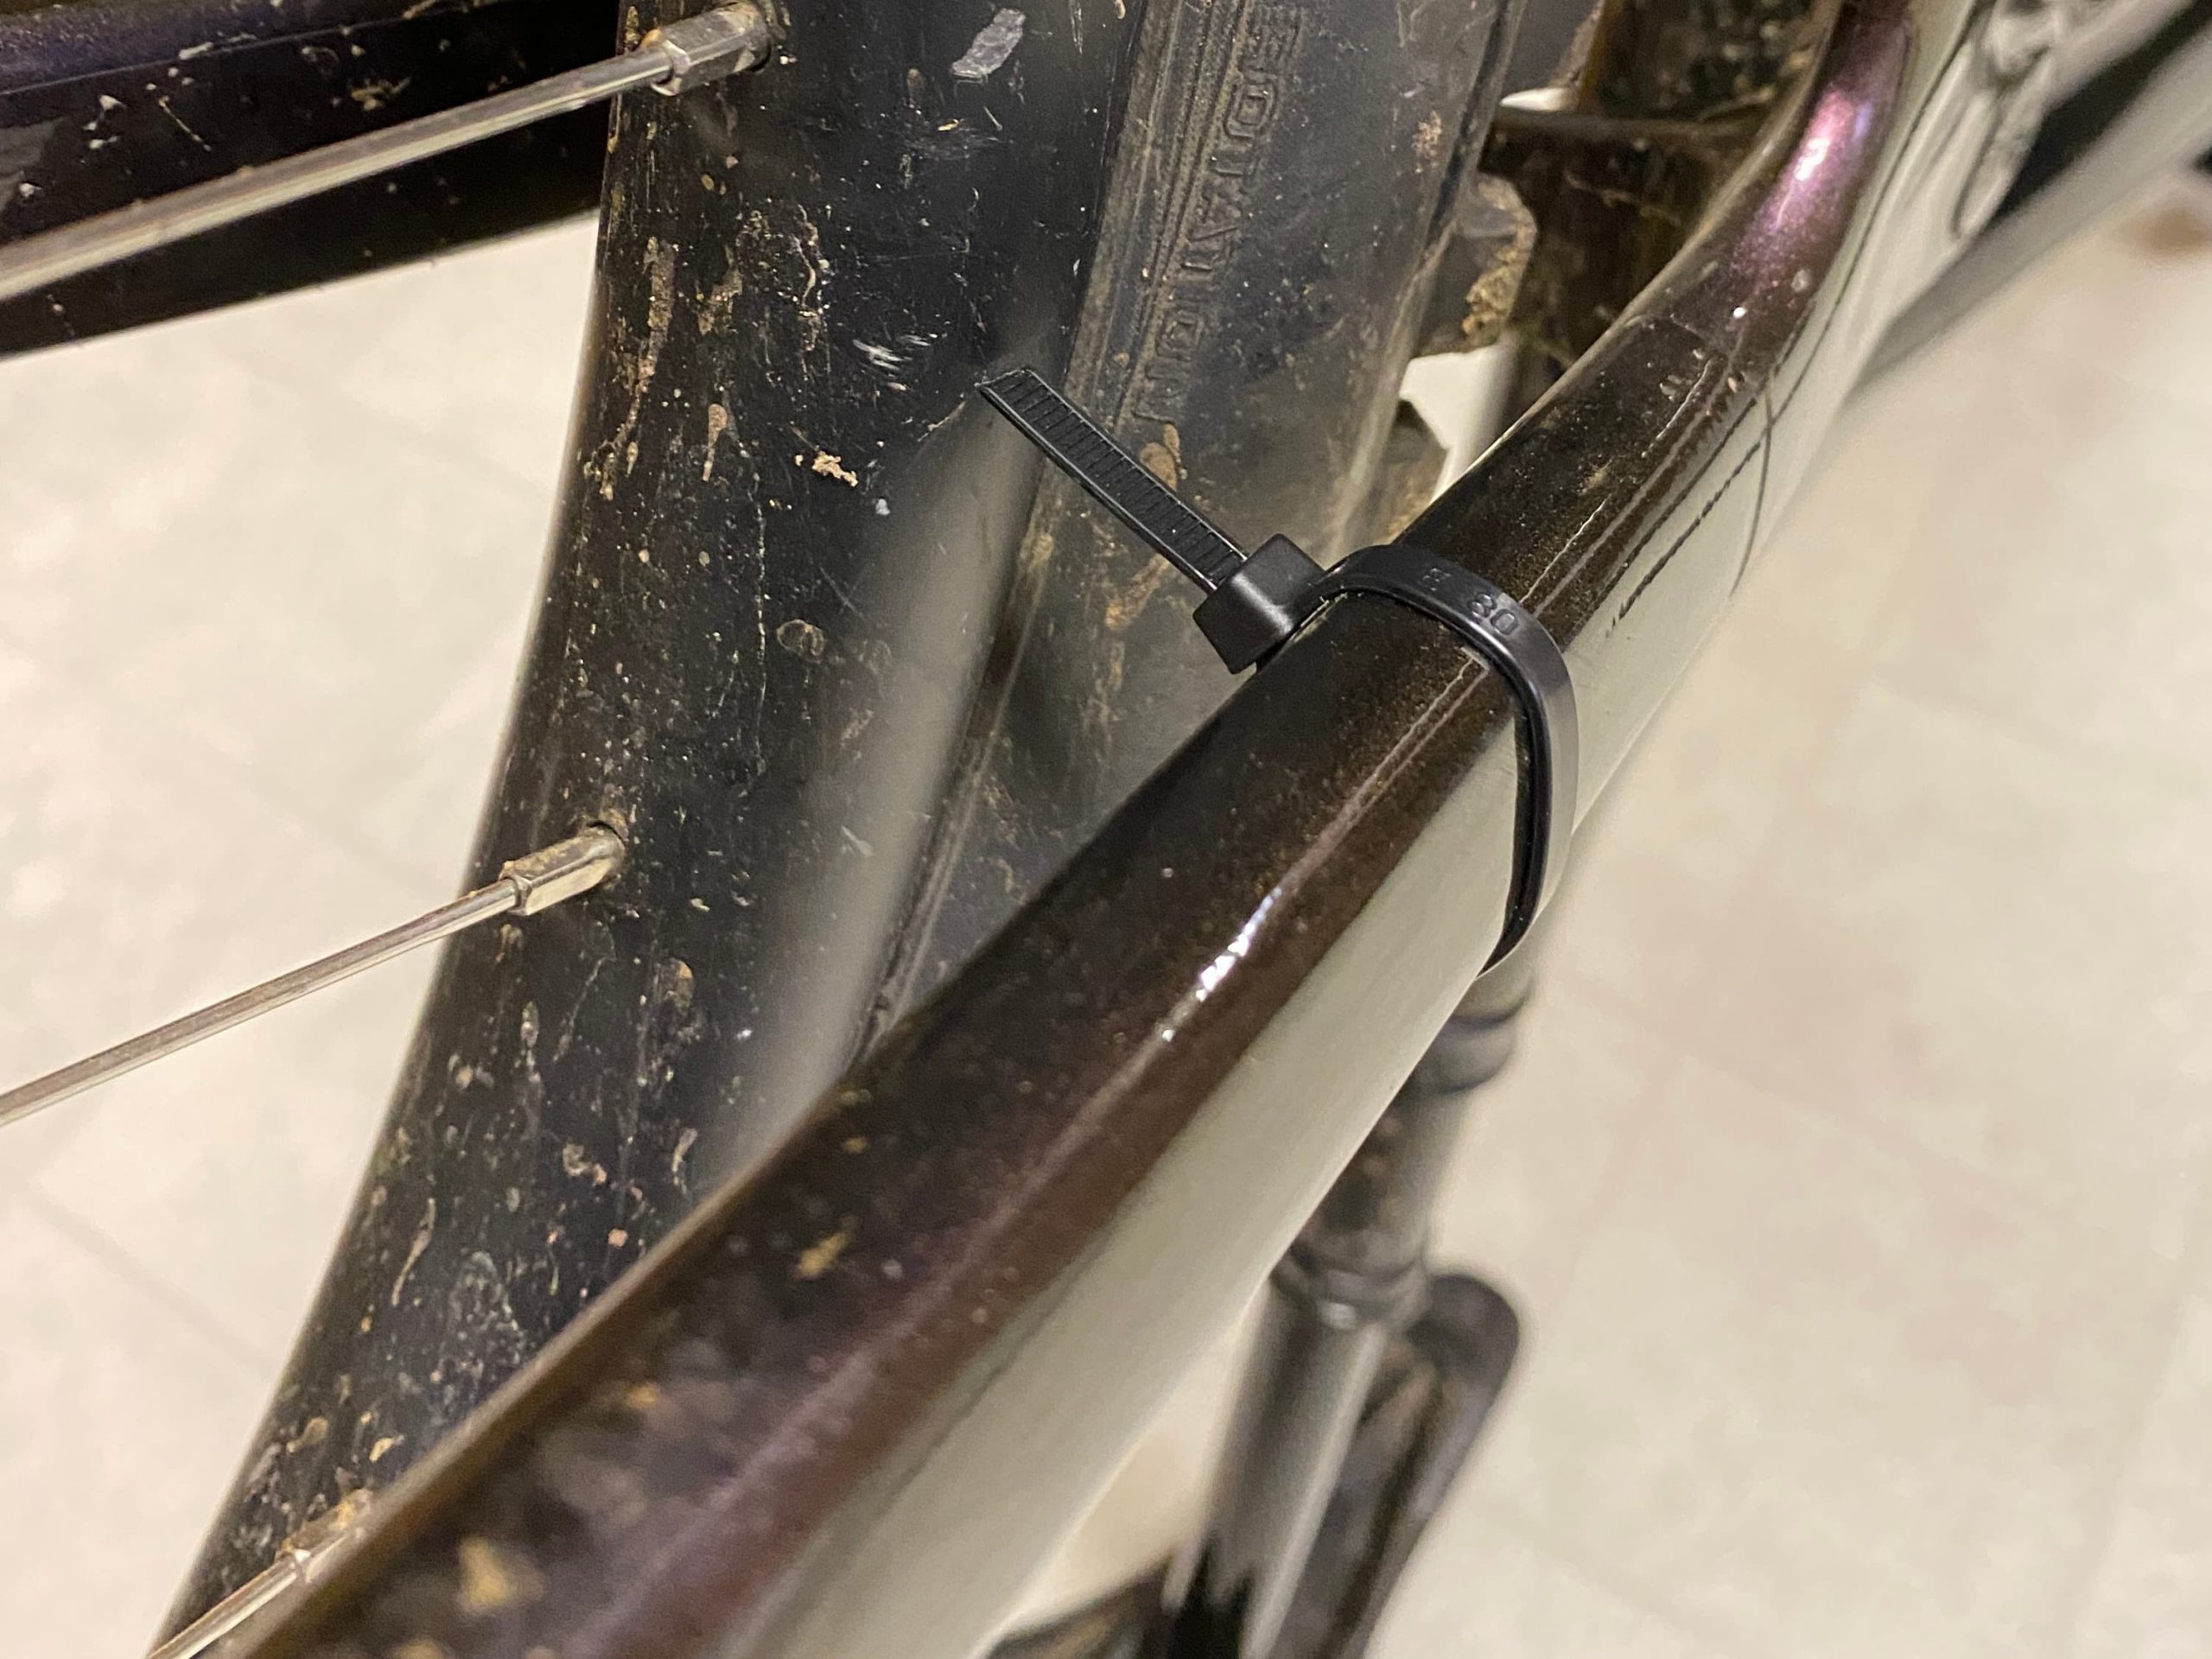
- Truing stand: A quality truing stand goes a long way to getting the wheel true with gauges for showing where the wheel is out of alignment. If you don’t have one, a zip tie on your frame or fork also works. This Park Tool TS-8 stand works great for home mechanics.
- Dishing gauge or dish stick: This is a gauge for checking that your rim is centered over the hub in the frame. It’s useful, but not really necessary for a home mechanic. This Park Tool WAG-4 will be more than most people ever need.
How to tension and true a wheel
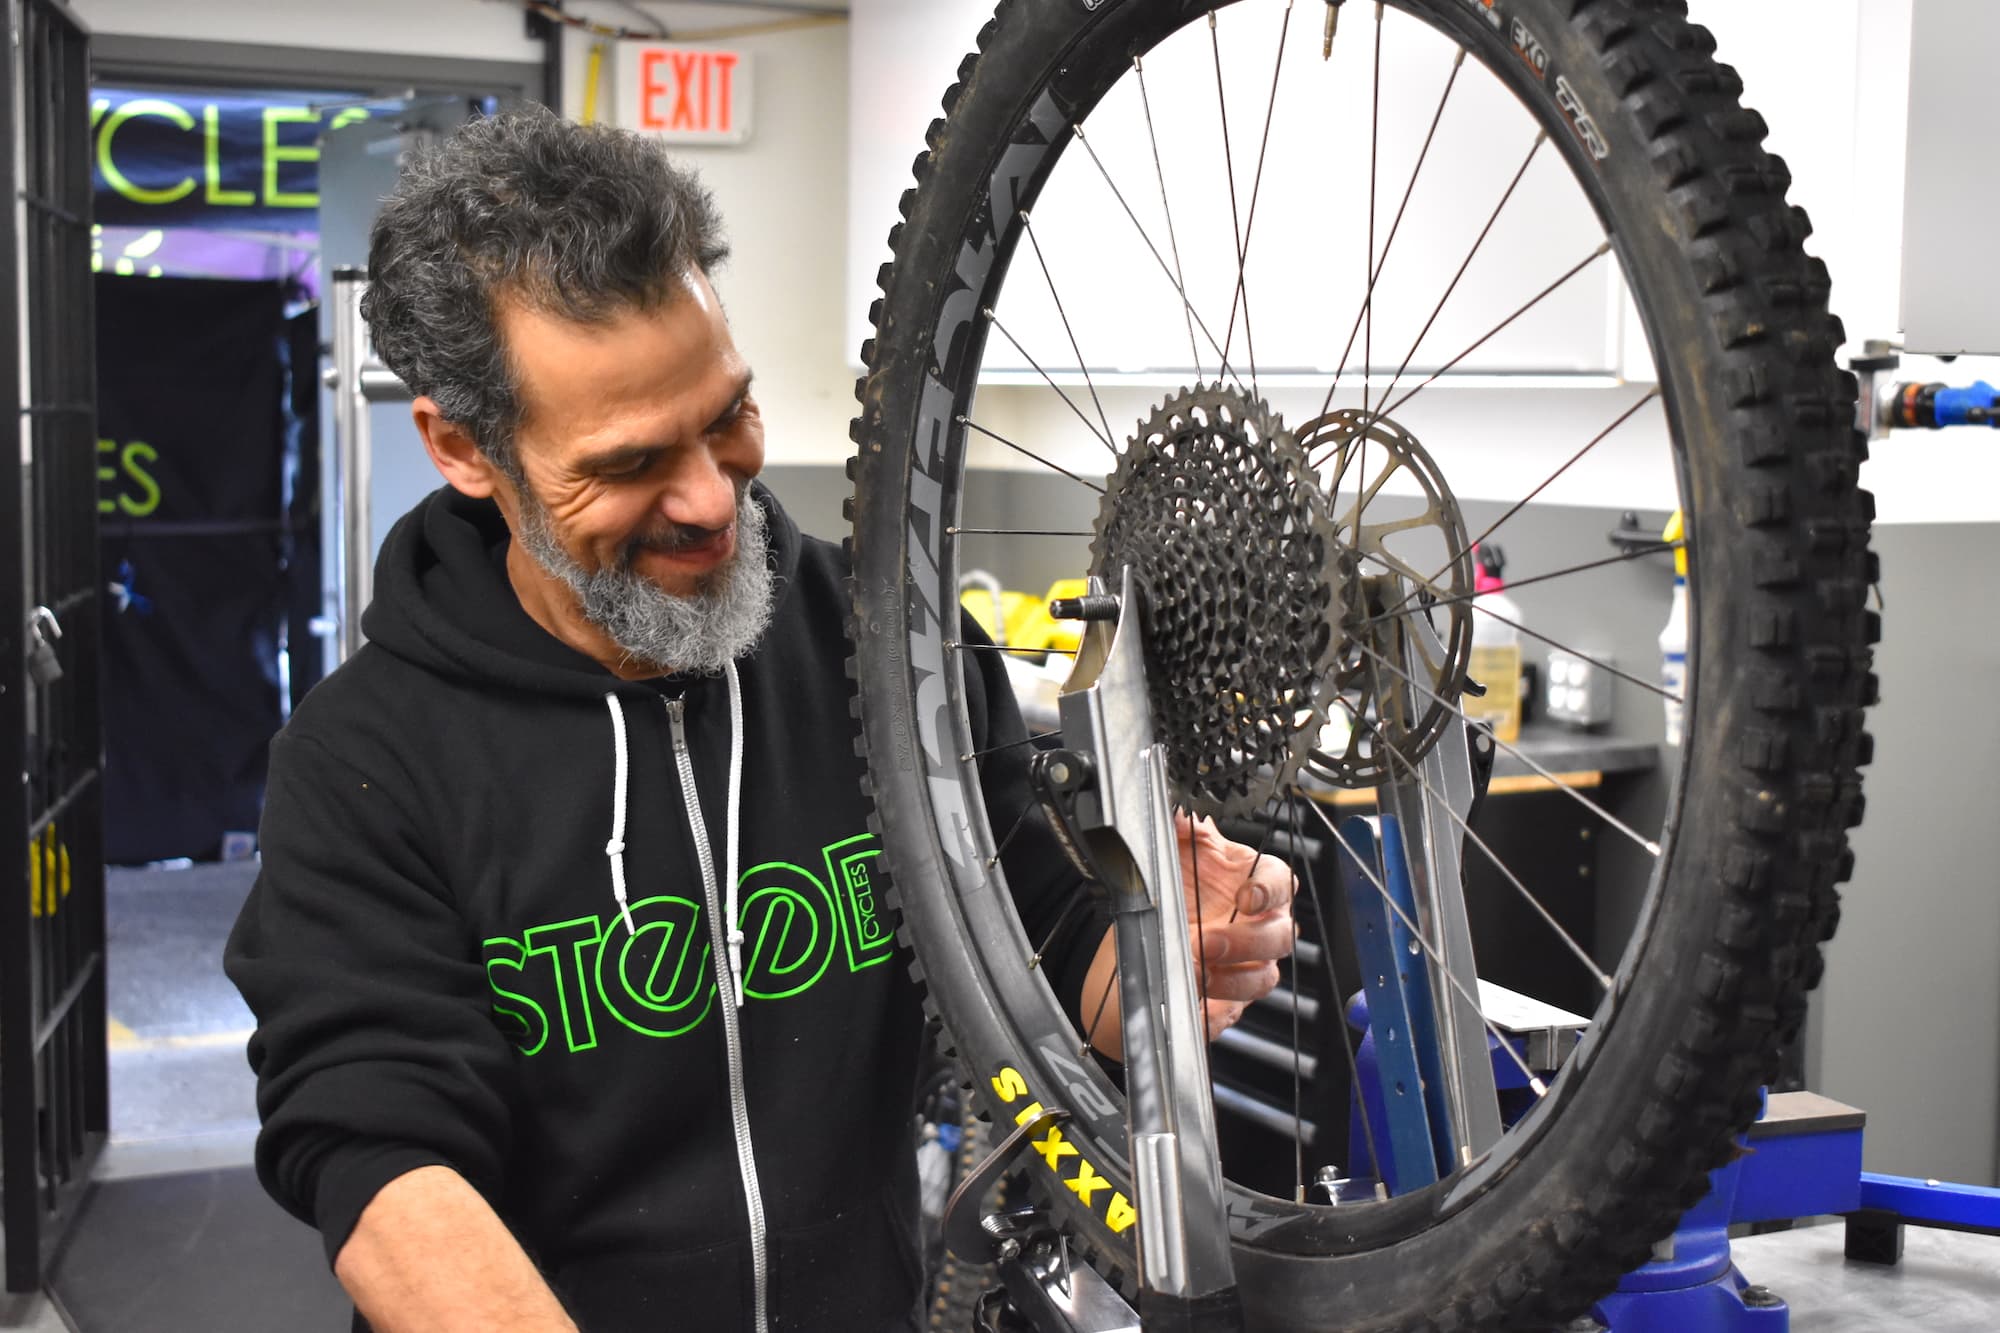
Now let’s get into the meat of it, and trust me this isn’t as hard as you think. Once we’ve decided that the wheel is out of true, it’s time to get the wheel in the truing stand. If you don’t have a truing stand, simply wrap a zip tie around your frame/fork and trim the end so that it’s a millimeter or less from your rim. This way you can see any deviations in alignment.
The first thing we need to do is get the wheel up to tension. This is where a tension meter is super useful. Without a tension meter you can move the spokes with your finger or tap them with your fingernail or a screwdriver to hear a tone, like a guitar. This isn’t particularly accurate but better than nothing. When you find a spoke that’s loose, tighten the nipple with your spoke wrench until it’s the same tension as the other spokes around it. On a rear wheel with a symmetrical rim, drive-side spokes will always be higher tension than non-drive, and on the front, your disc-side will always be higher. This is because the hub is offset to account for the cassette on the rear and the rotor on the front. On asymmetrical rims, tension is often the same on both sides, but the important thing is to get all the spokes on each side even – if one side is higher than another this is normal. Tension meters often come with conversion charts, and most rim manufacturers specify an ideal tension on their website.

Once the wheel is up to tension we can move onto truing. Truing the wheel can be the more daunting task but it’s simple enough if you work slowly and methodically. Spin the wheel in your truing stand or frame and see where the rim is out of true. I like to look for the biggest wobble where the rim moves away from the zip tie or truing stand calipers and start there. Where it moves away, you can tighten spokes on the side that you want to pull it over and loosen on the opposite side. I like to work in odd numbers, so starting in the middle of the wobble, I move out in pairs. For example, for a really small wobble, you can simply tighten one spoke, for a slightly bigger wobble you can tighten the spoke in the middle of the wobble and loosen one spoke on either side. For an even larger one, you would tighten the middle spoke, loosen the two on either side, tighten the next two on either side of those, and so on.
The best practice to avoid over-tightening or over-correcting is to only make changes by a half of a nipple turn at a time. Less is more when it comes to wheel truing and this allows you to be pretty precise. Once you’ve tightened some spokes, keep spinning the wheel in the same direction and make corrections to any other wobbles there might be in the wheel. You can now keep going and making small changes each time you spin the wheel and it will slowly but surely become straighter with every revolution.

Once the wheel is true, it’s worth checking the dish of your wheel. Dish is how centered the rim is over the hub, and for most bikes the rim should be exactly in the middle. If the wheel was dished correctly before and you haven’t had to correct any major buckles, then your wheel is likely still dished correctly, but it’s worth checking. You can use a dish stick to do this which measures from the hub end caps, adjusting the center of the dish stick to touch the hub end caps on both sides. If the ends of the dish stick sit off the rim on one side then you need to tighten the rim toward that side to bring the rim to the center. Alternatively, you can simply set one of the calipers on your truing stand to just touch the rim, then turn the wheel around in the stand. If it now doesn’t touch or is pushing the caliper over, then you need to adjust the rim one way or the other. You can also eyeball the wheel in your frame or fork. If it looks roughly in the center, it’s probably good enough. If it sits off to one side, to the left for example, you need to tighten all the spokes on the right side of the hub and loosen all the spokes on the left. Again, just go half a turn at a time to avoid over-correcting.
If you want to go a little deeper, you can also try truing your wheel radially, although this is more difficult with a wheel that’s been well used. Move the truing stand caliper or your zip tie to the very edge of the rim, spin the wheel and see if the rim has a bit of an egg-shape to it. Where the rim moves inwards towards the hub, you can loosen spokes to let it out a little, or tighten spokes to bring a section of the rim closer to the hub. I like to work in threes here to keep things even, but obviously, you will be either tightening all the spokes or loosening them all. You’ll likely need to true your wheel laterally again once you’ve done this.

If you find any flat spots in your rim, these can be tricky. If they won’t pull out by radial truing the wheel, and quite often they don’t if it’s a very visible flat spot, the rim is pretty much at the end of its life. When I say flat spot, I mean a spot where the rim is no longer circular, usually due to a large impact such as casing a jump or drop. A flat spot moves a part of the rim toward the center of the hub and usually causes one or more spokes to completely lose tension. For the reasons I mentioned earlier, this usually results in spoke failure at one point or another and it’s often worth replacing the rim. However, if this isn’t an option for you, the best way forward is simply to get the spoke tensions as even you can and keep an eye on them. If you start snapping spokes or continually lose tension, a new rim is the only option.
That about covers the most basic parts of wheel truing and tensioning. The wheel building rabbit hole goes a lot deeper and there are many caveats, special cases, and weird spoke/nipple/rim scenarios I’ve left out here, but maybe something we’ll cover in the future. For now please feel free to ask any questions you might have in the comments section and I’ll do my best to answer them.


9 Comments
Oct 19, 2021
Oct 23, 2021
Oct 20, 2021
Oct 26, 2021
How much I enjoy building wheels and airing up tires on them and riding that first ride. It happens to be a territorial thing however, my bikes are my bikes since I did alla da work to make em bikes
Here is a link to the video; https://www.youtube.com/watch?v=p2jTrJYJGd8
Damn, this could require a 12 step program...
And a thank you, Sam, for the article that enlightens folks that they too can do some wheel work.
Hope this all helps peeps out.
Feb 9, 2022
Turns it out it wasn't as difficult as remembered it to be. I'm building a 29'er #downcounrty wheel-set next...
Feb 9, 2022
I enjoy the time spent on lacing up a pair of wheels and it makes my bike truly, my bike! Some assembly required, batteries not included...
Nov 13, 2022
Nov 14, 2022
Having appropriate bike tools always makes the job quicker and easier - I always say that money spent on tools is never money wasted (at least that's my justification for an ever-expanding tool kit). As I mention above, it's certainly possible to do without, but it will make your life easier. Since a truing stand is a relatively big purchase and not a daily-use type of tool, maybe you could split the cost between a couple of friends.
Just FYI, a friend of mine up in Whistler is making these - maybe worth a look
https://unwobbler.com/
Oct 20, 2021
Keep on with the good things, bicycle!!9