
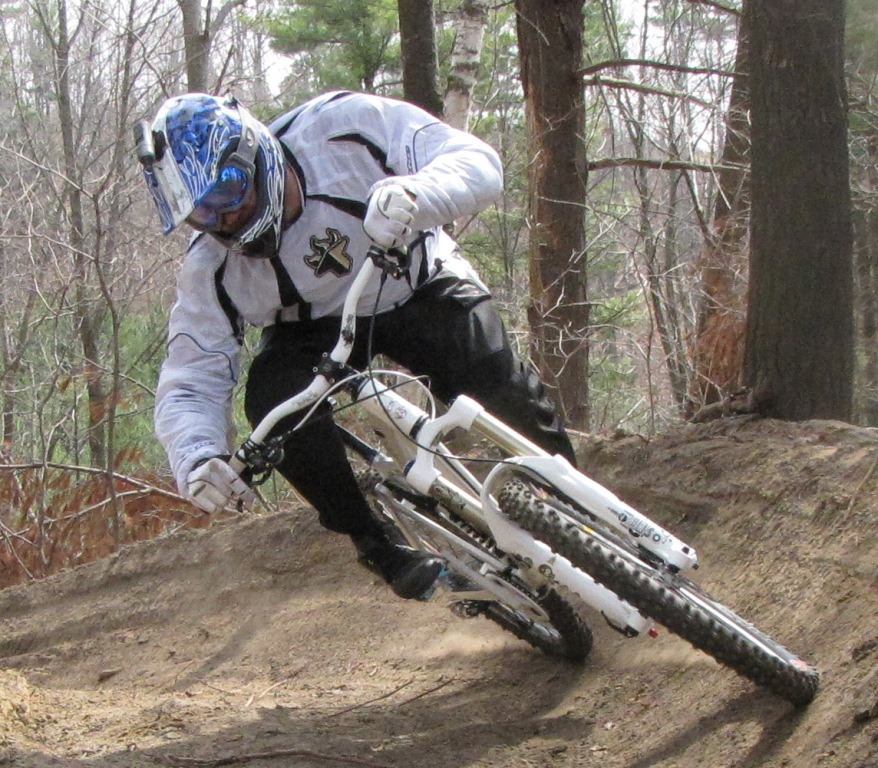
Words like tail whip, case proof, table tops, doubles, rock garden waterfalls, shuttle runs, and sessioning will get your heart pumping and adrenaline soaring but before you saddle up you need to make sure you and your machine can survive it all. I recently had the privilege of putting some time in with the RockShox Totem Solo Air fork and Vivid 5.1 rear shock on my Opus Nelson and not only did we survive – we owned it.
This year’s RockShox Totem Solo Air DH ($1096 MSRP) includes a high pressure pump as well as the SpeedLube kit. You have a choice of aluminum steering tube options (1 1/8″ straight, 1 1/8″ – 1.5″ tapered and 1.5″ straight) so if you’re in the need of a 180mm fork the Totem is sure to have you covered. My fork comes in at 5.8lbs which is more than half a pound lighter than the previous Totem coil I was running.
Installation and Setup
Since this fork costs over a thousand dollars and sports a 1.5″ steering tube, it may be wise to have someone with the proper steering tube cutting guide tackle installation for you. I recommend the SG-7 from Park Tool or a pipe cutter capable of cutting pipes over 1.5″ in diameter. Either way you go, it’s imperative that you get the steering tube cut straight and to the correct length the first time, especially if you’re not planning on using spacers. The proper tube length can be determined by measuring the steering tube, adding the stem measurement (the length of steering tube that the stem covers), and finally the stack height. Don’t forget to subtract 3mm from that total to allot space for the top cap. Check this article on how to install a fork for further information.
Once the Totem is installed it’s important to break in the fork. Pump in the recommended amount of air into the left fork leg and then jounce things around for a good 20 minutes or so to get all the fluids where they should be while relaxing the internals a touch. After that, it’s time to set up the Totem and head for the trails.
 The Totem Solo Air DH has settings for beginning rebound, high speed compression, low speed compression and air spring pressure. When personalizing my settings I usually start with air spring pressure. I put on all the equipment I normally wear on the bike – helmet, armor, hydration and snacks. I weigh myself with full gear and use that number to get the recommended air pressure setting. Looking at the sag meter on the right fork leg I set my fork at 25% sag.
Low Speed Compression
 Setting the low speed compression is the next step and it’s a good idea to start at full soft (about 4 clicks in) before adding clicks until you’re satisfied that the front of the bike doesn’t dive excessively when pedaling or hitting the brakes hard.
High Speed Compression
Finding the right high speed compression setting will take a bit of time riding as you need to get the speed of the fork up. The best way to check your settings is to take a drop or a square edged corner to get the shock reacting quickly. Again, I like start at about 4 clicks in and I keep adding damping until I have a controlled fork compression without the fork eating up all its travel and bottoming out (stopping abruptly in its internal bump stop). You will know you have too much high speed compression when you feel your wrists compress and an uncomfortable amount of force travels through your body on impact.
Rebound
 Rebound is the final setting to manipulate and you can also do this one on the trail. Here youre looking for a controlled return to ride height after the fork compresses. You dont want the fork to feel like its tossing you off the bike on return (too little rebound) nor do you want the fork to come up so fast that it feels like the fork is losing travel over multiple bumps (too much rebound). I set rebound so that when my palms are open and I press down hard, the returning force doesn’t push my hands away from the bars.
On the slopes with the Totem
Hitting my favorite testing ground with a new fork this early in the season was a real treat and I almost immediately noticed a difference in how the fork performed compared to the older coil unit that I had. Right off the bat the reduction in weight on the front end made it much easier for me to change direction through tricky obstacles. Consequently, going over flowy sections on the slope didn’t leave me as tired from pulling on the bars and left me with an ever bigger grin than usual.

The trails where I ride offer a great mix of rock gardens with progressively larger rocks (one of BTB’s favorite features to challenge riders) plus sections of super fast and smooth lines. These trails also go from raggedy, off-camber rooted sections along steep slopes to multiple step downs, step ups, and progressive table top jumps – basically your everyday freerider paradise.
 The transitions from fast stretches dropping into the tighter, technical rooty sections was great for testing the Totem’s low speed compression. This fork maintained its composure, controlling the attitude of my bike while braking and keeping the front end at ride height without feeling harsh in my hands. With the drop downs and table top jumps I felt like I was landing on a soft pillow before rapidly recovering with a controlled return to ride height. Whenever the bike hit the ground, the fork did its thing on initial impact, slowing me down without that harsh feeling on the wrists. Rebound also felt good coming back without bucking me off like a wild bronco.
From my tests I could also tell that this fork is tough – really tough. At one point I cased a jump so bad I had a few of my buddies on speed dial to 911 as I skidded across the dirt in a 720 degree body flip. There wasn’t a scratch or dent on the fork despite that tumble and everything still works great.
For those of you who are looking for a heavy-duty, single crown FR fork, the Totem Solo Air DH should be on a real short list of must haves. If pressed for a complaint about this fork I’d have to say I’d like to see a cable clip for the brake cable instead of having to use a cable tie (nitpicky, I know). I really love the simple layout and how easy it is to tune this fork; the high flow compression piston is my new best friend. And for those of you who love being an individual, the Totem comes with a massive sticker pack that allows you to make this fork uniquely your own. Check out the RockShox website for further details.
My overall ratings (out of 10)
| Tracking and steering | 8.5 |
| Rebound control | 9.5 |
| Compression control | 9.5 |
| Construction and quality | 9.5 |
| Trail worthy 1 For light XC, 10 For extreme FR/DH | 10 |
| Overall performance quality out of 10 | 9.5 |
Specs from RockShox:
| Travel | 180mm |
| Weight | 2634g (5.80 lbs) |
| Damping | Mission Control DH, Dual Flow |
| Spring | Long Travel Solo Air |
| Adjustments | External Beginning Stroke Rebound, High Speed Compression, Low Speed Compression, Spring via air Pressure |
| Crown | Forged, AL 66 TV, Anodized Aluminum |
| Steerer | Aluminum 1 1/8″, 1.5″, Tapered 1 1/8 – 1.5″ |
| Upper Tubes | 40mm, 7000 Series Straight Wall Aluminum, Low Friction Anodized |
| Lowers | Magnesium, Maxle Lite 20mm Axle, Post Disc Mount |
I would like to thank the folks at RockShox for providing the Totem Solo Air DH for review, and of course the good folks at OPUS for the Nelson as my test bike. Stay tuned for the Vivid 5.1 review.


5 Comments
Apr 21, 2010
Apr 21, 2010
LOL, not going to lie though, the XC-weightweenie in me nearly had a heart attack when you mentioned "My fork comes in at 5.8lbs which is more than half a pound lighter than the previous Totem coil I was running."
Apr 21, 2010
Apr 30, 2010
Apr 21, 2010