

The most exciting moment in my first photojournalism class was when my professor moved us into the sports segment of the course. That meant we’d get to learn how to shoot action, which was at the top of my list, and panning shots were something that we all needed to learn.
For someone enthralled with mountain bike media, the idea of going to college and being taught how to take a panning shot signaled to me that I was on the right track, even though I was a year away from completing my degree. The beginning of that track was not so glamorous either.
After explaining the proper technique, the instructor marched about fifteen of us out to one of the busiest boulevards in Denver and had us try out panning shots on passing cars. I do a great job keeping to myself, but if there’s one way you want to stick out, then take a DSLR to a busy street and start taking photos of people as they drive by.
Immediately after adjusting to the recommended settings and trying them out, I started to get some cool shots, and the fun thing about a panning shot, and specifically one that involves capturing mountain bikers, is that it captures the speed and feeling of riding really well, and that can be a hard thing to do.
Over the years, I’ve continuously tried panning shots at different events or on rides, and they’re still one of my favorite techniques to use, and one that I am always trying to improve because there are so many variables. Here are a few things to try if you have a DSLR (or mirrorless) camera. And if you only have a smartphone, then there are still a few ways to snag a panning shot.
Don’t sweat the technique
First off, it is best to be comfortable with shooting in manual mode. Learning manual mode allows you to really understand the camera’s mechanics and how they interact in an exposure. A panning shot keeps the subject or rider in focus and blurs the background in a way that conveys their speed and the direction they are traveling.
This happens by adjusting the shutter speed to a much slower rate while keeping the camera’s focus locked onto the rider. Because the shutter speed controls how long the shutter is left open and how much light is let into the camera, it’s necessary to bump up the aperture to let less light in.
Typically, it’s going to be best to shoot under 1/100, but for a more dramatic photo, you’ll want to try it much slower. It’s also still possible to get a shot with a faster shutter speed. As far as the aperture, it’s usually a given to move it up to at least f/8 or higher.
As far as the rest of the settings, if you’re familiar with manual mode then this won’t be much of an issue. It’s also possible to set the mode to shutter priority, where you’ll only control the shutter speed and the camera will determine the aperture per exposure. I usually shoot at the lowest ISO possible to avoid any noise in the image, and with my ISO set to cloudy or auto.
I also find it helpful to switch to a high speed, continuous shutter mode. If you’re making a friend hike back up every time for a shot, they will appreciate the fact that you’re trying multiple times on one run to get a shot. Then with every run, you’ll have multiple chances at getting something good.
The focus mode can be a preference. A larger focus mode can help the camera focus on a moving object more easily, but a smaller focus mode can feel more precise if you trust your aim and tracking skill. Try both, or try your preferred focus mode. A fast, and high quality lens will also help tremendously.
As with other photos, I try to avoid having the subject dead center, because compositionally, it’s usually less interesting, so I’ll try to put the focus toward one end of the frame. The trouble with using other compositional techniques with a panning shot though is that the frame is constantly changing, so it’s a little harder to plan things like leading lines, or framing.
In action, it will happen like this: Find the spot you want to shoot from, where you know riders will be passing by. Keep your eye in the viewfinder, and your finger pressed down on the shutter halfway to keep the lens focusing on the subject as they are moving. Snap when they are in your desired position and keep it down until they are completely out of frame. Depending on their location, you may need to operate the zoom on the lens.
Differences in shutter speed
So, to recap, there are really two main things to adjust on the camera before shooting panos, and those are shutter speed and aperture. With that, there are big differences in a photo that’s shot at 1/160 and one at 1/30. To illustrate, let’s look at some examples.
At a higher shutter speed like 1/160, there’s a greater chance that your subject will be in focus. The background won’t be as exciting though. On the other end of the spectrum, shooting at a much slower speed, like 1/30 makes for a really fun background blur, but it can be difficult to get the rider in focus depending on your position and the rider’s speed.

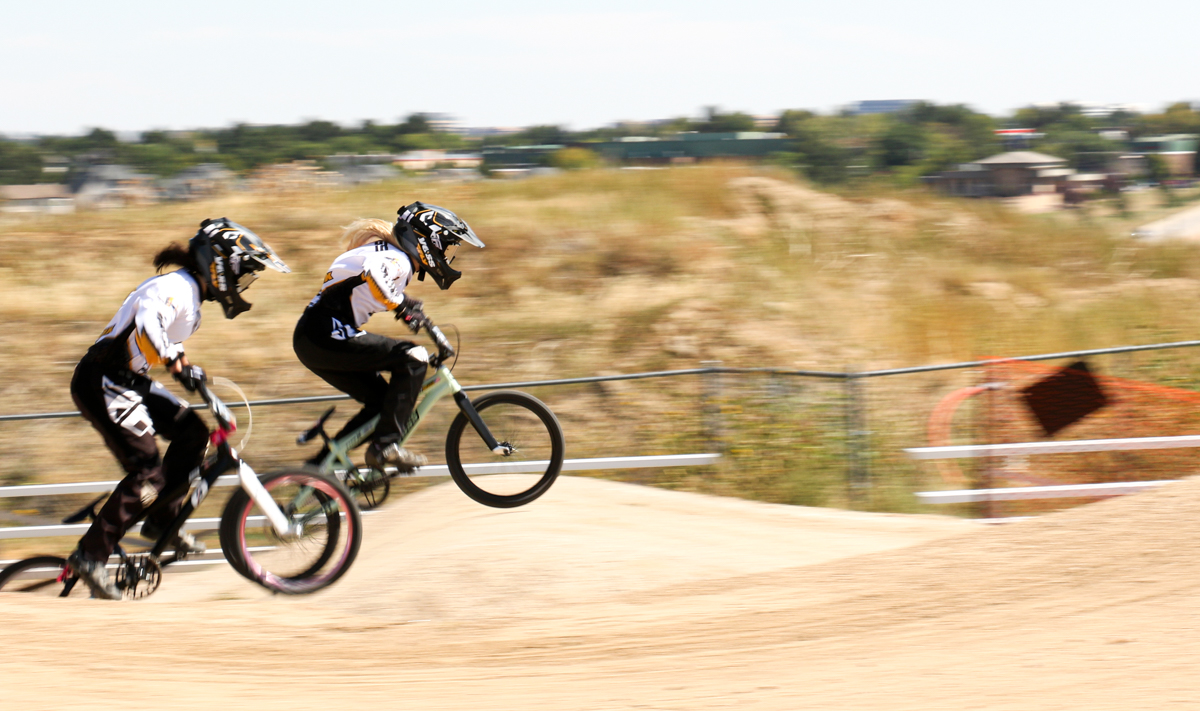
I shot the above photo at 1/160, and f/16 which is probably a faster shutter rate than a lot of photographers use panning. The tradeoff though, is that the subject, Cody Kelley, at the 2018 Crankworx RockShox Pump Track Challenge, is almost entirely in focus aside from his wavy blonde hair.

Everything from his eyes to the sole of his shoes are still sharp, while there is still a blurred background. This also has something to do with the f/16 aperture value, and likely helps bring a little more detail into the entire photo. To compare though, here is another shot, taken at a much slower, 1/60 of a second, and still the same f/16 aperture.

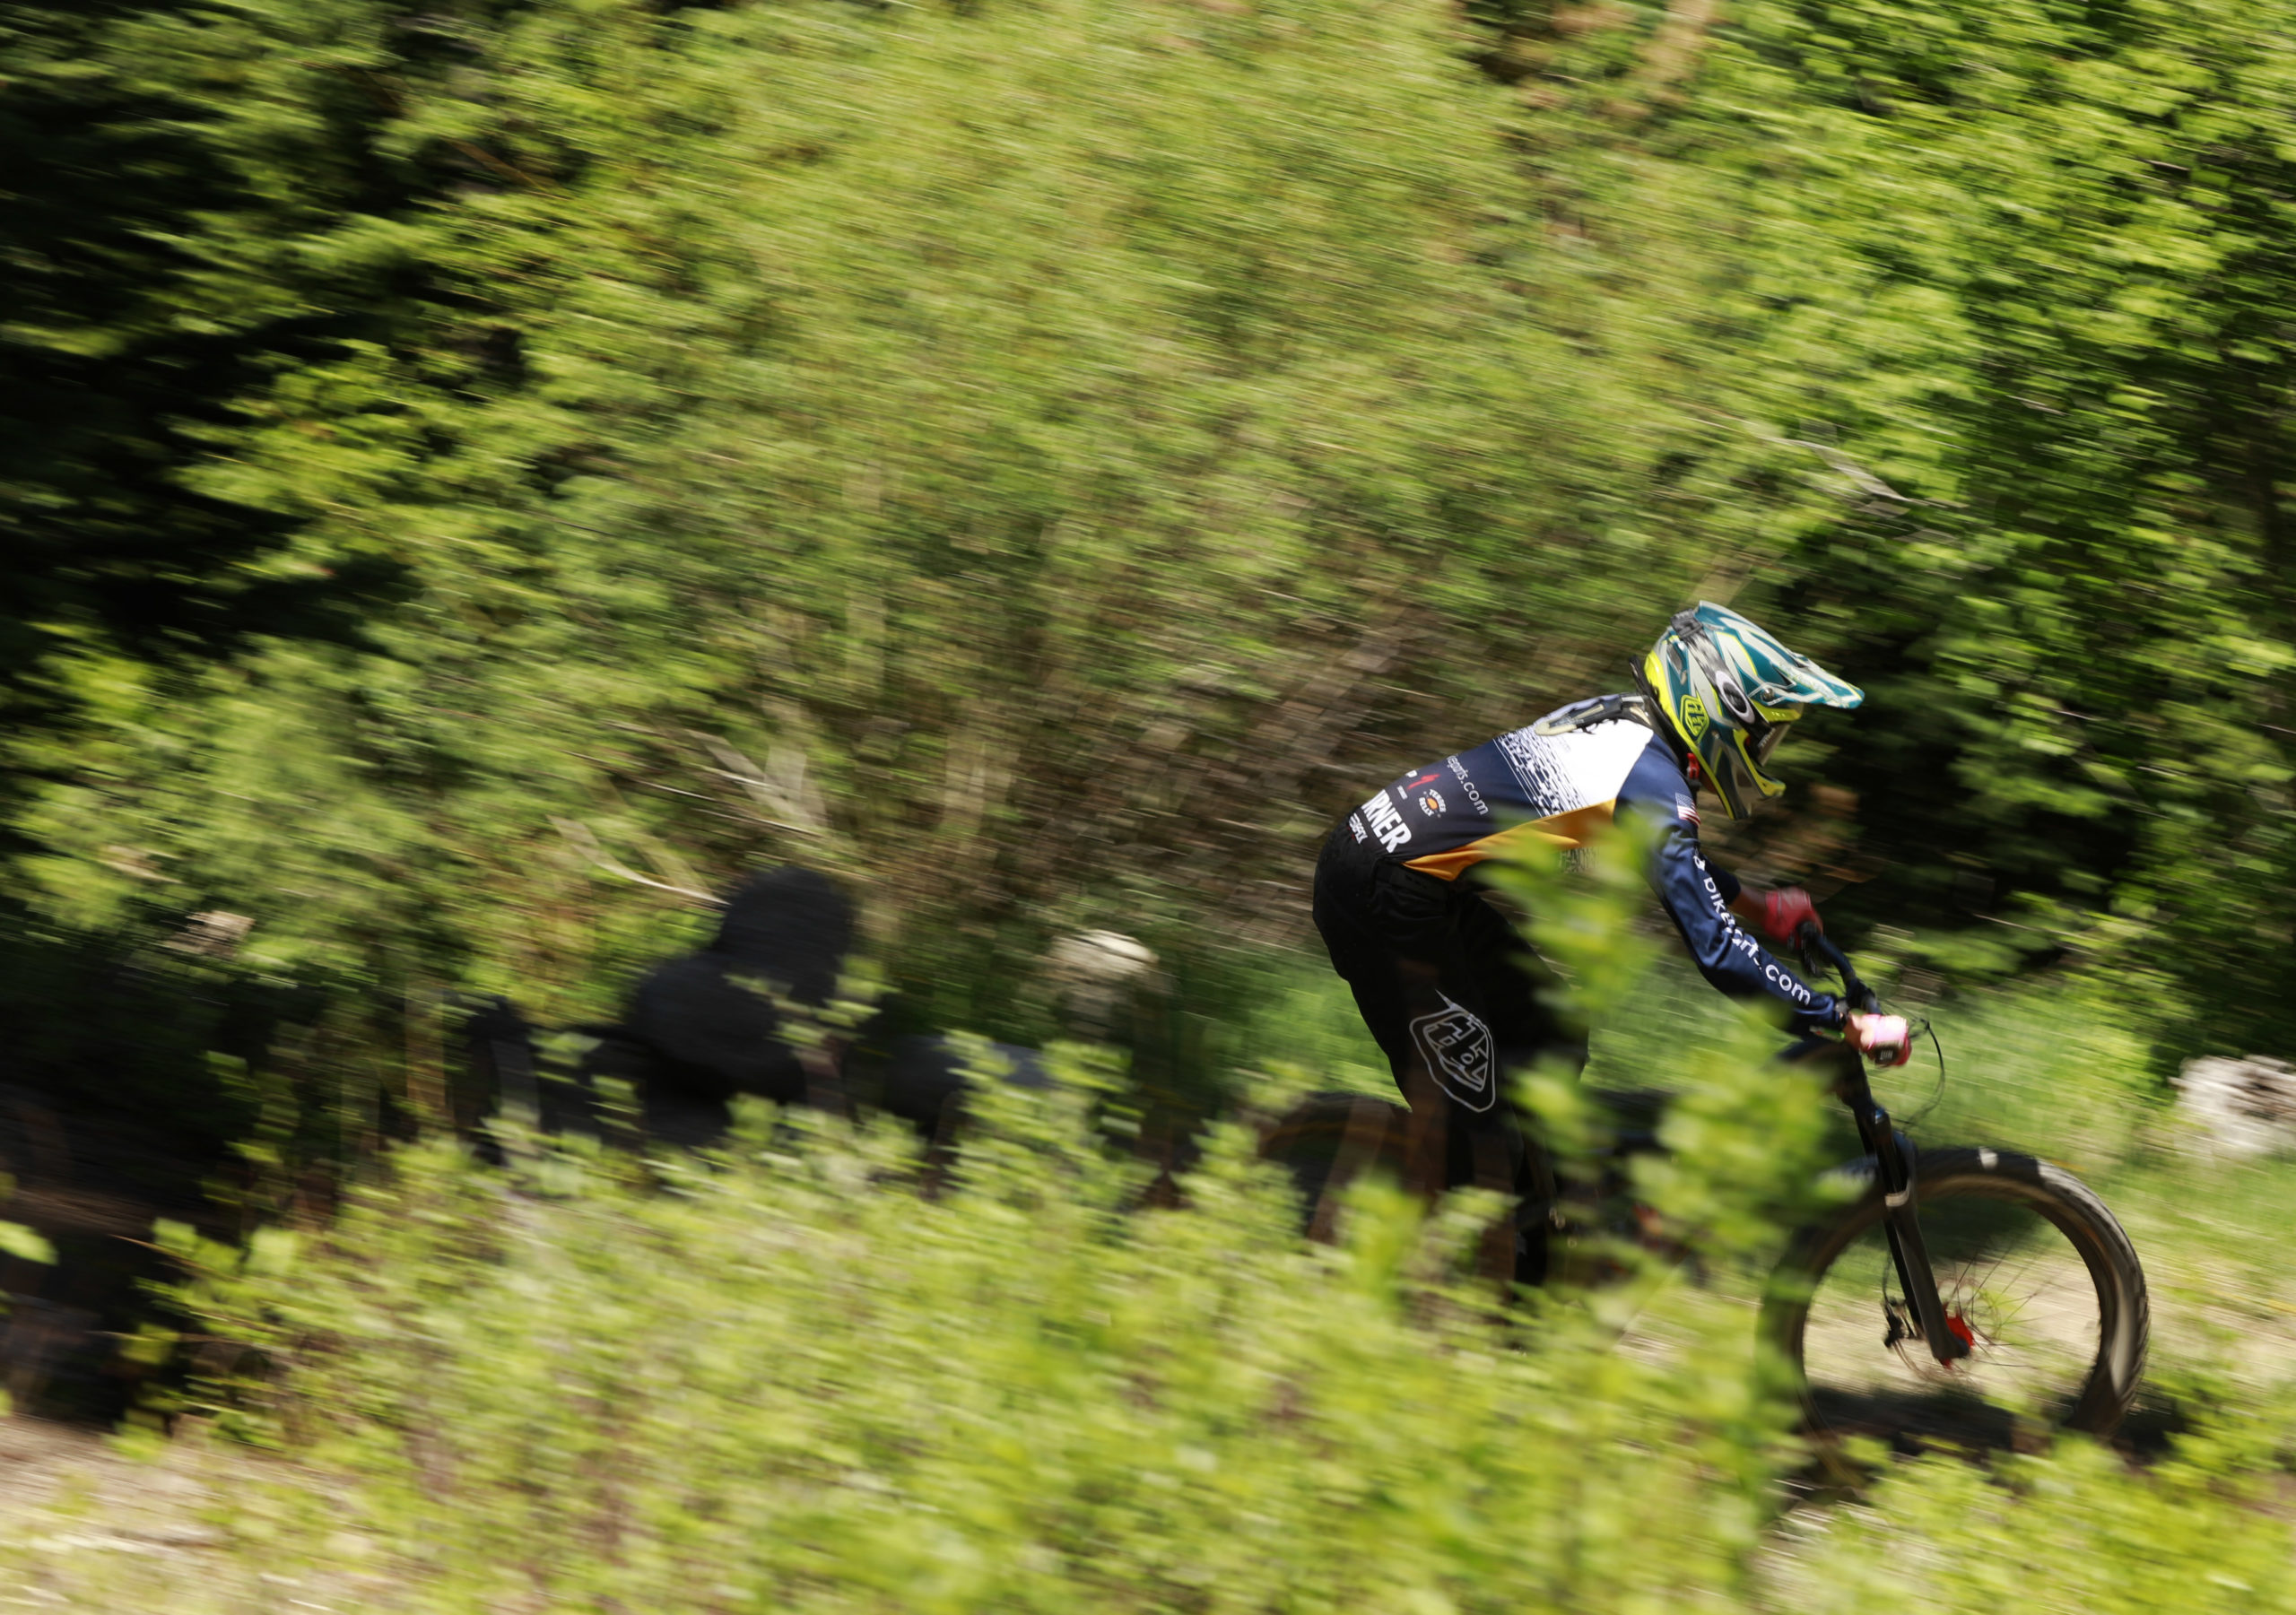
This photo above, taken at a local cyclocross race a few years ago happened during a fall golden hour. The blur is a little more exciting, but still with fun detail in the background, like the shrubs he’s riding past, and the other rider heading in the opposite direction.

This photo of two riders heading into the warm-up at the SPANK/IXS Whip-Offs at Crankworx Whistler was taken at 1/30 of a second and f/16. The motion blur and speed looks more dramatic, but it’s still fairly easy to distinguish where depth is in the background, and the narrower aperture again helps capture more in focus, otherwise, it would have been more challenging to get both riders as sharp as they are.
Differences in aperture

This photo illustrates the difference it can make shooting with a more open aperture. For this one, I was using a 300mm prime lens, with the settings at 1/100 and f/8. With the f-stop more open, the rider pops more from the background and there is a more dramatic blur, and less in focus in the background.

This photo, also taken during last year’s Whip-Offs at Crankworx, was snapped at a slow 1/30 of a second, and f/9. I was also shooting at a wide, 18mm angle so I needed to get very close and was about five feet away from the rider.
With the combination of a slow shutter speed and more open aperture, it does a few things. The rider pops from the background, there is an intense motion blur, and the photo starts to lose a lot of background detail where the light comes through.
Angle and direction of the rider

Depending on your angle from the rider or their trajectory, there are a few things to note. If you are shooting straight on, and the rider is passing along a horizon from right to left or vice-versa, then it will be faster than if you are snapping someone arcing in the air off of a jump.
This shot above, of Jordie Lunn, at the last year’s Whip-Offs, was snapped after he took flight on a jump. With the rider arcing, or coming at you from an angle, it will appear slower than if they are traveling perpendicular to you at a horizon.
If you are in a position where the rider is coming toward you, then you may need to zoom out while tracking them in the shot.
Panning will also have a different outcome depending on how far away you are from the rider. If you are closer to the rider then the background will blur more, but the tradeoff of is they will move more quickly across your horizon if you’re only five feet away from them instead of 20, making the shot more challenging. The same is true in reverse.
With a phone

The best camera out there is the one on your body. If you don’t have a DSLR, or mirrorless camera with countless settings, well it’s still possible to get a sweet panning shot, and actually much simpler. The limitation will obviously be the lens, but it doesn’t have to be. Because phones have a digital zoom, which basically just crops the photo, I try and stay away from using it, and use the wide angle lens on the camera as I would on any other. Just shoot wide and get close.
The technique is executed in the same manner, and when you are ready to shoot, pan your phone with the rider, while holding down the shutter on your camera phone. The camera should automatically focus on the rider, and you’ll have multiple shots. Easy, peezy.
Editing tricks


There are a few things that you can do to make the photo look even more dramatic. One of the first things to consider is cropping. Cropping the frame in closer to the rider makes the blur look more intense. For the above photo, taken at Red Bull Joyride in 2018, at a slow 1/25, and f/20, the lens quality and lighting already made it a pretty exciting photo, so I only cropped it in to make it look more dramatic. That gives viewers less of a sense of the background overall and focuses on the rider and speed.
It can also be helpful to increase the contrast in the photo, making the highlights and shadows more intense.

For the photo above, shot at a Big Mountain Enduro race in Keystone, Colorado in 2017, I increased the contrast and cropped it closer into the rider, and played with the brightness. A few small tweaks made the photo much more interesting and the color less dull.


I’ll revisit this shot of Jordie Lunn again to note some editing differences. The color version on the left is straight out of the camera, and on the right, I cropped it in very close, changed it to black and white, and played with the contrast. By cropping it much closer, the motion blur is more evident as Lunn screams past the trees.
Closing thoughts
There’s a lot to think about here, but put simply: start simple. Slow your shutter speed down, bump up the aperture, and keep the rest of your settings reflected on the surrounding light. Panning photos take a lot of practice, so be patient, give them time, and try them in as many combinations you can think of, with shutter speed slower or quicker, and the aperture narrower or more open. Most importantly, have fun and keep at it.


1 Comments
Mar 26, 2020