

Mountain bike component companies often have a few staff members who have been around since the dinosaurs were riding with rim brakes and elastomer forks, and many of those folks moved over from working in the moto racing world. Jude Monica from Magura is one such character, having wrenched around the pro MTB circuit during the heyday of athletes like Jonny Tomac. Monica started with Magura in 2000, bringing his deep knowledge of moto road racing to the benefit of the brand. He was first looking at hydraulic disc brakes as a good innovation for mountain bikes before they were in regular use, and watched the hesitant shift to where we are today; totally in love with our powerful stoppers.
We recently chatted with Monica about some of the methods that all hydraulic brakes use to function properly. Two of the elements that are largely universal at the caliper are: how the pistons and pads retract when you release the lever blade, and how those pistons adjust to thinning pads as the braking material wears away.
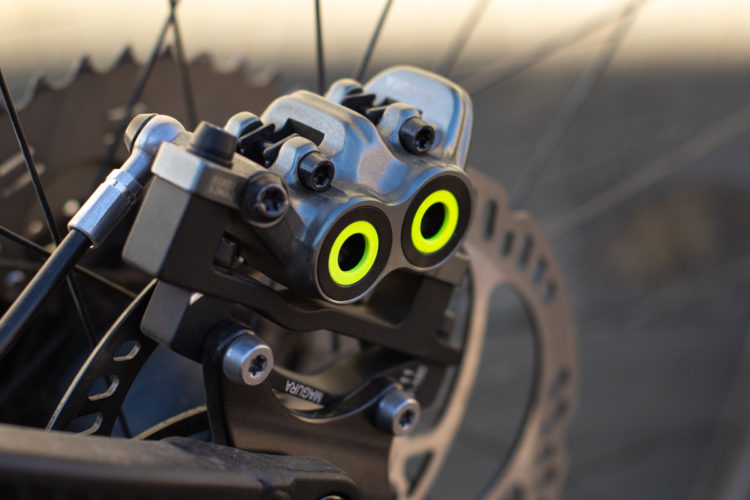
To start at the finger, there’s a spring that helps push the lever blade back as you release pressure from your digit. However, that doesn’t pull the pistons and pads back. There’s one very intricately designed rubber quad-ring that flexes to do all of that work, with the aid of some precise shaping along its flanks. The photo below, coupled with Monica’s explanation, should make it clear how this surprisingly simple system functions.

In the image above, a Magura brake caliper has part of the aluminum caliper body cut away to reveal the piston seat and the seal that holds the piston in place and flexes as oil pressure is applied and removed. The piston never actually touches the caliper body itself. When you pull the lever blade, oil pressure pushes on the back side of the piston, and the quad-ring seal flexes inward to move the pads toward the rotor. If everything is working properly, the position doesn’t slide through that seal with every pull of the brake. Rather, the quad-ring flexes and molds into the angled chamfer on its inner edge until the pad hits the disc, and then it pops back. Violà, it’s that simple. The angled, or chamfered inner edge of the seal’s seat allows for more flex inward where the rotor is, while the flat outer edge of that seal seat stops it on the return.
Now, while the seal does flex instead of pistons sliding through the rubber seal with every braking event, the pistons do eventually move inward. The tiny cylinders adjust to pad wear by sliding incrementally through the seal toward the rotor by itty bitty amounts. This is why you have to push the pistons back into the caliper body before installing a fresh set of brake pads. Once more, for the sake of clarity, the pistons sliding inward through the seal is not what makes them move back and forth with the lever movement; that all occurs thanks to the quad-ring seal flexing to-and-fro.
Singletracks contributor Sam James mentioned another important piece of this equation that’s often misunderstood. A lot of folks think that they need to lube the pistons in order to maintain proper movement and pad engagement, but in fact, you want to do the opposite. The pistons will slide inward to adjust for pad wear without the help of additional lube, and adding lubrication between the piston and the seal can actually cause problems. If the surfaces between the position and seal are too slick, the piston will slide around in the seal instead of the seal flexing as it’s designed, resulting in a piston and pad that doesn’t retract properly. This is one of the many ways you can end up with rubbing brake pads. The piston needs the flex and retraction of that quad-ring seal in order to come back to its intended resting place. So, when you rebuild calipers it’s often a good idea to clean and reinstall the seals and pistons before any oil is introduced into the system.

On a final note, Monica mentioned that this flexing quad-ring, the inner chamfer, and the caliper design are the variables that determine where a pad sits in relationship to the rotor. A lot of companies have created systems like Shimano’s “free-stroke adjustment” and SRAM’s “contact adjustment” that shift things around in the lever’s master cylinder, affecting how and when the oil is pressurized by the lever, but those systems have no effect on where the pistons are situated in the caliper. This is worth considering, as brake manufacturers sometimes write confusing marketing copy around “moving the pads’ point of contact with XYZ adjustment,” when in reality that’s not what’s taking place. There have been a couple of “closed system” brakes in the past where this worked differently, but the majority of all modern mountain bike brakes use an “open system” that functions as described above. We will dig into the difference between those systems in future articles
We have other hydraulic brake explainer articles coming in the near future, featuring tips and tricks from a variety of industry legends. Please type any tips or questions in the comments below so we can share them with future DIY articles.


8 Comments
Feb 3, 2022
Feb 3, 2022
Feb 3, 2022
Jul 5, 2023
Thank you for the cutaway photo, it helped me see how far I could safely extend each caliper for cleaning. Much appreciated, and great work as always Gerow!
Oct 12, 2022
Feb 6, 2022
Feb 3, 2022
Mar 5, 2022