

On a mountain bike, you can cover 50 miles of backcountry singletrack in a day and still make it home for dinner. With the ability to cover so much ground, we often underestimate the need for simple gear on these epic rides. Below is a list of affordable and compact items that you’ll need to have for that next long day mountain biking through the backcountry.

[see_also id=’208454′]
1. Water Filter
Why choose a filter? Not all purification is the same. For instance, iodine does not kill cryptosporidium, a very common parasite in most water sources (even high altitude ones). Chlorine dioxide tablets do, but they take 4 hours, which is not conducive to a day ride.
I’m not referring to an expensive, clunky pump. There are several compact filters that work great at the fraction of the cost. The MSR TrailShot ($50) is designed for trail runners and mountain bikers alike — those who are moving light and fast. Squeezing the TrailShot pulls water through the pre-filter at the end of the hose and into the filter, then pushes it out the nozzle. You can use this with any bottle, or even drink straight from a water source.
[see_also id=’226953′]
The Sawyer Squeeze and Sawyer Mini are two other small, compact filters. They work the same, relying on a small pouch full of water to be squeezed, pushing the water through the filter. The Sawyer Squeeze ($50) allows for a higher flow rate than the Mini, but it’s larger. The Sawyer Mini ($20) is inexpensive and compact, performs just as well, but needs to be backflushed more often.

Note: Filters don’t remove viruses. If you know you’re in an area with very contaminated water, you may want to bring an additional way to purify water, such as an iodine tablet that you’d add to the filtered water.
2. Emergency Bivvy or Blanket
I’ve relied on an emergency blanket or bivvy far too many times to not recommend them. They’re light, cheap, and will keep you warm… ish. They’re not meant to keep you comfortable. But they will protect you from the elements.
The reflective coating on the underside works by trapping reflecting back the heat your body is putting out. Many are colored “safety orange” to stand out among the trees. They pack down small and weigh as little as 2.9 ounces. I’ve had the best experiences (or worst, depending on how you look at it) with the Emergency Blanket ($5) and Emergency Bivvy ($15) from SOL.
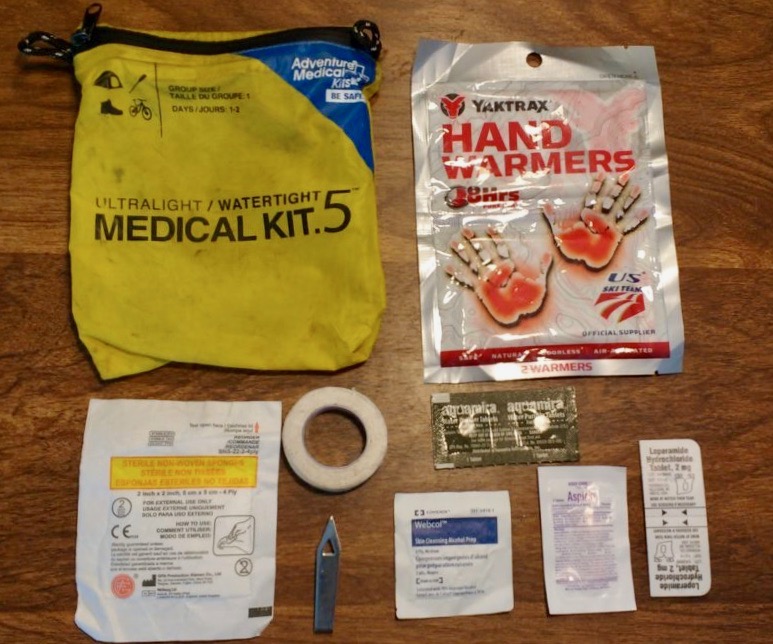
3. A Dialed First Aid Kit
It can be easy to become lax and think you won’t get injured riding, but the fact is that mountain biking is a dangerous sport. What makes it even more dangerous is where we ride. We often aren’t surrounded by people or in an area with easily accessible help. We have to rely on ourselves to get out of a challenging situation. Having a first aid kit that covers the bases without taking up too much space is essential.
We have a great article that covers all the items that should be in a mountain biking emergency kit, here. I have found the Adventure Medical Kit for 1-2 people adequate. This kit often comes with far more than what I’ll use, so I remove extra Band-Aids (athletic tape and gauze are often more effective) and things like anti-itch cream. An item you might consider tossing into your kit during cooler temperatures is a hand warmer. Adding a small X-Acto knife blade isn’t a bad idea, either.
[see_also id=’66143′]
4. Tape, Tape, Tape (and some zip ties too)
Tape is likely the most versatile item you can pack. Bring multiple types of tape and bring enough. Tape often requires ingenuity and creativity to use, but you’ll be surprised by the number of applications for it.

Athletic tape can be used in a first aid kit as well as mending a tear in a tire sidewall or bead (been there, done that).
Gorilla tape needs no introductory. It’s durable and a must.
Electrical tape is more elastic than the other two mentioned. I’ve used it in combination with Gorilla tape to patch a tube when no tire patch kit was present — it held into the next day.

Tyvek tape is waterproof. It’s great for mending dry bags, tarps, and more. It’s easy to tear, but once applied it’s not going anywhere.
Of course, don’t bring a full roll of each. One method of carrying the different types of tape is wrapping each one on your bike pump.
5. Navigation Tools: GPS, Maps, Small Compass
Most of us have a smartphone and bring it with us on our rides. There are several GPS and navigation apps that are useful in the backcountry.
[see_also id=’211199′]
Alternatively, you could use a dedicated GPS device. Either way, if you’re going to be in the backcountry all day covering 20, 30, 50+ miles, you’re likely to be traveling through some unknown territory. A device that displays your current location and helps you navigate will be a game changer. Bring a GPS.
Local area maps are extremely helpful. Often times they can take up a lot of space and thus don’t get brought along. There’s an alternative. Cut the map into sections — I’ll leave how you cut them up to you — then put them in a Ziploc bag for organization and waterproofing.

[see_also id=’62211′]
In addition to the map, bring a compass. These don’t have to be very big. Suunto makes a great compact compass for $20 that can be clipped to a pack strap, wristband, or map.

6. A Spare Battery Pack
Photos, videos, GPS, Strava, an emergency flashlight, accidentally forgot to turn on airplane mode… your phone battery is likely going to drain out. This is ok if you don’t need it. But if the sun is setting and you’re not 100% certain of the route, you’re likely doublechecking your tracks a lot. This activity will burn through your already diminishing battery life. There are too many compact battery packs that take up very little space for this to be a worry. Anker makes some affordable battery packs that perform well.
7. Lights
Think you’ll be back before dark? Bring lights anyway. If you’ll be riding any roads with cars, absolutely run a rear light. For singletrack riding, don’t skimp out on a cheap light that could fail you. Bring something that is going to last and perform well — riding down technical trails in the dark and coming up on animals is no fun. Been there, done that. Never again.

So what do you look for? 500 lumens is great. 800+ lumens will light up the night and give you the confidence required to negotiate rocks and roots in the dark. It’s a good idea to have a high powered light mounted on the handlebars and a lesser light on your helmet so you can see where you’re looking and not where your bike is facing.
[see_also id=’219296′]
8. A Whistle
Ever tried yelling in the woods? The dense trees soak up your voice like nothing came out. A whistle is cheap, compact, and saves your voice should you need to get someone’s attention. It’s also a useful method to let wildlife or other trail users know you’re coming around the corner.

9. A Fire Starter and Dryer Lint
You probably didn’t plan on it, but here you are. For whatever reason, you weren’t able to ride out and you’re stuck for the night. A tiny BIC lighter and a small baggy of dryer lint will go a long way toward lighting a fire. In addition to heating up water for warmth or cooking some dinner, fire is a morale booster.
[see_also id=’227499′]
Bonus: A Satellite Messenger or Personal Locator Beacon

If you’re way out in the backcountry, you probably won’t have cell service. Should something go wrong, or if you end up taking longer than you intended and have someone waiting to hear from you, you need to have a way of contacting them. What do you do when you can’t let them know your status?
Satellite messengers and personal locators like the Garmin inReach or the Spot device can literally be a lifesaver. Specific contacts can be programmed into them. And when you need help, you can push the emergency button to contact local search and rescue to get you out safely.
Yes, by in contrast to the definition of this article and in comparison to the rest of the gear here, satellite-connected devices are quite spendy. That said, what price can you put on your life? Having talked to friends in Search and Rescue, they wish more people heading out into the backcountry would carry a Spot or similar.
[see_also id=’215630′]
Your Turn: Did I miss anything? Let me know what lightweight, inexpensive survival gear you recommend in the comments section below!


4 Comments
Feb 3, 2018
Feb 2, 2018
Otherwise it’s a great tips for every rider who consider an all day epic ride. Better be prepared then sorry
Feb 1, 2023
Feb 2, 2018