

Believe it or not, this article can save you from visiting the dentist. Nope, this isn’t about brushing your teeth (though a toothbrush is involved) – it’s about servicing your mountain bike fork. Servicing your mountain bike fork is important yet it’s often overlooked until it’s too late. Your MTB fork owner’s manual should state the service intervals and it’s a good idea to follow the recommendations to get the maximum life and performance out of your fork. Some forks really work the fluids hard which will cause the them to break down slowly meaning won’t be able to tell the difference from one day to the next. But if we place two forks side by side and one was run for 75+ hours and the other was fresh, you will definitely feel a difference.
For this article I’ll be talking specifically about Manitou forks that utilize TPC and Absolute damping but many of these tips will be applicable no matter which fork you ride (just remember to check the owners guide that came with your fork for specifics).
Continuing to run a fork past its service interval will cause excessive wear which can cost more to repair. Lets face it: in today’s economy, no on can afford to spend needlessly. As a licensed technician in Canada, I always tell my students and former customers: You can pay a little now…. or a lot later. Servicing your MTB fork yourself will save you a bunch of cash in the long run. This is actually a pretty simple job and believe it or not there is only one special tool that you may need depending on your fork.
WARNING: Before attempting any work or opening the fork, make sure you release any pretension or air pressure.
CAUTION: When re-assembling your fork, follow all manufacturer-recommended torque procedures. If you don’t own a torque wrench, now may be the time to invest.
DO it right…FIX it right….DO not over tight!
Who should attempt this task? If you’re not afraid to change your tires or make minor repairs, this job really isn’t that much harder. All you have to remember is to take pictures of the deconstruction and follow your service guide. Changing the fork seals and fluid is actually easier than it sounds – just make sure you have a clean place to work and a solid work bench. Please remember to go over the list of necessary equipment before you start the job.
Tools and materials required

 20mm and 11mm socket or wrench
8, 6, 5, 4, 2mm Allen wrench or socket
Soft face hammer
1/2 dowel
Graduated cylinder or fluid measuring cup
Graduated syringe
Pick tool or fine flat screwdriver
Small zip lock bag
O-ring kits (order for your year fork)
Dust wiper kit (the Manitou R7 uses a 30mm kit)
Fork oil (5 wt is standard for the oil bath)
Semi bath oil (5W40 synthetic)
Prep M grease (synthetic)
MTB Fork Removal


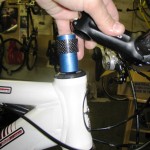
So you got all your parts together (seals, fluids, tools) and are ready to go. The first thing is to remove your front wheel and front brake from the fork. You will need a 6 or 5 mm Allen socket or wrench to remove the brake completely from your fork (you may also need to cut the tie wrap that holds the brake line.) Once the wheel and brake are removed you can concentrate on removing the top cap and stem. Once again, most bolts will require either a 4, 5, or 6mm socket or wrench.


Be sure to hold the fork when you are ready to take the stem off your bike; otherwise, the fork may fall on the ground when the stem separates from the steering tube. Once the bar and stem are free, let the fork hang carefully. Now remove the fork and make sure to grab the lower bearing and seal and place them with the other bolts that you removed thus far. You should have a top cap and bolt, two bolts and washers which held the brake, spacers, and the lower bearing. Place all those components somewhere safe. To finish this segment off, place the fork in a stand (if you don’t have a stand you’ll have to hold it or have someone assist you at times).
MTB Fork Cleaning
You are now at the stage where it becomes very important not to contaminate the inside of your fork. Sand particles inside your fork will ruin things very quickly, so it’s time to thoroughly clean the outside of the fork. I use a bike specific cleaner (you can simply use dish soap and warm water solution if you like) to wash off all the sand and crud. Using an old toothbrush to agitate the dirt, I make sure that all the grim has been removed, especially around the seals. Once you have removed all the dirt and the fork is dry, it’s time to start taking things apart.
MTB Fork Disassembly


Just in case you missed the warning. THE FIRST THING TO DO IS RELEASE THE AIR PRESSURE. The following instructions apply specifically to Manitou forks like the Minute, Drake, and R7. If you have a different fork, consult your owner’s manual.
Underneath the black Schrader cap on the LEFT fork leg (in the saddle looking at your fork) is the pressure release valve. You can use any thing to depress the valve; note that there may be a little bit of fluid that comes up which is normal. You will also notice that when all the air is released the fork will slightly compress which is also normal (this is the negative spring in the left leg).
Now, on the bottom of the RIGHT leg you have to first turn the rebound knob all the way in (clockwise), then remove the 2mm Allen bolt and adjuster knob. With an 8mm Allen key, turn in the damper shaft (same side) clockwise all the way until it is disengaged from the lower casting. Have a container ready to catch the little bit of oil that will come out of the lower legs. Moving back to the LEFT fork leg (still upside down), use an 11 mm wrench to remove the bolt that holds the compression rod in place. Turn the fork right side up (legs down) to catch all the fluid (approx. 2oml) and you’re ready to remove and clean the lower assembly.


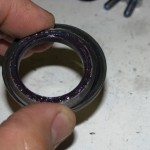
Start by removing the seals with a large wrench. Be careful to grab only the seal, then pry it off gently. I usually replace seals after 100 hours of riding since they are cheap and offer great insurance against any crud getting inside. Once the seals are off you can remove the foam seals which are just under the wipers. Use a mild soap solution to clean out the oil residue inside. If you have a lint free rag, wipe out all the rest of the residue and let dry. Set the fork lowers aside for a moment while you work on the fork uppers.
On the LEFT fork leg you are now going to remove the air piston and the compression rod. To remove the compression rod and piston, use a 20 mm wrench and turn the black nut on the bottom counter-clockwise until the rod is free, then clean it up a bit and set it aside. Pay attention to the bottom-out bumper – if it looks squashed, it’s time to get a new one.


On the top of the LEFT leg you can remove the black nut with Schrader cap using a 20mm wrench (counter-clockwise again). Once the cap is removed, take a look at the seal and make sure it is not ripped or dry. At this point you can see the air piston in the fork leg. To remove it, slide a dowel from underneath to push the piston all the way out. The piston has orientation with a blue square seal on top and a black round seal on bottom so keep that in mind when placing it back (remember what I said about taking photos?). Inspect both seals to make sure they are not scratched or cracking. I like to apply a small amount of synthetic shock oil to the piston and place it in a bag until I am ready to reassemble the air spring side of the shock. Final step on the LEFT leg is to clean the bore out of the fork leg using a solution of warm soap and water followed by a rinse of Speed Clean. Towel dry the tube and that’s that for the LEFT leg.


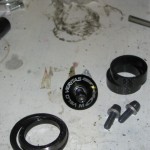
Moving on to the RIGHT leg, it’s time to grab a graduated cylinder that is totally clean. Use a 2 mm allen key to remove the top TPC / Absolute adjuster cap. BE CAREFUL when lifting up the cap underneath – there are 2 ball bearings and 2 springs inside. Carefully collect the pieces and place them somewhere safe like a plastic baggy. Once the springs and bearings are removed you’re ready to remove the damper using a 20mm socket or wrench.
With the damper loose, make sure the fork has its legs facing down and remove the damper. Once the damper is out you’ll need to measure the amount of oil inside and there are two ways to do it. I like to use a graduated cylinder to catch all the oil and record the amount of fluid. Alternatively you can use a measuring tool and look up table supplied in the owners service guide to find the correct oil level. I prefer the first method for the first time doing the service (factory fill is correct – see example chart below). Once the damper is out, turn the fork over and collect all the oil (the photo above shows about 100ml of oil that came out of my fork). Cycle the damper shaft a few times to remove the remaining oil. Clean the piston assembly with a lint free cloth and put it aside.
MTB Fork Reassembly


Starting with the lower assembly, install the foam seals and add some semi bath oil (5W40 synthetic P/N 85-0022) to get the foam seals good and wet (I use a heavier duty synthetic lube from Red Line called Shock Proof Heavy). Next, install the seals using a large socket that fits over the entire seal to seat squarely in place. Once the seals are in you can add a bit of Semi bath oil in each leg to lube the DU bushings.
Set the lower legs aside and start assembling the upper assembly, LEFT fork leg first. Lube up the compression spring with a bit of synthetic grease (prevents noise), then install it into the assembly, and add about 20 ml of semi bath oil. Torque the end cap to 80-100 in/lbs.

Turn the fork so that the fork legs are facing down and install the piston into the LEFT fork leg (remember the direction of the piston **blue seal up**). Now place the lubed piston squarely on top and add a bit of semi bath oil to help push it past the first few threads on the top of the fork. Once you get it past the threads you can push the piston in a bit more and add about 3 cc of semi bath fluid to the top of the piston (I use the heavier-duty Red Line product there as well). Replace the top cap using a 20mm socket wrench and torque to 60 – 80 in/lbs.


Now it’s time to assemble the damper side RIGHT fork leg. First thing we have to do is set the fork legs facing down, then fill the fork leg 1/4 of the way up with damper fluid (P/N 85-0023) which is a 5wt oil (depending on your weight you may want to add a heavier oil). I weigh about 185 lbs plus another 6 lbs for gear I am at 191 lbs so I use a 10wt oil in my fork which allows me to really back off on the compression and rebound adjusters.
With the leg 1/4 of the way filled, cycle the damper rod slowly a few times (removes the air) then fill the leg to the correct level – in my case the Manitou R7 needs 105mm. Once the level is correct you can place the compression rod and torque it to 80 – 100 in/lbs. Finish off the task by placing the small springs and bearings opposite each other under the adjuster knob and tighten with a 2mm Allen wrench. Torque to 4 – 6 in/lbs.

Orient the fork so it’s tilted at a 45 degree angle and carefully slide the lower fork legs onto the upper assembly. Please be careful – the seals must not get folded or they will leak. Slide the lowers down until they just about touch the compression rod and rebound damper. Inject 16cc of Semi-bath fluid in each fork leg and slide the fork in further so you can tighten them in place. For the RIGHT leg you will need the 8mm Allen socket to tighten it in place (counterclockwise 30 – 40 in/lb); replace the rebound knob (blue knob 2mm Allen bolt 4 – 6 in/lbs). On the LEFT leg, use the 11mm socket wrench and tighten it to 45 – 55 in/lbs
Once the fork is all assembled you can simply install it on your bike and you’re good to go. All you have to remember is the orientation of the bearings and remember to make sure that the brake bolts are torqued in place and the brake disk is drag free. It feels good to avoid the dentist 🙂


12 Comments
Sep 18, 2009
Btw, Fox owners can find detailed service instructions (with step-by-step instructions, pictures, part numbers, the whole bit) at the Fox website: http://service.foxracingshox.com/consumers/index.htm
Mar 13, 2011
Sound like you missed a few things...
From what your saying the fork is traveling freely which more than likely means the oil level in the right leg is low.
The left fork leg has 20ml below the piston and 3ml above it....
The right fork leg you fill it to the indicated reading on the yellow chart which in the case of an R7 is 105mm from the top If you have a TPC...
What you may want to do is print out these instructions or go to :
http://www.manitoumtb.com/index.php?page=support&c=service-guides
Let me know what happens..
Mar 12, 2011
I'm hoping you can help me out. I have an R7 MRD 2009 which I took apart recently to service. I tried as best I could to follow your instructions but must have screwed up with something. Here are my problems;
1) Fork bottoms out much more than previously did
2) Fork sags about 3cm on lockout and when I apply pressure it sags even more
I weigh 75kg and am using 90psi. I used 5-10 Motorex oil all round.
I put exactly 16cc into each leg. I'm quite sure the problem I have is with the damper. I'm not sure about the damper. Should I quarter fill the small tube inside the stanchion or the stanchion itself?
Thanks
Mar 4, 2011
Jun 14, 2014
I will do a service to my R7 Super 80mm TPC based on your tutorial. I think i'll have to adjust the oil level to meet the requirements of the Super 80mm.
What is not fully clear to me: at which step will I have to pump air into the fork and what pressure would you recommend?
And: Is it possible to use the o-rings from the newer R7's on my old (2006) one?
Thanks!
Apr 6, 2011
Sep 17, 2009
Sep 16, 2009
With this article however you can for go most of the rebuild and just change fluids..If that is all you want to do PM me and I could let you know how to do it.
With Fox forks to change up fluids its a matter of only discharging the fork (ALWAYS do that first) then remove the lower nuts and washers that hold the Lower fork legs.. Then change up the fluid...Manitou, Fox, Rockshox all sell just a wiper kit and then its a matter of fluids.
Apr 6, 2011
Here is the link to the service guides from Manitou:
http://www.manitoumtb.com/index.php?page=support
Cheers
Sep 17, 2009
Mountain Biking Guide
Sep 17, 2009
Sep 16, 2009
Unfortunately I have neither the patience nor fortitude to crack open my Talas RLC and RP23 can to service it, thus I pop the $150 to have them serviced 2X a year.
Are some forks just easier to service than others??
I did my SID World Cup once...and swore I'd never touch those guts again either, maybe it was because when it was all put back together, I still had a part in my hand!! Yep that went to the tech too.