

NVH (Noise, Vibration, Harshness) testing is nothing new. In the automotive world there are volumes of books on NVH testing. It is probably the biggest concern that both bikes and automobiles share. In this article I will cover a few of the more common points to check for NVH testing.
When it comes to testing or diagnosing anything, there are a few things to consider. Before you go at it, give the bike a good wash. Many of the checks are visual and need a clean surface to identify possible problems. A large build up of grime and gunk will already cause some crunchy sounds. Depending on what kind of problem you have, with a rubbing, creaking, cracking sound, or a possible vibration, you have to isolate where it happens and when it happens.
Do your best to isolate the general area of where the noises comes from. Ride along a quiet path and listen intently. Sometimes a helper can identify the general area for you.
Once you have an idea where you’re getting the noise, the next step would be to identify when it happens:
- Are you standing over your bike?
- Are you pedaling?
- If you’re pedaling, does the noise happen in a specific gear, or constantly regardless of gear?
- Does the noise go away when you coast?
- How about when you hit the brakes?
So where do most of these noises happen? Starting from the front of the bike, lets go over a summary of possible places.
Wheels

Wheels with loose or broken spokes could make a clicking or rattling sound. With a broken spoke, you’re likely able to see the wobble. For some straight pull spokes you could get a ping sound. In any case, replacing the broken spoke and re-tension the wheel.
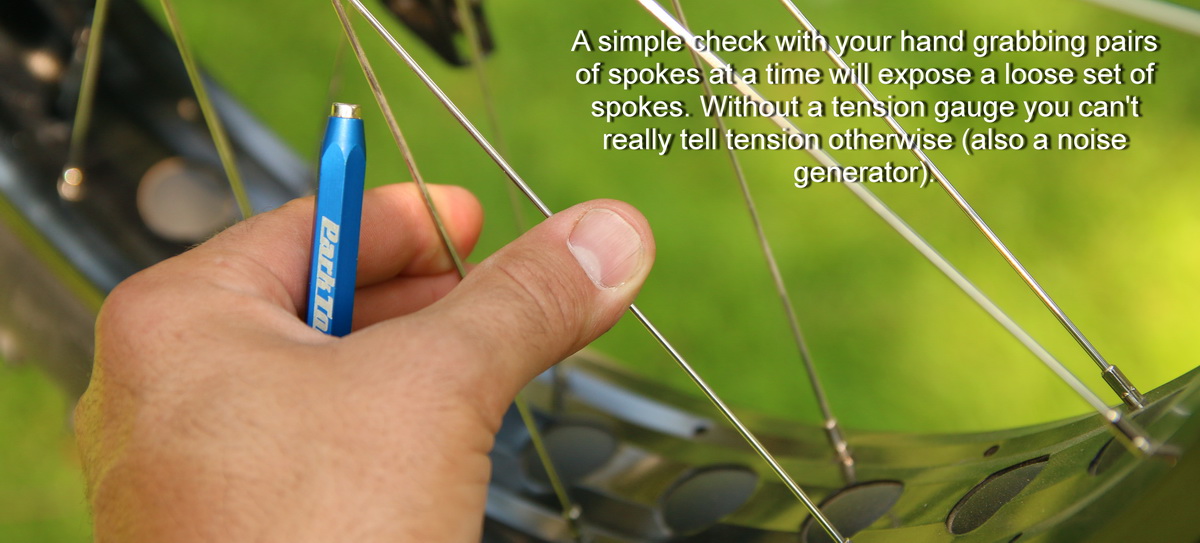
Rumbling sounds from the wheels are a good indicator of a dried up/contaminated bearing, which if left too long will leave you with replacement as your only option. Sometimes you can just overhaul the wheel bearings (Shimano) or you may need to repack cartridge bearings (sealed units). While checking the wheel, you should check for any side-to-side play. Just grab the wheel near the fork arch and wiggle it side-to-side to feel for any unwanted movement. Adjust as necessary.
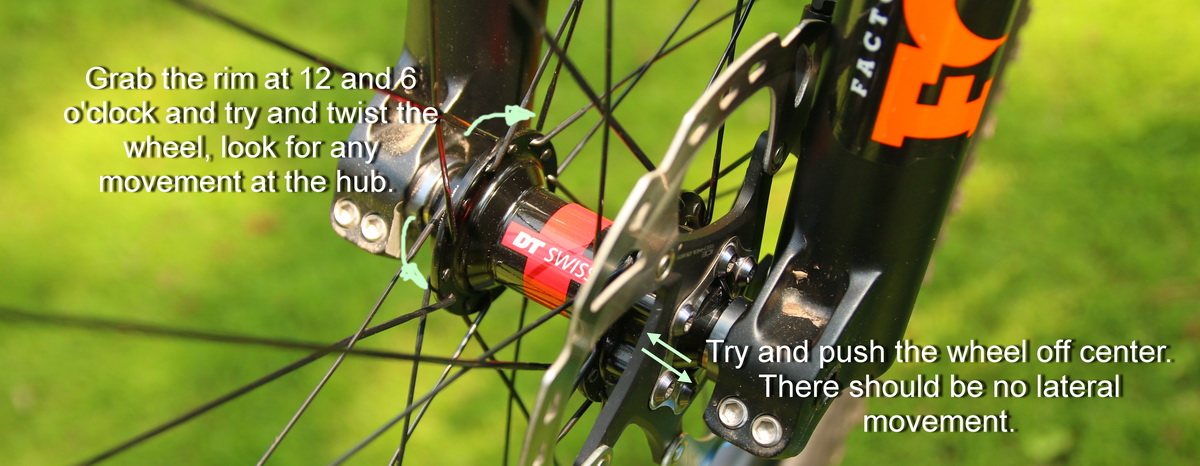
Sometimes bearings are totally fine–perhaps a wheel wasn’t installed in position correctly (especially with 9QR wheels), usually because the quick-release or axle wasn’t tight enough. If this is the problem, you will hear a click- or crack-like sound as the wheel shifts around a bit. Reposition the wheel and correctly tighten the quick release.

A badly-neglected wheel will not want to spin freely and make an awful racket. At this point think about replacing a hub or buying a new wheel. Seek advice from your LBS.
Fork

Fork lowers can cause noise from worn out seals or DU bushings (slider bushings). Put the bike in a stand and remove the front wheel. With the wheel off, grab both fork lowers, try to move them forward and back. Listen for a clunk or feel for excessive play. If you feel the fork lowers moving too much, bushing replacement may be necessary. See your LBS or if you have the tools, start a parts list and get ready to order up new DU bushings, preparing for a rebuild.
Checking and replacing fluid in the forks is necessary to prevent seals from squeaking, with regular fluid changes prolonging bushing life. Newer forks that do not run open bath systems have very little lubrication, and can dry out quickly at the seals.
Compress and extend the fork, listening for weird noises. On long travel forks that use an internal coil rather than an air spring, a clunk may be heard. The clunk could just be the coil spring touching inside the stanchion tube. Some of the noise can be removed by reapplying shrink tubing on the mid section of the coil.
If you hear clunking in the damper side stanchion, and the fork has poor or inconsistent compression/rebound cycles, then damage to the piston may be present, or the fork fluid level is low. With damper units being so complicated these days, it may be time to visit the shop.
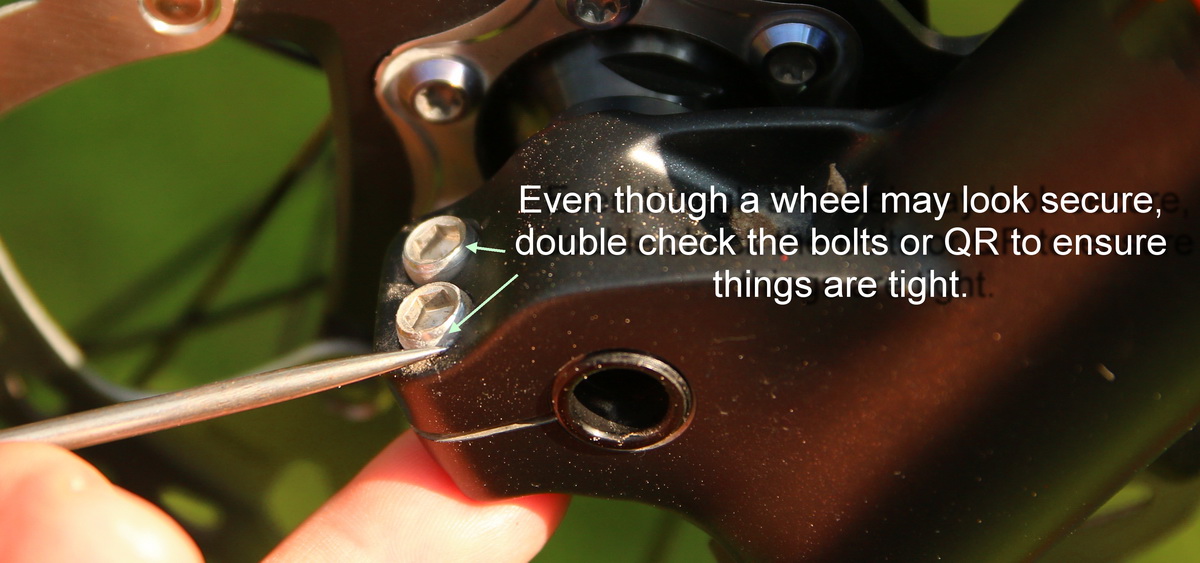
A fork with a quick release or improperly adjusted through axle will cause a few noises when loose. A large click noise from the wheel or warbling sounds can be generated from the wheel when it shifts place. The warbling sound usually comes from the rotor contacting the brake caliper. To prevent this when using a quick release, make sure it is snug, and with 15mm and 20mm through axles ensure the bolts are evenly tight.

Headtube

It is necessary to check the torque on stem bolts from time to time, but do not over torque them. The same can be said with stem to handle bar bolts. Torque them evenly to the correct torque value that is stamped on the stem or bar. With carbon bars, the addition of friction paste material will reduce noise and prevent component slippage.

When you hear creaky/cracking when riding, when hitting uneven surfaces or applying brakes, there is a possibility that the headset could be loose, or the bearing is in need of attention. A quick visual inspection of the bearings will confirm if you have a rusted out or dusted bearing.

Double check the top and bottom bearing race cups. Make sure both races are seated properly. To verify this, you will need to check for parallelism. Use a vernier caliper and measure the headtube race cups, making sure they are perfectly parallel. If you find that they are not parallel, then visit a bike shop and have the headtube faced. You’ll need a very specialized Park Tool HTR-1 or HTR-1.
While you are checking things out, double check the fork race as well. Make sure the race is also fully installed correctly on the fork.
For those who use a Cane Creek Angleset headset or similar type of offset headset, and hear a cracking sound, go over the installation procedures provided by the manufacturer. If you’re hearing that noise, chances are your cup is maladjusted.
Another possible point of noise generation is cracked parts. Snapped bolts or cracking around the stem or headtube will cause creaking sounds. If you have a carbon steering tube, remove the top cap and check for cracking due to poor stem to headtube interface.
Frame
Note: I am including the crank in the frame area for some of the article.
Check the bottom bracket area by turning the crank. While you’re there, listen to the crank and bottom bracket area for grumbling sounds. If you hear them, more than likely there is a worn out or dry BB in need of repair.
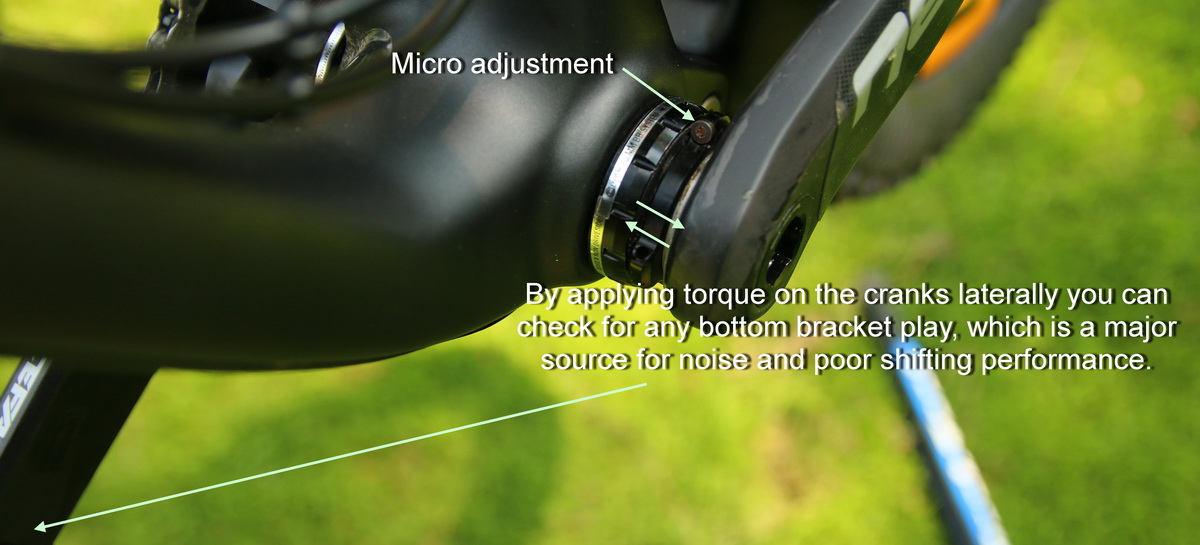
Creaking or cracking sounds in the BB area could be signs of loose cups, loose crank arms, or a loose bearing. Crank arms are a simple fix: just re-torque the bolts to the manufacturer specifications.
With press fit bearings like those found in a BB30 system, there is a neat trick using Loctite 848 compound. It will hold the bearings nicely in place if you find that they’re loose. With regular bottom brackets, check factory service recommendations for adjustment procedures.

Check pedal-to-crank play for creaking or cracking sounds. Some pedals are made adjustable, while others have parts available for rebuilds. Some clipless pedals develop a loose screw that holds a retainer plate or spring in place–confirm that all necessary plates and springs are in place. All of these items generate unwanted noise.
For suspension frames, inspect all the pivot points carefully. Check for any signs of cracking, or stiffness in the links. It is best to remove the rear shock for this. Move the suspension through its full travel, and wiggle the rear triangle side-to-side, listening for noises.
While cycling through the travel, feel for any roughness in the bearings. If you find a link to be rough, take it apart and identify the faulty bearing. Many bike manufacturers have replacement bearings, and a company like Enduro Bearings has a full line of replacement bearings ready to go.

Links will often display wear marks if a bearing or bushing is shot. Replace them as necessary, and remember links should be repaired as pairs.

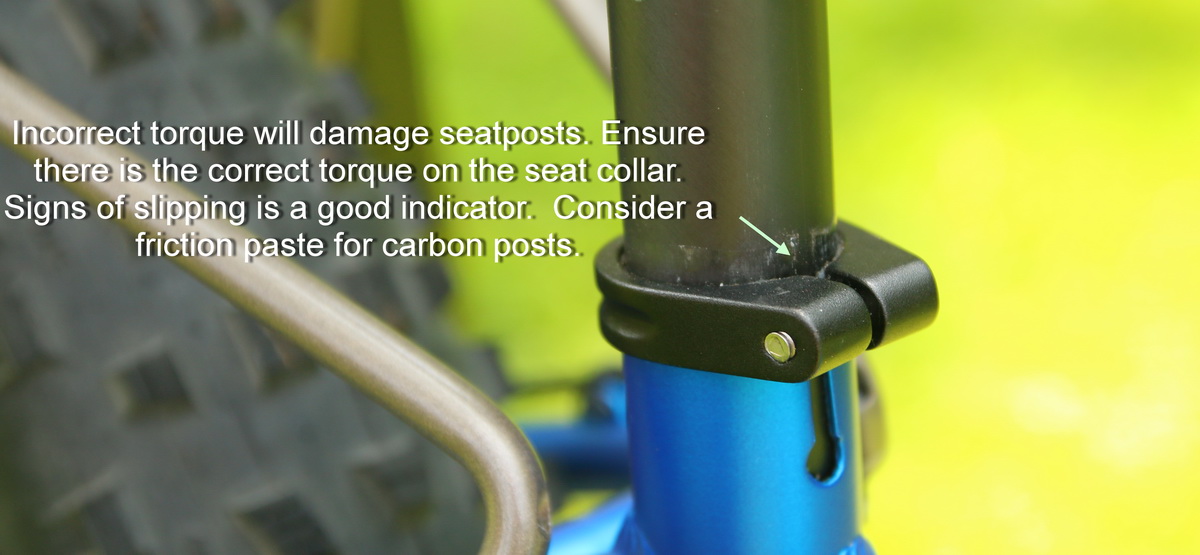
Inspect the seatpost collar and seatpost for signs of damage, and with carbon frames do not over torque the collar. Use carbon friction compound if possible.
Another mystery noise is the creaky saddle. Check the conditions of the rails and saddle. Depending on saddle brand, it could have conventional rails or a beam rail. The correct amount of torque must be applied here. Slipping or crushing of the rails will end up generating noise and failing in the near future.
A bad crash may cause a seat rail to bend, usually very close to the seatpost head clamp. Over time that slight bend creates a stress riser causing that seat rail to fail. It generates cracking noises as the rail breaks apart. Unfortunately, replacing the saddle is the only solution. Attempts to straighten bent rails only cause further damage.

Brakes

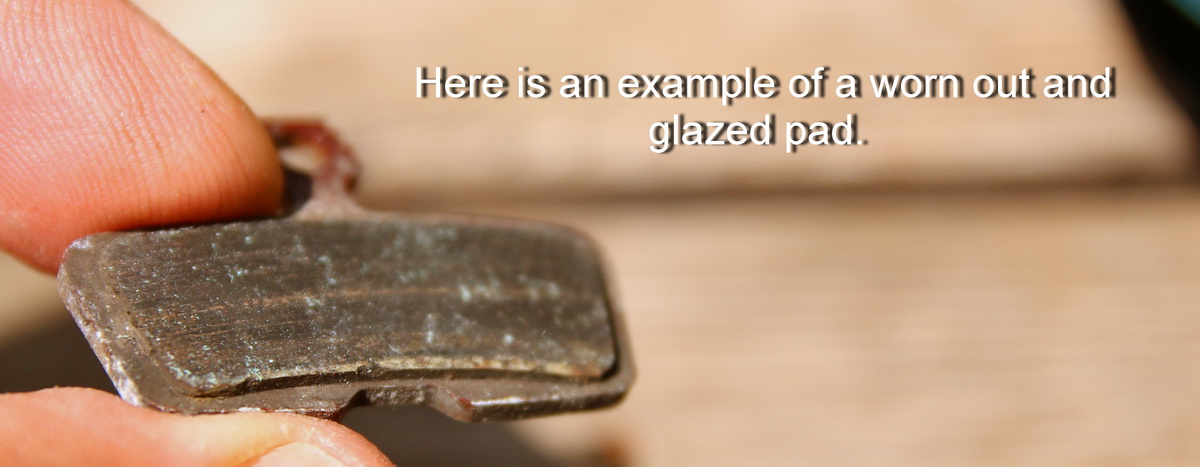
Vibration or howling noises could be generated from contaminated brake pads when applying the brakes. Remove the pads and inspect their condition. If the surface has a glazed appearance and has more than 0.5mm material thickness, try to lightly sand off the contamination.
Snapping or cracking sounds when applying the brakes could be due to a loose caliper or brake lever. Other less probable places that can generate cracking sounds are badly damaged caliper pistons. Shimano uses ceramic pistons in some of their calipers, and improperly pushing them back into a caliper body may cause them to crack, generating noise when riding. In this case with Shimano, you have to replace the caliper. Other brands may have limited rebuild kits.
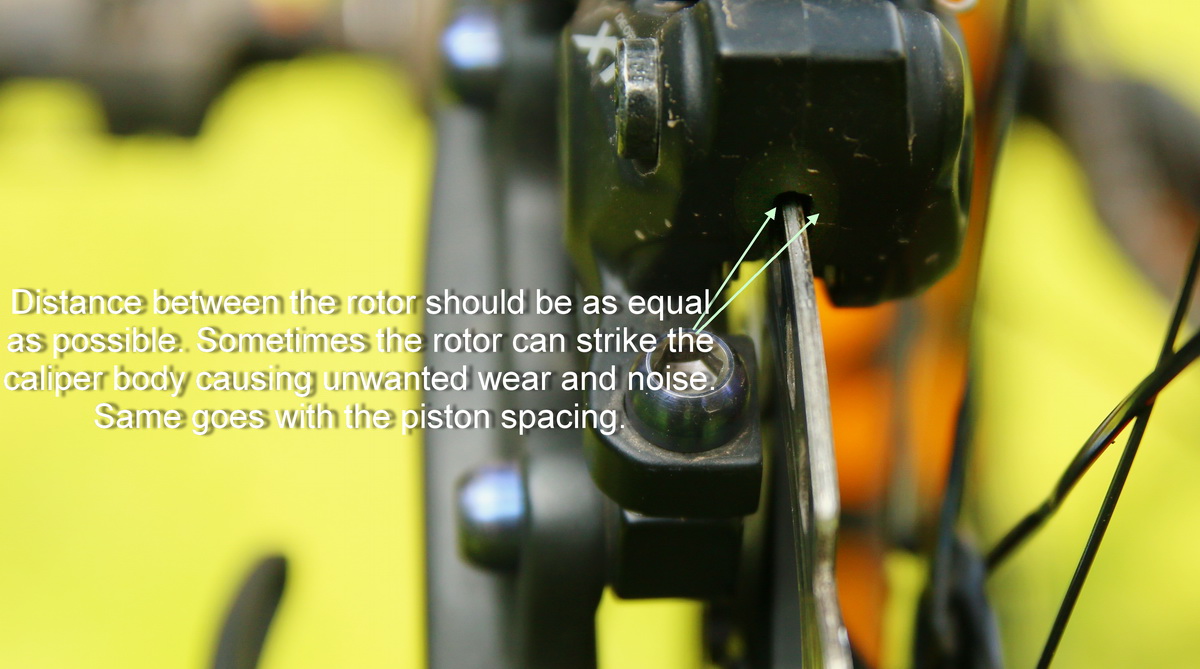
Check piston travel from side-to-side on the calipers. Sometimes with four piston units one side or one piston gets stuck. Stuck calipers are due to lack of service, and when the brakes get applied, they tend to slightly warp the disk, causing it to vibrate. Remove the caliper from the brake adapter and give it a good cleaning with denatured alcohol. Applying a few drops of brake fluid on the side of the pistons, followed by cycling the brakes (without pads), will hopefully free up the piston and restore the moisture on the seal. Clean the caliper once again, install pads, and install the brake back on the bike.
Periodically check brake caliper alignment, specially after a big fall. If the caliper contacts the ground when the bike hits it, the caliper may slip out of place.
Check for cracked paint under any brake adapter; this may throw the brake adapter out of alignment, causing unwanted squeal.

Drivetrain

Cranks are prone to a few noises. Loose chainrings will cause a snap/creak sound when you put down the power. Periodically check your chainring bolts and crank bolts for proper torque.

Grinding noises can be generated from misaligned derailleurs. Looking straight behind the bike, make sure you see the derailleur pulleys line up with the intended gear you’re in. If you see any misalignment, your bike might have the wrong amount of cable tension, or if you see a visible distortion to your derailleur in relationship to your cassette, you may need a new derailleur hanger. You could always try to hand tweak the pulley cage back into place, but more often than not you may snap the hanger. Aluminum hangers just don’t like being bent too many times.

Check the condition of the pulleys, cassette, and rings. Badly-worn teeth will cause skipping and additional noise.
Check the condition of the chain: it should be free from any signs of rust, and not be kinked on any links. Slowly pedal backwards while sighting the chain line. The chain should be dead straight without kinking. Kinking or twisted links will cause the chain to pop out of gear. Replace as necessary. If the chain is pretty old and stretched, you may need to purchase a new cassette as well.

If the suspension cycles and you get ghost shifting or crackling sounds, check your shifting cables. Fraying from abrasion or age takes a toll on cable housing, making it noisy and degrading shifting performance. Replace as necessary.
Your Turn: Have any unexplained noises? Tell us about them in the comments section below!


1 Comments
Jul 5, 2017