To replace your disc brake pads you’ll need a pair of needle-nose pliers, a clean dry cloth, some rubbing alcohol, and a flat-sided tool like a 10mm wrench. For this demonstration I’m using Shimano hydraulic disc brakes but the procedure for most makes and models will be roughly the same.
First, remove the wheel.
A bike stand is handy for this type of work. If you don’t have one, ask for one for your birthday!
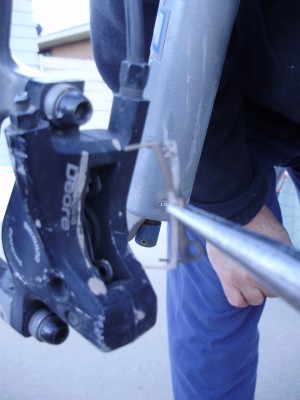
From the front or bottom you’ll be able to examine your brake pads. If they are thinner than the thickness of a nickle it may be time to replace them. If you wait too long to replace brake pads you can end up damaging your rotor, just like with brakes on a car. Or worse, you may find yourself without adequate stopping power out on the trail.
From this view point you can see my brake pads are still in good shape. For the purposes of this demonstration, we’ll be “replacing” them anyway.
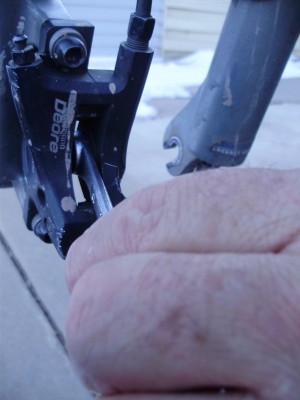
Pads are typically removed from the back or top side of the brake caliper body. This view shows the cotter pin at the bottom holding everything in place and the clip that holds the brake pads.
Using a pair of needle-nose pliers, remove the cotter pin. You’ll have to carefully unbend the right side of the pin first (out of view).
Next, remove the clip and then the pads using your pliers.
Be careful when removing the pads. You don’t want to touch the new pad with your fingers because you’ll get oils on them. If this happens, put some rubbing alcohol on a clean cloth and gently clean the pads.
You should now have all of these pieces removed from the caliper body. Hopefully your cotter pin won’t break like mine did.
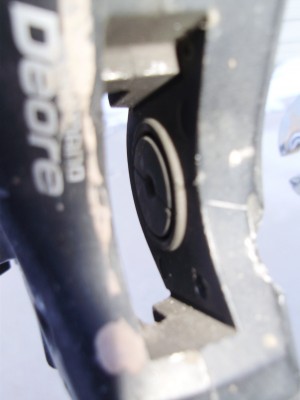
In order to create a little more space between the pistons, insert a 10mm wrench into the caliper area and gently press it against the pistons on either side. This will push the pistons away from the center of the caliper, giving you more room for the new brake pads.
Look at all that space! This is a good time to use a rag and some rubbing alcohol to clean this brake dust out of the inside area of the calipers.
Next you’ll want to line up the clip and (new) brake pads so the holes all match up. The cotter pin will need to go through the entire stack those at once.
Next, take your lined-up clip and pads, turn them so the holes are on the bottom and the hook is on the top, and insert them back into the caliper area. You may need to angle them toward you slightly to get them back in.
Replace the cotter pin, making sure to bend the end once it’s all the way through the caliper body, and then replace your wheel.
After replacing the wheel, pump the brake lever a few times. Then spin the wheel and listen carefully to make sure the brake pads aren’t rubbing the rotor while the wheel is spinning freely. If the pads are rubbing, you may have to loosen the wheel, try to realign it a bit, and then tighten it again.
Of course the procedure for changing or replacing disc brake pads can vary based on the brand of brakes you have and whether they’re mechanical or hydraulic disc brakes so be sure to read the instructions that came with your brakes.
The part I always have trouble with is pushing the calipers back in place before inserting the new pads. Seems like no matter what I do, the new pads are always way too tight on the rotor. Sometimes I just deal with a little drag initially and wait for the pads to get worn down to fit. 🙂
That can definitely be an issue! Although I don’t know if I could stand to just wait…I know even without dealing with new pads I hate it if I’ve had to take my wheel off (to put the bike on a rack for example) and then, when reattaching, I get the rub…shhh shhhh shhh. HATE IT. We’ll fiddle for up to 10 minutes to get it just right before we’ll ride with drag!
Following manufacture instructions is a good idea sometimes when it comes to pushing pistons back.Sometimes resetting the lever is necessary to uncover the compensation port to allow the fluid to flow back into the lever.. (Just saying)
Another thing that should be done at this time is to use the supplied brake adapter (plastic) that was shipped with the brakes to move the pistons out a bit and back again a few times. This helps make the pistons move more freely. Once you do that a few times, apply a drop or two of fresh brake fluid on the extended pistons before pushing them back into the caliper will also make the brake feel smooth again.
Good point @Syd. Every style/brand of brakes is a little different…following the instructions though? Who ever heard of such! Hahaha.
Before I upgraded to bb7’s, I had tektro brakes. The only thing I liked about those brakes was that the pads were held in place magnetically. That made things way easier.
I commend all of you do it at homers but I believe…at least for me God created bike mechanics for a reason! Very interesting write up it is always good to know to do things.
It’s not unusual to swap out brake pads as a “trailside repair,” especially during an epic ride. Fortunately most calipers are designed to make the process as painless as possible. Many models even boast of tool-less swaps.
Good point Jeff I never thought of brakes as a trailside repair but a few months ago I had my fair share of breakdowns and only wished I knew how to do more. Keep the info coming!
It is very easy to change out brake pads, especially after you’ve done it once. I do encourage you to try it out yourself sometime, but I do admire the fact that you are at least supporting mechanics!
One thing I do while working with brakes on cars, motorcycle, or bicycles (or almost any mechanical work I do, especially when working with any chemicals) is wear nitrile gloves. That way you protect your hands and do not have to worry about contaminating your brake pads or rotors. Also if you do decided to clean the pads and rotors just to be on the safe side, (as I usualy do) especaily with new rotors (you need to clean the protective oil off first) your skin is protected.
What? The new pads don’t come with new cotter pins? A good mechanic always replaces rather than re-uses cotter pins. Not only are they easier to insert, but they haven’t been made brittle (and thus liable to fail) by “work hardening” at the point where they are bent and straightened.
P.S. mtbikerchick: Your hands look a little rough in that first shot there. Forget the nitrile gloves and get yourself a bottle of hand lotion asap!
LOL good catch there @MarcS 🙂 Hey, I had to have an assistant so I could take the photos!
Hey mtbikerchick I got brave after a few months and changed my first set of brakes! Thanks for the article!