

Disclaimer: I’m not an engineer or composites expert by any means. I’m just a guy that likes working on bikes and trying to figure out new things. This guide is intended to be a helpful resource for someone considering repairing their carbon frame at home. Do NOT try to repair carbon fiber handlebars, seatposts, forks, saddles, etc. Professional repair companies won’t even touch those.
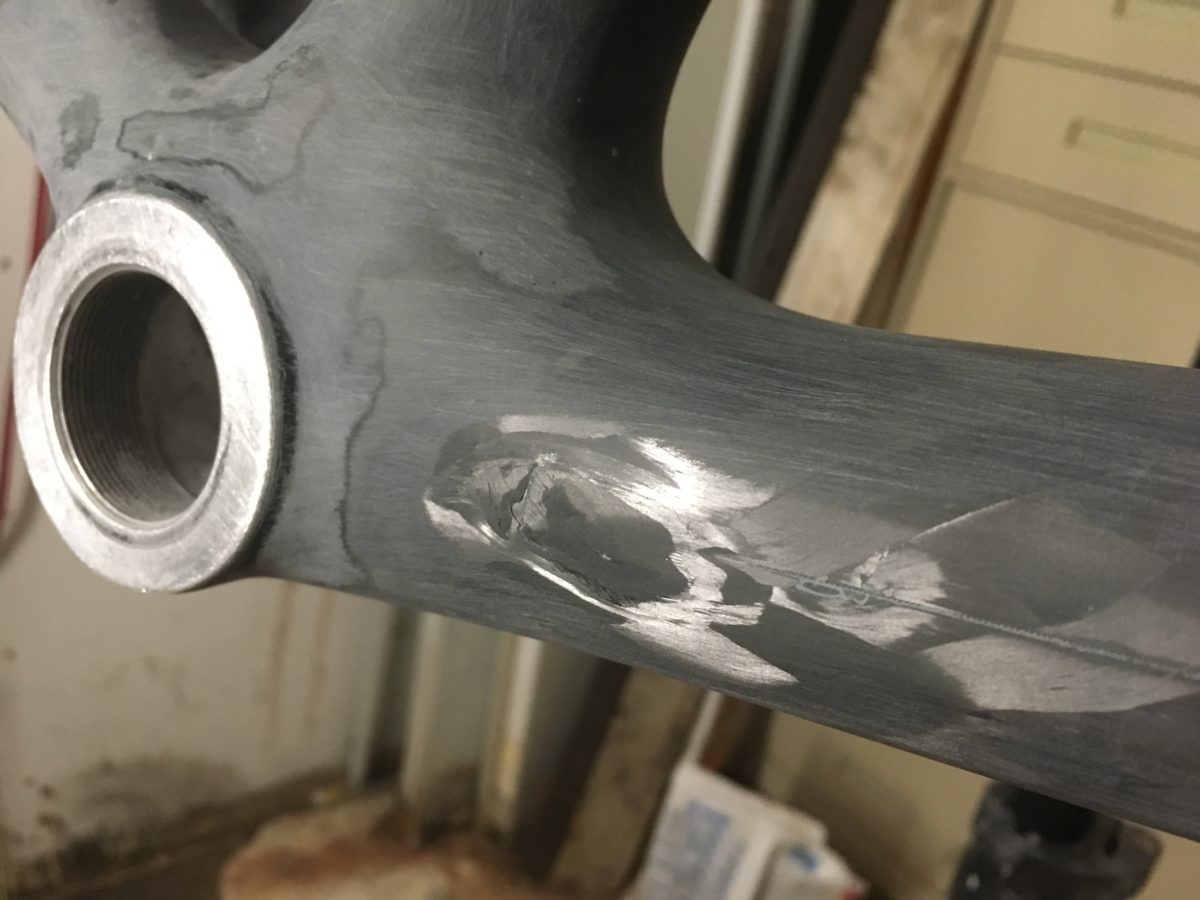
My carbon fiber road bike had a pretty serious gouge in the downtube from dropping the chain. It happened years ago and I’ve ridden it probably 15,000+ miles since then without issue. I figured since my frame hadn’t broken in the intervening years, the damage wasn’t structural. It was, however, an eyesore. After coming across a DIY carbon fiber repair kit on Amazon, I decided to try my hand at fixing my frame.

Supplies

I ordered the “Easy Start” kit from a company called Gorilla Carbonworks on Amazon. The $40 kit includes a 39″x6″ sheet of 3K carbon fiber, a bottle of epoxy, a bottle of hardener, mold release wax, a brush, mixing pot, and gloves. It turns out that I should have paid more attention to what was in the kit, as it was missing a crucial piece needed for the type of repair I was doing.

The Easy Start kit is for making a shape out of carbon fiber using a mold. But I needed to add carbon fiber to an existing structure. Sure, I could easily add layers of the fabric to my frame, but I didn’t have any way to compress it. Without compression, there would be excess resin, and the finished product would look junky.
I looked at other carbon fiber repair kits like this one from Predator Cycling, and realized I needed shrink release tape — a highly-specialized type of tape used in composites. It took a lot of searching to find this tape. Predator Cycling offers it on their website, but at $15 (plus shipping) for just 5 yards of tape, I searched for a better deal. I finally found a 100 yard roll of the tape online from a composite supply company called Composite Envisions. With shipping, it was about $25, but now I have plenty of the tape for future projects.

Since I had to completely disassemble my bike to do the repair, I decided to take the opportunity to repaint the frame as well. In addition to the repair kit, here are a few other items that I bought or used for this project:
- Sandpaper
- Dust masks
- Extra latex/nitrile gloves
- Painter’s tape
- Electrical tape
- Spray paint from Spray.Bike
- Nail polish remover/acetone
The Process

Step 1: Disassembly
Completely stripping the frame of all components — including hardware like the derailleur hanger — made it easier to work on.
Step 2: Sanding

Lots and lots and lots of sanding. In the damaged area, I sanded down to the raw carbon. On the rest of the bike, I was less concerned about getting that far down. I only needed to roughen the surface for the new paint to adhere. Wet sandpaper helped keep the dust down for this step.
Step 3: Clean Frame

Once I was satisfied with the sanding, I thoroughly cleaned the frame with alcohol and a lint-free cloth.
Step 4: Masking

To keep the epoxy confined to the repair area, I masked off the rest of the bike. First, I laid down some electrical tape, and then I put painter’s tape over the top of that. Predator Cycling suggests using plastic wrap to protect the rest of the frame, and if I had any at home, I would have used it instead of the painter’s tape.
Step 5: Make Templates
The damage had gone through at least two layers of carbon, so I decided to use three layers on the repair. I made templates from paper before cutting the sheet of carbon, which allowed me to find the perfect size and shape. The first piece was just big enough to cover the damaged area, the second piece was a little bigger, and the final piece was larger still.
Step 6: Clean Work Area
Carbon fabric can easily snag on a rough surface or pick up debris from a dirty work surface. Before I rolled out the fabric for cutting, I cleaned my workbench, put away any unnecessary tools, and laid down a large, clean piece of cardboard.
Step 7: Cut Carbon Fiber
Using a pair of good kitchen shears, I cut out my three patches of carbon based on my templates. The weave was loose, so I handled the fabric gently, and stored it in between foil to keep it safe while I prepped the epoxy.
Step 8: Mix the Epoxy
Using a kitchen scale, I mixed the epoxy and hardener together at a rate of 2:1. Since this batch of epoxy was only going to be used for a base layer, I mixed a fairly small amount. The videos I watched and written instructions that I read all emphasized taking the time to thoroughly mix the two. The kit I used suggested five minutes of mixing.
Step 9: Apply Surface Coat of Epoxy

The surface coat of epoxy is applied with a brush and then left to dry anywhere from 1.5 to 4 hours. You want the epoxy to be tacky when you touch it while wearing a rubber glove, but no residue should come off on the glove. In my case, it was a warm evening and it took about 2 hours to reach that consistency.
Step 10: Lay Down Carbon Fiber Fabric
Once the surface coat of epoxy was at the appropriate level of tack, it was time to lay down the carbon patches. But first, I needed to mix up another batch of the epoxy. I made about twice as much for the second batch, following the same procedure above.
With the epoxy ready to go, I carefully laid down the first patch. You only get one shot to get the first piece right, so take your time. I started at the top edge of the patch and gently pressed it down onto the base coat of epoxy, careful not to create any bubbles or ridges in the fabric.
Step 11: Wet Out Patch with Epoxy
The goal with this step is to completely saturate the fabric without going overboard. Any excess resin is going to have to be sanded away later, so it’s in your best interest to keep it neat.
Step 12: Apply Additional Layers of Carbon
After wetting out the first layer of carbon, I put the second, larger patch over the top of it. I then wet this layer out and placed the final, largest patch over that, and also wet that out. Repeat this process as many times as you have layers of carbon.
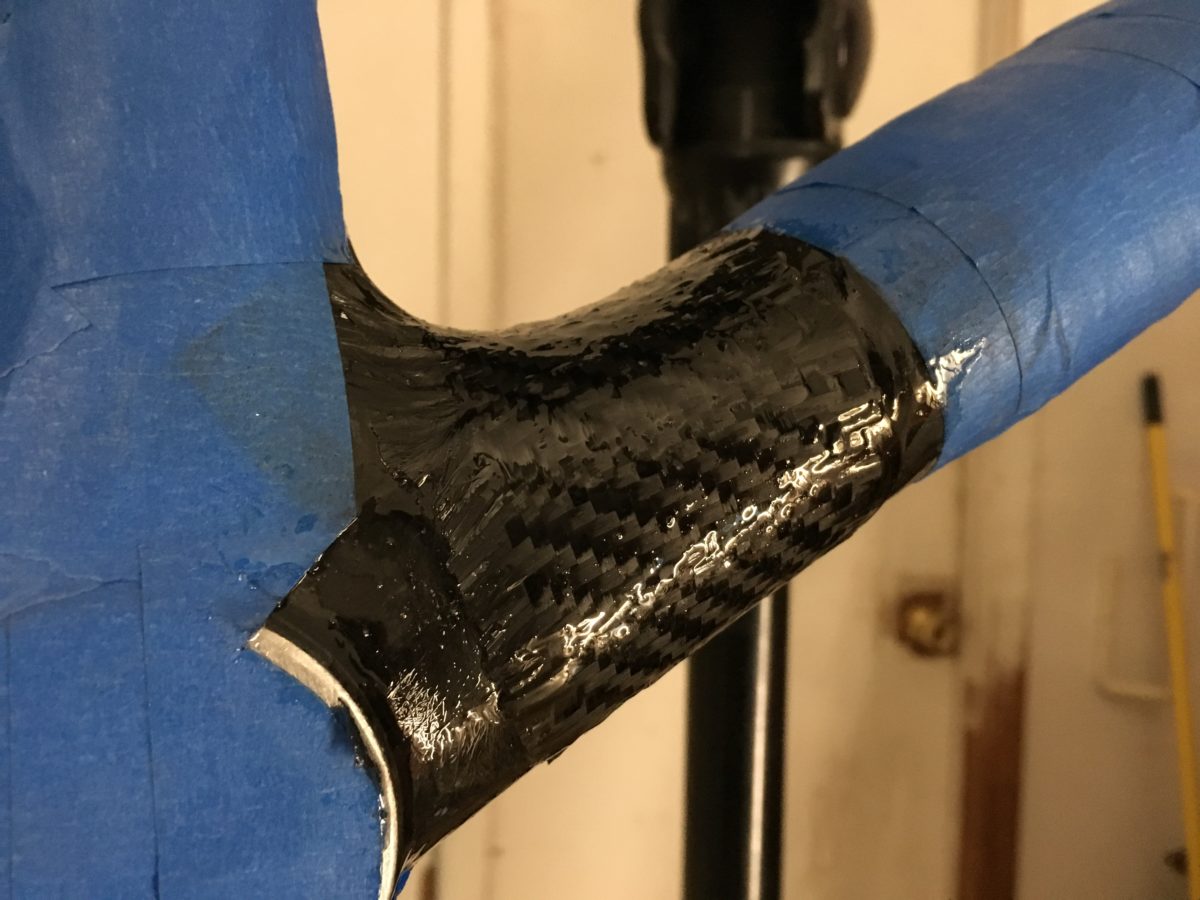
Step 13: Wrap with Shrink Release Tape

With all the layers in place, I wrapped the repair area with the shrink release tape. Be sure to use the correct side of the tape, as only one side is coated with the release agent. I used electrical tape to hold down each end of the shrink release tape.
I used a hair dryer to apply heat, but a true heat gun would have been much better. The hair dryer worked just okay, and it took far too long.
Step 14: Allow the Repair to Cure
The instructions from my kit said curing time would be 8 hours at 70 degrees (F), but I left it for 24 hours, just to be on the safe side.
Step 15: Remove Shrink Tape and Sand

I peeled away the shrink tape to find a very tidy looking repair! There was some excess resin here and there, but nothing a little sanding couldn’t take care of. If I had used a heat gun instead of a hair dryer, there would have been even less resin. When the repair was sanded to my liking, it was time to paint.

Step 16: Paint/Refinish Frame

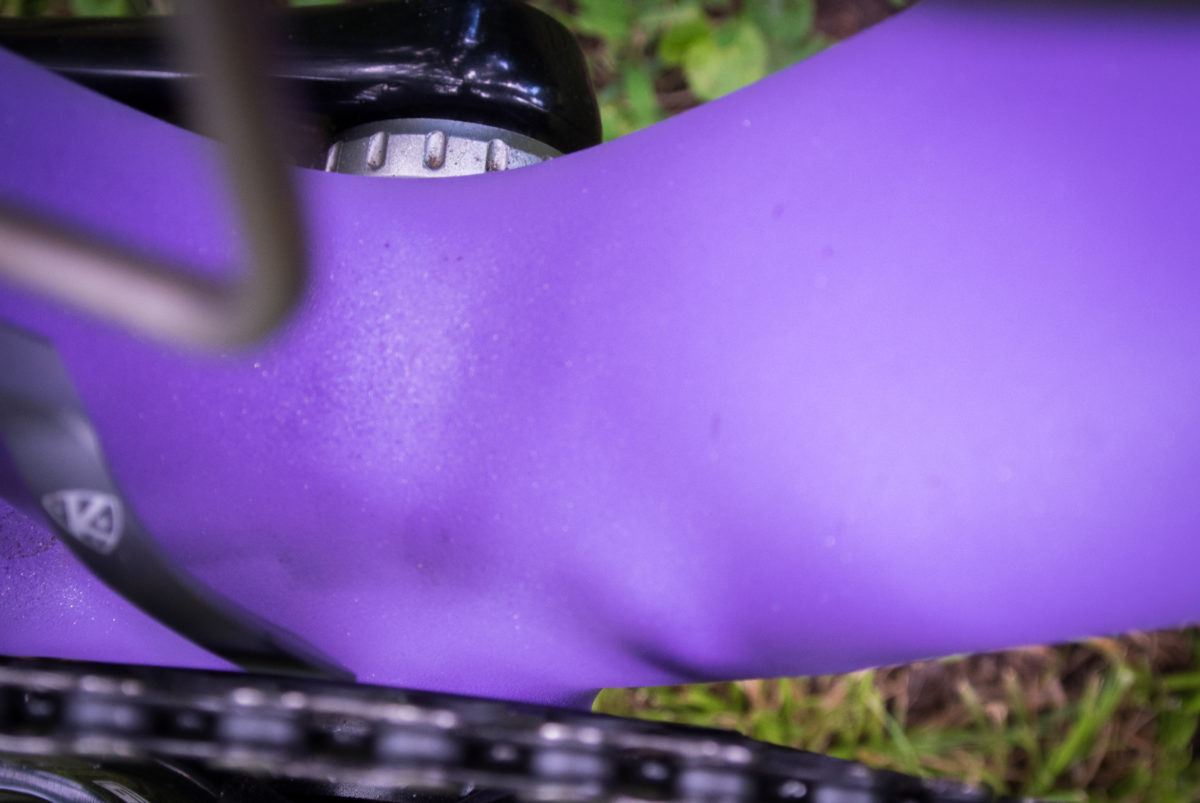
Painting was a whole other project in itself, so I won’t go into depth here. I will say the Spray.Bike paint was very easy to use and their site is packed with tons of great tips. The base Memphis Purple color came out great, but I was disappointed with the Keirin Sunlight Tokyo Gold top coat. It’s a clear cloat with tiny beads of colored glass in it that are supposed to shine brightly in direct sunlight. I was hoping it would be flashier than it turned out. I think one of their Keirin Flake options may have been a better choice.
As with the carbon repair, being methodical and thorough at each step yielded excellent results.

Step 17: Reassembly

Now that the frame was patched and painted, all that was left was to put the components back on and go ride!
In all, this was a relatively easy project to complete. It doesn’t require any special tools or supplies once you have the repair kit. That said, it was a labor-intensive project. Patience and attention to detail goes a long way. My advice would be to take your time, read (and reread) instructions, and watch videos on YouTube for tips on technique.


3 Comments
Jun 28, 2017
Jun 27, 2017
Jan 6, 2019