

Did you ever wonder how some of the mountain bike photos you see here on Singletracks and in magazines were taken? Well today is your lucky day, as I’m going to spend a bit of time talking about the basics of mountain bike photography: aperture, ISO, shutter speed, composition, white balance, and photo editors. Of course, there are volumes of books written on all of these topics, so this is just an overview to get you interested in going beyond the point-and-shoot stage.
The most important thing to learn is how to properly expose a shot, and that includes three key elements: aperture, shutter speed, and ISO sensitivity. Of course, in most cases you just shoot automatic and don’t pay close attention to the exposure meter, but if you do have a chance, take a look at the meter and then do your best to see which settings the camera is deciding to use.
Aperture
Think of aperture as a control for the depth of field, i.e. how much is in focus. A large aperture lets in more light. Setting like F1.4, 1.8, or 2.8 are very large apertures and bring in a tremendous amount of light, allowing for fast shutter speeds. With large apertures you end up with a very narrow depth of field. This is great for portraits, product shots, or a way to remove a distraction and bring focus to the main subject.
A small aperture will allow less light in. F8, F11, and F22 are all small apertures which give more depth to a photo. Unfortunately, they also require slower shutter speeds to get proper exposure.
As a design element, aperture is a powerful tool to use in setting the mood of a photo. Tight, big aperture shots placing only a small portion of the shot in focus force the viewer to focus only on what you want, while small aperture shots are great for landscape shots and getting a scope of how big something is.
Directly below is a shot that was taken with a large aperture (low F value). Notice how only a portion of the bar falls within the depth of field while everything else is pleasantly out of focus:

The photo below is an example of a shot taken with a small F stop (F11), which put everything in focus along with a camera flare bonus.

Camera flare happens when the light bounces around inside of the lens, usually at F11 and F22. The flare can be used effectively to add to the picture as in the one above, giving a more artistic angle to your shots.
ISO
Many years back there was actually film in a camera. You had to purchase film and place it in the camera…. imagine that! And you had to select a specific film type and speed. Stop the insanity! Seriously though, back then it was a bit more difficult than it is today, since now you can select the sensitivity of the camera on the go. Well, more like the sensitivity of the image sensor. As the ISO goes up, however, so does the noise. The noise shows up as grain, or aberrations that are not there in real life.
The photo below was taken with an ISO of 320 and an aperture of F4 and a slow shutter speed of 1/13th of a second. This brings out the richness of color in the shot and blurs the background nicely. The 320 ISO is acceptable as it does not bring in too much noise.

The next photo was tweaked a bit to enhance three of the blooms but still retains the overall look. I took it using ISO 600, with an F4 aperture, and this time 1/60th of a second shutter speed. Overall this shot still looks great, but if blown up it starts to show a bit of grain. It still has the same general appeal as the first flower shot, but this time you will notice that the amount of time the shutter was open was much shorter. This was compensated for with a higher sensitivity on the image sensor:

This last example shows an ISO 100 setting, using a F2.8 aperture (aimed a distance away from the camera) and a shutter speed of 1/13th of a second. This shot used image stabilization (reduces camera shake), and I underexposed the shot a full stop to grab the richness of the sky. I also tweaked the rocks, but used local overexposure to bring back detail:

Shutter Speed
Shutter speed is the third item that you need to know about. Shutter speed can stop action entirely or give a pleasing blur effect that helps show the motion. Depending on what you’re after, shutter speed can be used as a stylistic effect. For mountain biking, I use 1/125 to 1/1600th of a second. The speed of the shutter depends on how fast the subject is moving and if you want any blur. Directly below is an example of a very short shutter speed (1/1600th of a second):

The shot looks nice, but when blown up to full page print size, the grain shows up a bit. ISO 800 was the sensitivity setting and F5.6 was the aperture for good depth of field. The decision to go high here on ISO and shutter speed was due to the speed of the rider–my friend Glen is traveling at about 40km/h, and mostly across the field of view relative to the camera.
Below is an example of a soft-focus shot. A soft-focus shot is a photo that has acceptable focus, but is still a bit blurry. This shot used a longish 1/160th shutter speed. The subject was heading towards the camera but turning. You can see that there is implied motion to the shot yet you can still read the parts and well as the gear.
The photo was taken with a large F2.8 aperture and a relatively fast ISO setting of 1250. The narrow field of view was due to the 70mm focal length. This is a compromised shot, as the grain starts to show when you blow up the image.

To recap
Three important exposure functions–aperture, ISO speed, and shutter speed–are the main things we have to worry about. With nearly all cameras (DSLR, mirrorless, and point and shoot) you have different shooting modes to adjust exposure other than full auto. The most common “creative modes” are Tv (time value), Av (aperture value), and P (program). These three main modes allow you to set one value, with the camera adjusting the other two for proper exposure. Some brand cameras and models have other modes like Portrait, Landscape, Night Time, and Sport modes. Those modes are basically self-explanatory and set the camera for each respective shot.
The other important points to remember when taking a photo are composition (more on that in a second), white balance, light quality, and positioning. All of these (and more) help make for a great photo.

Composition
This topic is widely debated, but many authors and photographers believe in the rule of thirds, as do I. For those who haven’t heard of the rule of thirds, take a photo and divide it both vertically and horizontally by thirds. One of those points of intersection is where the focal point of your image should rest. Things like the horizon, people, and objects of interest are all great things to put on third lines.
Below is the exact same photo as above, just unedited and cropped-in slightly to show points of intersection:
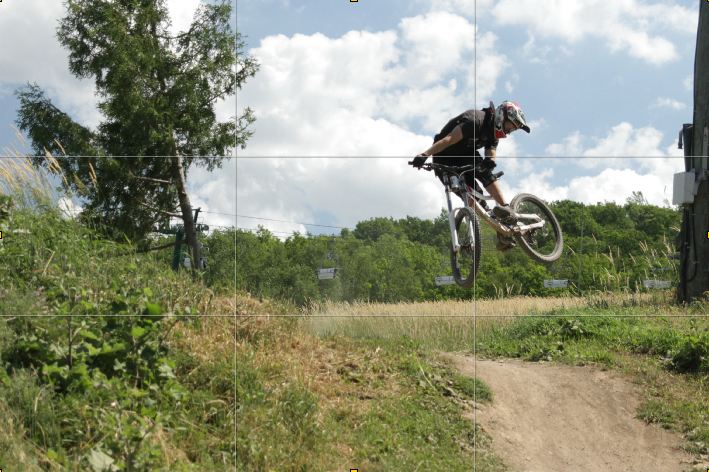
Keeping with the theme of that same image (above), you can see some distractions that are not as of yet removed from the picture. The ugly post on the right side of the image is at the same height as the rider and tends to pull your focus away from the main point of the pic. In the background, the ski lift and its cabling also distracts from an otherwise beautiful tree line. The sky and clouds are over-exposed and could use work with a photo editing program. White balance is spot on, but again the shot is too bright.
White Balance
If you take a shot and it looks either too warm (yellow biased) or too cold (blue biased), before you shoot you could either change the temperature with the white balance control in a preset or set it manually. I tend to set it manually with all my interior lighting equipment running 5000K bulbs (a sunny day is about 5500K). Below is a Canon 7D’s menu, where you can go and select various white balance settings.

The 7D is considered a semi-pro model and can be a bit daunting when it comes to setting it up. Even the main screen (when pressing the “Q” button) can get messy.

If you pick up a camera like a Canon 5, 6, or 7 series, ease into the settings for now. But don’t be afraid to experiment.
Photo Editors
There are even more ways to improve your photos using various photo editors. I personally use Lightroom, Photoshop, and ACDSee. That is just a short list and is far from all-inclusive. Many camera brands have their own software and, in their own right, work very well. All of them have basic exposure compensation, white balance correction, cropping (cutting image to size), and color correction features.
Things to Remember:
- For well-exposed shots, aim to have the exposure at 2/3 to 1 stop underexposed.
- Take control of your white balance.
- Aperture controls how much is in focus.
- Shutter speed controls the amount of light and crispness of your shot.
- ISO controls the sensitivity of the sensor. The higher ISO, the grainier the shot.
- Try shooting RAW.
- Place important objects, including the subject of the photograph, on third lines.
- Try editing your photos on the computer for that final touch.
So what are you waiting for? Get out on the trail and start shooting, and be sure to upload your best photos for consideration as a Photo of the Day!
Stay tuned for my next photography article: advanced settings, filters, and lights.


15 Comments
Nov 19, 2012
Best advice, don't stick with the Big Green Box. Shoot in Av or Tv (aperture and shutter priority) and work your way up to M. Av will allow you to set a specific aperture setting (f2.8, f11, f16, etc.) and the camera will figure out the shutter speed for proper exposure. The same is true for Tv. You can set the shutter speed you want (excellent for getting motion blur panning shots) and the camera will alter the aperture to suit.
Experiment. The lovely thing about digital is, you don't waste film. Don't like the shot? No biggie! Just delete it off the card and move on. Got a winner? GREAT! Take a look at your shot settings and try and replicate it again down the road.
Nov 20, 2012
I have now purcahsed the Lowepro Photosport 200 AW.
A brilliant bit of kit, nice protective pouch for the camera. Side access for quick reach of the camera.
I can fit my Nikon D5100 with Lens and have a second lens and flash in the camera section.
There is then plenty of room in the top of the bag for waterproof and bike kit, and a seperate compartment for a water bladder whichh is seperate to the camera compartment.
You can even fit a tripod to the straps on the side.
Have taken the pack on many full day high mountian rides and it has always been comfortable. Even coming down at speed it remains stable and comfy. Weight is not too different to having a standard bike backpack on such as a Camelback.
I woudl give it 4.5 out of 5....
Link below to product:
http://www.lowepro.com/photosport
Nov 20, 2012
Nov 20, 2012
Nov 19, 2012
Nov 20, 2012
I've also seen pro MTB photogs using a waist/fanny pack to carry their cameras and lenses. That way it's easy to grab the camera but I imagine you need to be a pretty confident rider to make this work.
Nov 19, 2012
By normal photography backpack is way too big and bulky (I tried it and quickly gave up on it). I can also mount a back rack that I already own on the back of my bike and bungie the bag there. But that would be too slow to get the camera out to shoot.
I'll have to see if i can find a really small camera backpack.
Nov 20, 2012
http://forums.singletracks.com/viewtopic.php?f=101&t=9023&p=51695#p51695
I will review it when I take it on the trail.
Nov 20, 2012
Nov 20, 2012
http://forums.singletracks.com/viewtopic.php?f=101&t=9023
Nov 19, 2012
Nov 25, 2012
I use a Dakine Quest bag to carry around my gear.. It's sturdy enough that if I do fall my gear is well protected.
The padding and straps really make for a decently comfortable pack that I don't worry about when riding and picture taking. Even DH/FR riding. The trick with that is a pack that does not migrate up the back when descending. I just don't carry a tri-pod in those cases..
Nov 20, 2012
http://peakdesignltd.com/capture/
Nov 25, 2012
just bring your wife a photographer wit her DSLR and hire a babysitter. Then you can get out on the trails, she can get some great photography time, and you are together enjoying the outdoors.
PS my wife read the article over my shoulder and really thought the article was well written as well.
Nov 25, 2012