
There is going to come a time when your well-used mountain bike will need its cranks serviced. When and how often really depends on you and what kind of conditions you ride in.
You’ll know that your crank area needs to be serviced when you hear audible creaking or clicking, if the cranks are hard to turn or have a gritty feeling, or if you can visually see things like worn out chain rings (if the teeth on look like sharp shark teeth). Regardless of what made you look at your crank/bottom bracket, if you have a question, chances are it needs to be serviced.

A multitude of frame designs and drivetrain options can make acquiring the right tools to get the job done tough. Presently, there are well over 5 variations of bottom brackets, with either two piece or three piece cranks. Three piece styles include use standard names like JIS (square taper), ISIS (10 splines), Octalink V1/V2 (8 splines), and Power Spline (12 splines).
Three of these units use press fit-style bearings, and I do not recommend trying to service those by removal, as more than likely the bearings will be destroyed. The BB30, PF30, and BB86/92 require bearing adapters and a hammer-like press.
Of the threaded bottom brackets, there are two major thread designs. The most popular for mountain bikes is the English BSC 1.37″ x 24 tpi.
Before you start, you have to be well aware of the tools required for the job. Finding and printing brand-specific instructions is also a great idea.

Note: for simplicity, I will be quoting Park Tool numbers, as they are the easiest to find and they work well.
Which set of cranks you have installed on your bike determines the tools required for the job. Most modern bikes use a self-extracting system (with some exceptions on cheaper bikes). You will need an M8, M14, or M15 mm bolt.
Below is an image of the older square taper bottom bracket tool CCP-22 and the CCP-44 for the square taper and Octalink bottom brackets without self extractors:


To remove either one of the aforementioned crank arms, do you best to firstly try and extract the crank with its own extraction method (if equipped), without the use of a crank extractor.

If you find that when you remove the bolt (turning counter clockwise) that it binds and does not want to pull the arm off, then stop, turn the bolt in a few turns, and then remove the retaining cover. A pin tool may be needed (SPA-2 or similar). Once that is removed, then look at what type of bottom bracket you have. If you see a square, you will need the Park CCP-22 tool. Splined cranks will require the CCP-44 tool.


Two-piece cranks, like Shimano’s Hollowtech II or FSA’s Mega Exo, are a bit easier to remove, as they require you to only remove one or two fixing bolts on one crank arm. SRAM GXP and RaceFace X-type cranks have a single bolt that bottoms out. Specialized has their own version of a two piece crank which is very similar to a Campagnolo design.
Either way, you will need a few tools here: a 5mm hex key to remove the two bolts on a Shimano (FSA) crank arm followed by the use of the BBT-9 or BBT-10 (8mm for FSA) tool to remove the crank cap.


Keep in mind that Shimano has a stop plate that will need to be carefully removed as well. The stop plate is found only on Shimano, and is used to prevent the crank from sliding out in the event the cap falls off (if someone forgot to tighten the cranks down in the first place). A few small taps from a soft face hammer, such as a mallet, may be needed to get these cranks off.

Some cranks, like the FSA Megaexo, SRAM cranks with a PF GXP bottom bracket, and e13, use a wave washer for tension. Keep that in mind, as this item needs to go back in the correct side (usually the non-drive side). Failure to replace that wave washer will result in side-to-side play in the cranks.

X-type bottom brackets use thin white chainline spacers and spindle spacer seals. These items should be noted when removing the cranks (it’s wise to write down the order that you removed the pieces).
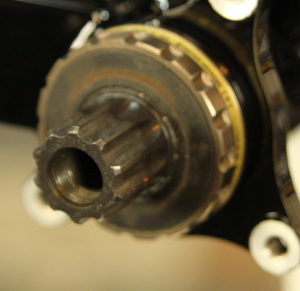
Once you have removed both crank arms, take a look at the chainring teeth.

When inspecting the teeth, look for both the amount of wear and cracks, or bent teeth. Both will cause poor shifting and skipping gears. There should be no missing, broken, chipped, or excessively-worn teeth. If you’re someone who rides aggressively over rocks and roots, pay close attention to cracked teeth.
Dedicated single ring bikes have no ramps and use a deeper tooth profile. You’re more likely to find bent teeth on these rings than anything, especially if you’re not running a bash guard.
Rebuild kits are available.

With the cranks off, throughly clean both arms and chain rings. Take everything apart at this time. That way, you can inspect, clean, and decide whether the rings are worth putting back on, or if they need to be replaced. Depending on the cranks, you need to use either a 4, 5, or 6mm hex key or T30 torx key, and a chainring nut wrench CNW-2. Again, keep in mind of the condition of the hardware. Alloy bolts, if over torqued, will crack.
Presently, 3x, 2x, and 1x systems are available on mountain bikes. With the 3x and 2x systems, the larger rings will use shift ramps and pins to help lift the chain for faster shifts. You need to look for damage and wear. The pins should still be sharp, and the edges as square as possible on the ramps.

Make sure that all 3x and 2x systems have the chain rings indexed to the crank. It could be a pin or tang that juts out of the ring. Either way, take note of this when re-installing the cranks.

Once the crank arms and chainrings are all cleaned, reassemble them. Do not over tighten the hardware, as it may crack. Using a drop of Loctite on the chainring bolts will prevent them from coming loose in the future.

Before sliding in the crank, double check the bottom bracket bearings, as they can come loose. Use a Park BBT-9, 22, 18, or similar tool to check the tightness of the bearing cups in the frame (a loose cup will generate a creaking noise under power). Most mountain bike bearing cups tighten counter clockwise on the drive side, and clockwise on the non-drive side. The drive side should be torqued to about 35-50Nm. If the bottom bracket is a cartridge type, then the non-drive side uses the same torque. I’ll discuss non-cartridge bottom brackets in a separate article.

Reinstalling the cranks is pretty easy. When reinstalling the cranks, they should be clean, with a small touch of waterproof grease on the splines and spindle. Ensure that you have all the spacers or wavy washers on hand and in the correct spots before you proceed. Raceface and e13 use white spacers to set the correct chainline. Shimano and FSA don’t have any spacers on the chainring side.
Slide everything in place, and then in the case of SRAM and RaceFace cranks, start to tighten the single tension bolt. Be sure to keep the chain in mind when tightening the cranks together. I’ve seen a mechanic forget that the chain dropped in and jammed itself between the crank and bottom bracket bearing: that was a mess. Mistakes like that could damage your gear to the point where replacement is the only option. To prevent that issue, drape the chain on one of your rings as you tighten things down.
Cranks that have no master spline can be installed incorrectly. Shimano uses a master spline to keep the cranks in line. SRAM and RaceFace do not. Also keep in mind that Hollowtech II cranks use a plastic spacer to keep the cranks from sliding off.
Follow your manufacturer’s directions on how much torque to apply to the bolts. Do not over torque them: damage will occur to your bearings.
If everything has gone according to plan, you’re now ready to get back to shredding singletrack!


0 Comments