

Not everyone can afford the latest and greatest all the time. But if you find that you’re in need of a rebuild on your older 2005-2008 or 2009-2011 Fox 40 and want the best Fox has to offer, have I got news for you! Fox was cool enough to contact me to see if I wanted to pimp someone’s 40 for them. One of my good riding buddies happened to have popped the diaphragm on his 2010 fork afterone too many flat landings, making him the perfect candidate for an upgrade.
After considerable riding time, all Fox 40 forks start to lose plushness and exhibit increased stiction which affects sensitivity and increases harshness. This can be due to contamination of the fluids and minor loss of lube over time, not to mention the wear associated with thousands of cycles of compression and rebound. Needless to say, my buddy Chris was super stoked for the pimped out parts!
With an upgraded inverted cartridge, Chris is getting a host of improvements, the most obvious of which is the repositioning of the compression knobs (now on top). Internally the cartridge is more reliable which reduces the chance of bladder cap bending and bladder blow outs.
Performance-wise the new cartridge puts the weight of the oil and cartridge body on the top of the fork which reduces sprung weight. Because of the new placement of these parts, the bump force does not need to overcome that weight to start absorbing the actual bump. This improves fork sensitivity.
For this task the following FOX parts must be ordered:
2005-2008 40’s: 820-08-126-kit Service Set: Inverted 40 RC2 05-08 Retro Cartridge Assy Complete
2009-2012 40’s: 820-08-092-kit Service Set: 2011 40 RC2 Cartridge Assy Complete ($450)
SKF 40 seals part# 803-00-616 Info to pass on below. ($35.00)
2005-2008 40’s: 208-03-056 Kashima Stanchion tubes x2 ($300 for a set of two)
2009-2012 4o’s: 208-03-056 Kashima Stanchion tubes x2 ($300 for a set of two)
Fox Float fluid

And here’s the tool list you’ll need for the job:
32mm 6pt socket
1.5,2,3,4,5,6,7,8,10mm Hex key set.
10mm deep socket
15mm open socket
7,12,15,16mm wrench
10-18mm cone wrenches (thin)
13,14mm crowfoot
Pick
Plastic hammer
Screwdriver
Torque wrench
Extensions
Graduated liquid container
20cc syringe
Cleaning solution
Micro towel
I would also highly recommend a flashlight and a repair stand to do the work on.
Start off the job by clearing out a work area and have all your supplies with you. Safety glasses would be a good idea, especially when dealing with fluids and cleaners.


First, remove the front wheel and brake. Carefully remove the 4 pinch bolts on the axle using a 5mm hex key. The caliper follows next with the same 5mm hex key; remove the cable guide using a 2.5mm hex key and re-mount the guide (it’s small and can easily be misplaced).


At this point there should be nothing attached to the lower assembly so it is safe to remove the stanchions from the upper and lower crowns. Loosen the six bolts that hold the upper and lower crown assembly to the stanchions using a 5mm hex key. Once they are all loose, slide the stanchions from the upper and lower crown. If you find them to be a bit snug, use a brake tool (those little plastic spacers that people usually discard) and tap them in the pinch space (trust me it works great). The stanchions should slide out very easily. Just remember to catch the two bumpers and more importantly, remember to put them back.

Now that the fork is removed, it needs a good cleaning before you go any further. You don’t want any contamination to enter the fork when working so a good cleaning product like Bike Super Wash from Finishline should do the trick. Use an old tooth brush and get into the hard-to-reach spots around the lower assembly to get all the grime that may have collected. After drying everything with a lint-free cloth, release any spring tension on the coil side by backing out the the pre-load.


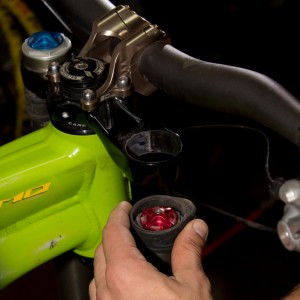
Place the spring stanchion in your bike stand and make sure you’re not scratching anything (wrap the stanchion once with a cloth). Since you’re replacing both stanchions and the damper cartridge you only need the guts out of the spring side. Using the 32mm 6pt socket, remove the top cap (counter clockwise). Note how many spacers were placed directly under the top cap and use a pick to pull out the damper spring.

On the bottom of the fork use a 6pt 1omm socket and loosen the bolt that holds the plunger shaft about 3 threads, then give it a tap or two with a soft face hammer to loosen it up. Get ready to catch the 40ml of oil that will drain out from the fork lowers.

After the fluid drains, set the lowers aside and wipe down the bottom half of the spring side.Using a pick and small screwdriver (or second pick), carefully remove the spring clip that holds the plunger shaft assembly in place. I use the second screwdriver to pry the spring out of the groove while the pick rotates around moving the spring clip. Once it is off, save the plunger assembly and spring clip.


Place the new stanchion in the stand carefully (again wrapped with cloth or the packaging material that it came in) groove side up first. Install the plunger assembly and spring clip. The clip should go in easily – just carefully work it in with a circular motion using the pick as a guide. Turn the stanchion thread side up and install the spring and spacers (remembering the order in which they were removed). Then install the top adjuster assembly. Us a bit of Fox Float fluid on the O-ring to prevent it from binding. Torque down the top cap to 24 Nm and set aside for final assembly.


With the remainder of the fork (old damper cartridge and lowers), you now can place the damper side of the stanchion in the repair stand.


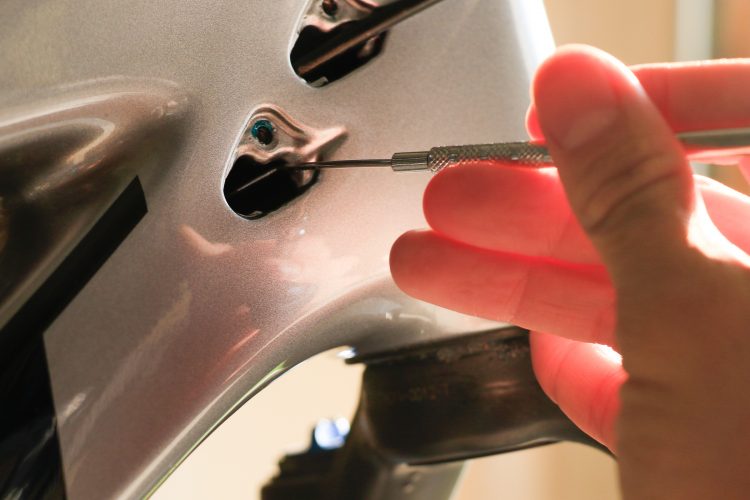
Remove the protective cover from the compression tuning knobs and remove them using a 2.5mm hex key. After that, use a 15mm deep socket to loosen the bottom nut.


With the nut loosened about 3 threads, reinstall the cover and tap that with a soft face hammer until the damper shaft comes loose (get ready to catch the fluid). There will be about 40ml of fluid in that space that will need to be caught before you can separate everything. Remove the nut fully and you’re done with the damper unit.
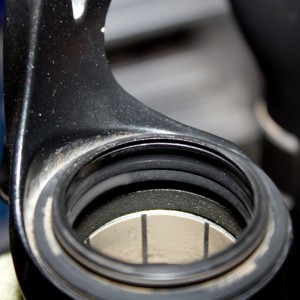


Clean up the fork lowers using a bike cleaning spray and remove any residue. Once clean you can now proceed by removing the seals and foam O-rings. I use a pry bar (basically a wide screwdriver) covered in cloth to protect the finish of the fork.


After a bit more cleaning I soak the O-rings in Float fluid and carefully place them in the fork, followed by the new low-friction seal. To install the seal I use a bottom bracket tool that happens to fit snugly around the seal without damaging the seal itself. The most important thing is to avoid bending or physically touching the seal lip and spring. You could even use a PVC tube of close diameter here. Whichever method you use, be sure the seals go in as straight as possible.

With the new damper cartridge, remove the top screw that holds the two compression adjusters, and set it aside temporarily (do not tip it over or that small detent ball in the photo above will drop out). Remove the lower cap and the red rebound knob using a 2.5mm hex key. Then apply a light coating of Fox Float fluid to the damper cartridge O-ring. Thread the cartridge into the new Kashima-coated stanchion all the way down (don’t worry about torque yet). Place the assembled unit in a bike stand (protecting the coating with a rag or packaging material), and use the 32mm 6pt socket to torque the cap to 24 Nm. Install the adjusters and single tapered bolt. The adjusters are indexed so be careful to match things up – the single tapered bolt uses 1.5 Nm max, so use caution.
At this point you should have two complete stanchions and a lower crown assembly with new seals. Install the damper cartridge on the right side (the arch of the fork is forward) and the spring side stanchion on the left. With both ends it is critical to carefully install each stanchion with a twisting motion, so that you do not fold the lip of the seal. A bit of Fox Float fluid on the seal itself and the stanchion will work great at eliminating any chance of the seal grabbing.

Once each one is in I temporarily place the bottom nuts in place until I can fix the whole unit on the bike. With a friend and those plastic brake shims installed, carefully reinstall the stanchions back into the fork crowns. Now remember to slide the frame bumpers on before sliding the stanchion into the upper fork crown. At this point you can also feed your cabling as well. Once you have the stanchions in place, remove the shims and line up the stanchions.

This is a good time to use a quality measuring tool to get both sides in place at the right heights. By adjusting the height you can also slightly adjust the steering angle. With a near-flush stanchion to the top crown you have a slightly shallower head angle for more stability at higher speeds. With 10mm of stanchions over the deck of the upper crown you have a steeper head angle which is better for tighter situations. Torque the bolts to 7.28 Nm and while you’re there, set the bumpers and double check the torque on the adjuster caps.

Turn the bike and fork upside down and fill each leg with 50ml of 10wt Fox green suspension fluid or equivalent. Then place the new washers supplied with the seals and torque the bottom nuts to 5.6Nm. Lastly, install the red rebound knob using a 2.5mm hex key.

With the bike upright, install your wheel and front brake. Remember to torque all the bolts and do a once-around check to make sure you didn’t miss anything.

Was all this work worth it? From the very first time we compressed the chamber we noticed a massive change in the fork. Talk about buttery. I personally hate using food as an analogy for bike performance but.. buttery smooth it is. My good buddy Chris ended up taking his bike literally from my shop at home to a Pennsylvania bike park within 24 hours.
Here’s what Chris has to say about the upgrades:
The test venue for the fork upgrade was Seven Springs Bike Park located just outside of Sommerset, Pennsylvannia. (The park) has a diverse selection of trails from the ever so fun “Aline” type trail aka “007” to faster rocky tech trails such as “EC” designed by top rider Eric Carter, to some pretty gnar trails such as “Frankenstein” which was littered with huge rock gardens and decent sized rock drops.
Before the first ride, the high and low speed compression knobs were set in the middle positions at 11 of 22 and 13 of 26 clicks respectively. I normally run with only two to three clicks of preload which is just enough to make sure the spring is not loose. Rebound to me is the hardest setting to get dialed as it should be fast for bashing through rocks without pack-up but slow enough to cushion big hits without bucking you off of your bike like a wild horse after landing something big. The best starting point for rebound is in the center position (10 out of 20 clicks).
The first trail I rode was a perfect test for the fork which was a flowy trail called 007 with tons of jumps and big berms and even a few rock sections. This trail was great for getting a feel for all aspects of the fork set-up.
During the first run of the day I totally forgot about the new fork by the end of the trail. It felt so good that I got lost in the moment and joy of riding. Once the utter awe of amazement wore off I took a few more runs down 007 paying more attention to the fork settings and honestly the fork was set up pretty bang on for the most part and there (were) only a few things to slightly adjust.
The high speed compression was set a bit soft with the bike slightly diving into the front travel a bit too much on rougher landings and drops. After a few more test runs I was confident (in) my observations and I cranked the high speed dampening up maybe 4-5 clicks which now was set at (14 out of 22). After getting the high speed compression set, adjusted, and tested out for a few runs I felt as if I could use an ever so slight increase in response from the rebound. 3 clicks faster seemed to do the trick (so now 13 out of 20 clicks towards fast rebound). The low speed compression was pretty bang on in the center position. I tried adding a few clicks of dampening from the center, as well as taking a few clicks off but I really liked the feel of the fork with it set exactly in the center position (13 out of 26 clicks)
One thing I really liked about the 2012 fork parts compared with the 2010 (is) the revised damper cartridge. I find that I like to adjust my high and low speed compression far more often than my rebound. Riding at different places often times requires slightly different compression settings depending upon the terrain. On this version of the fork the high and low speed knobs are located right at the top of the stanchion which makes adjustment an ease. The knobs are buttery smooth to turn and the clicks are very pronounced.

Thanks to the folks at FOX for sending up the parts for the modifications.


3 Comments
Sep 21, 2011
Sep 27, 2011
Here is the Link:
http://www.foxracingshox.com/service.php?m=bike&ref=shsidebar#upgrades
Sep 20, 2011