Trails
Reviews
Tips
Community
Deals
Latest
Support
Trails
Find trails
Best bike trails
Destinations
Add a new trail
Reviews
Mountain bike reviews
Components
Tires
Clothing & shoes
Helmets
Accessories
Product news
Community
MTB Clubs
Races & Events
Bike Shops
Tips
Skills
Fitness & Training
Health & Nutrition
Beginners
Repair
Latest Articles
Podcast
Deals
Support Singletracks
Sign in
Create an account
About us
Newsletter signup
Shocks
Rear Shocks
Cane Creek DB Air CS is Still the Rear Shock to Beat [Review]
Rear Shocks
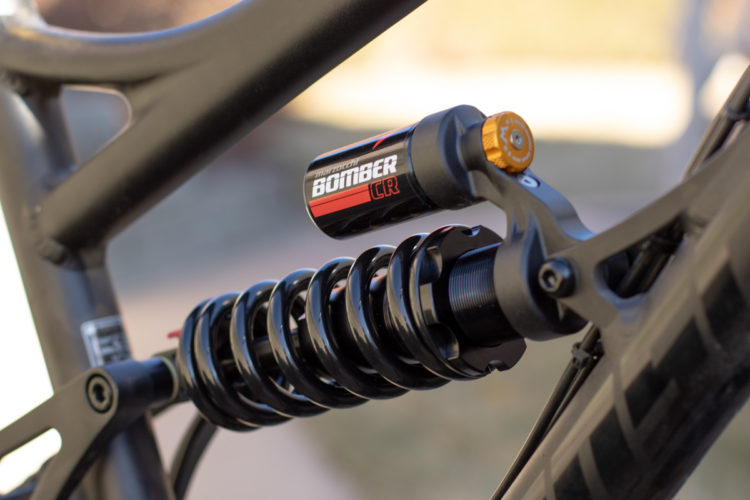
First Impressions: Trail Riding With the New Marzocchi Bomber CR Coil Shock
4
Forks
How A Volume Spacer Changes Your Mountain Bike Suspension
Mountain Bikes and Gear
Fox Factory Tune Program Allows Mountain Bikers to Customize Suspension, Upgrade Performance
2
Mountain Bikes and Gear
SR Suntour Is Making an Awesome $850 Fork... For 20" Kids' Bikes
Mountain Bikes and Gear
A Taste of Italy: Marzocchi Suspension, Alpinestars Sprint + Faster Packs, and Dainese Propack
Mountain Bikes and Gear
Interbike MTB Suspension Report: Fox, Rockshox, Marzocchi, and More
2
Mountain Bikes and Gear
X-Fusion Forks and Shocks
Mountain Bikes and Gear
How to Install a Front Fork
10

 4
4


