After a recent accident on the trail that toasted both body and bike, I figured I needed to learn something from the experience. Otherwise I might repeat the same thing over again without making changes to prevent it from happening. Experiences like this offer excellent opportunities to better oneself, or in some cases, someone else.
Today I’m handing over some technical know-how to you thanks to my accident. One of the results of my crash was a pringled wheel and the only real way to fix it was to replace the rim. So here’s the quick and dirty on building (or re-building) an MTB wheel.
The first thing you need to know is whether you’re building a 24, 28, 32, or 36 hole wheel, the process is the same. The only difference is the number of spokes per stage are different: 6 for a 24 hole, 7 for a 28 hole, 8 for a 32 hole, and 9 for a 36 hole wheel (can you spot the pattern?).
So to get started there are some things that we need to do before turning a truing key. Here’s a list of tools that you’ll need:
- Truing stand such as the Park TS-2.2
- Truing keys for the spokes
- Measuring tool or Vernier caliper
- Spoke prep or a lube
- Proper length spokes (for disc wheels each side requires two different lengths)
- Spoke nipples
- Calculator (to calculate spoke length)
Now we’re ready to go. The first step to building up a wheel is to figure out the spoke lengths for both sides of each wheel. Due to the prevalence of disc brakes on mountain bikes, most wheels today have four different lengths of spokes. The following websites have formulas to help you calculate your spoke length. You can choose any site for this task:
DTSwiss.com (has access to many major branded hubs)
WheelPro.co.uk (good site with info on how to measure)
BikeSchool.com (good site with great links)
AppliedThought.com (one more site for completeness)
Wheel building is essentially the same for front and rear wheels. There are the same number of steps and you’ll drop the same number of spokes at the same time for both front and rear. Take the number of spokes for your wheel that you’re building and divide by four – that will be the number of spokes you will set in each flange at any one given time. I am building a front wheel but the hub and rim positioning holds true for a rear rim as well.


Positioning the hub and rim
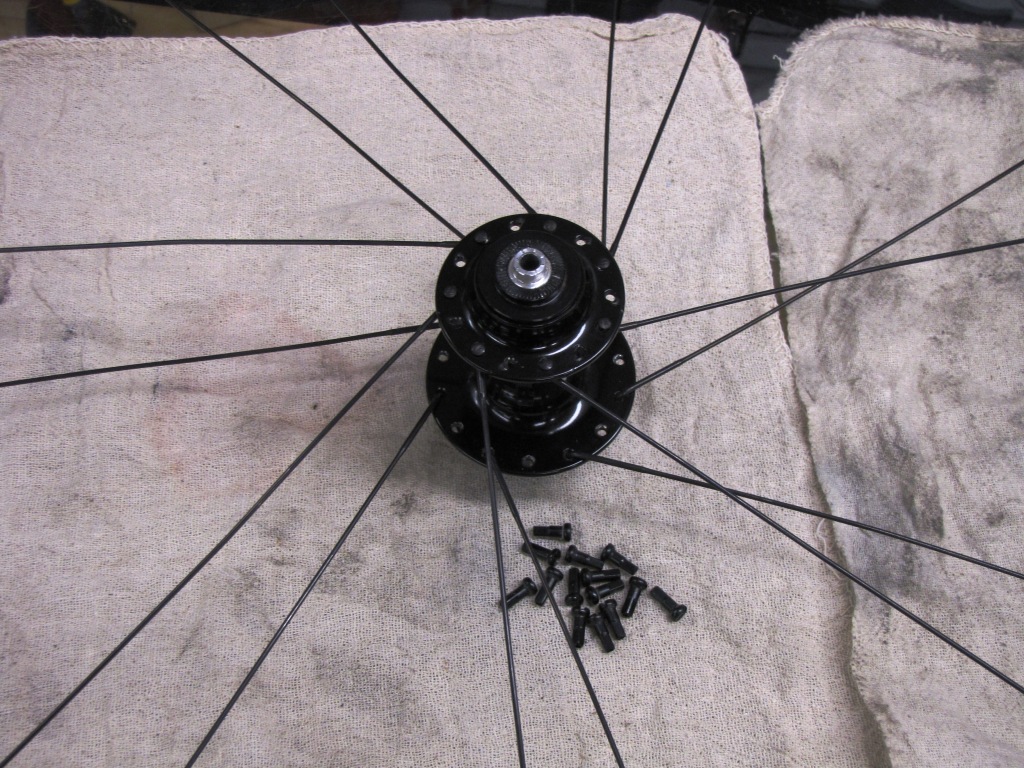
Position the hub so that the disk mount side of the hub is facing up (front wheel) and drop in the first set of 7 spokes (28 hole rim). Place the rim so that the sticker on it is facing upside down (front wheel only). If you look at the valve hole you will see that the spoke hole on the left is up and the spoke hole on the right is down. When building with this method you must always have the rim situated this way. If you’re building a rear wheel you’ll have the hub with the cassette facing you and the rim sticker right side up.
Laying in the key spoke and lacing in the first set
You can take any spoke and now fit it in the rim hole to the left of the valve hole. Thread a spoke nipple on and repeat this every forth spoke hole, rotating the rim and installing the remainder of the spokes. The wheel should look like the one in the photo. Just remember from now on you are always skipping three holes when you add the next spoke.


Setting the second round of spokes
Flip the wheel and orient the rim so that the valve hole is facing away from you. You should now have the spoke on the right side of the valve hole. Drop in the next set of 7 spokes into the hub and drop them in every other hole. Before you place a spoke you should look down at the hub and notice that the holes are offset. Pick the hole that is to the right of the key spoke and drop the spokes in every other hole. Once the spokes are in it’s time to lace them to the wheel. At this point there should be one spoke on the right of the valve hole. Install the spokes loosely at this point – you should have a wheel that looks like the one below. Turn the hub clockwise while holding the rim so that the spoke are tangent to the hub.


Dropping the third set of spokes
You’re now ready to start feeding the third set of spokes. The easiest way to remember is under the first two, over the last. This holds true for 3-cross lacing. For a two-cross lacing pattern, lace under the first spoke then over the last. Either way it’s easy – just remember these sets of spokes now go in the opposite direction that the previous two sets have been going. Thus this set will fit in the spoke hole on the opposite side of the valve hole. Once you feed the entire set of spokes you should have a familiar pattern emerging. When all the spokes from the third set are in, feed the remainder of the spokes on the opposite flange doing the same thing you did on the third set. The fourth set will have the spokes entering the other side of the flange.
Flipping and dropping the fourth set of spokes
Complete the pattern by weaving the last set of spokes just like the third set (under two, over one for 3-cross). Once you’re all laced up, get your wheel on the truing stand and using the valve hole as reference start tightening the spokes until the threads just disappear under the spoke nipple (this is why getting spoke length is critical). You can also use a spoke key or screwdriver for this task. At this point you’re getting ready to breathe life into your creation by adding spoke tension.
Tips before truing a wheel
Pre-bend the spokes so that they are straight as possible, both at the nipple and the hub flange. This task may take time but in the end will give you a wheel that is stronger and stays straighter in the long run.
Make sure you use a spoke prep. It will make assembly easier and will also prevent the spoke from winding up. A piece of masking tape on each spoke will indicate when a spoke is twisting (not my idea but a good one nevertheless).
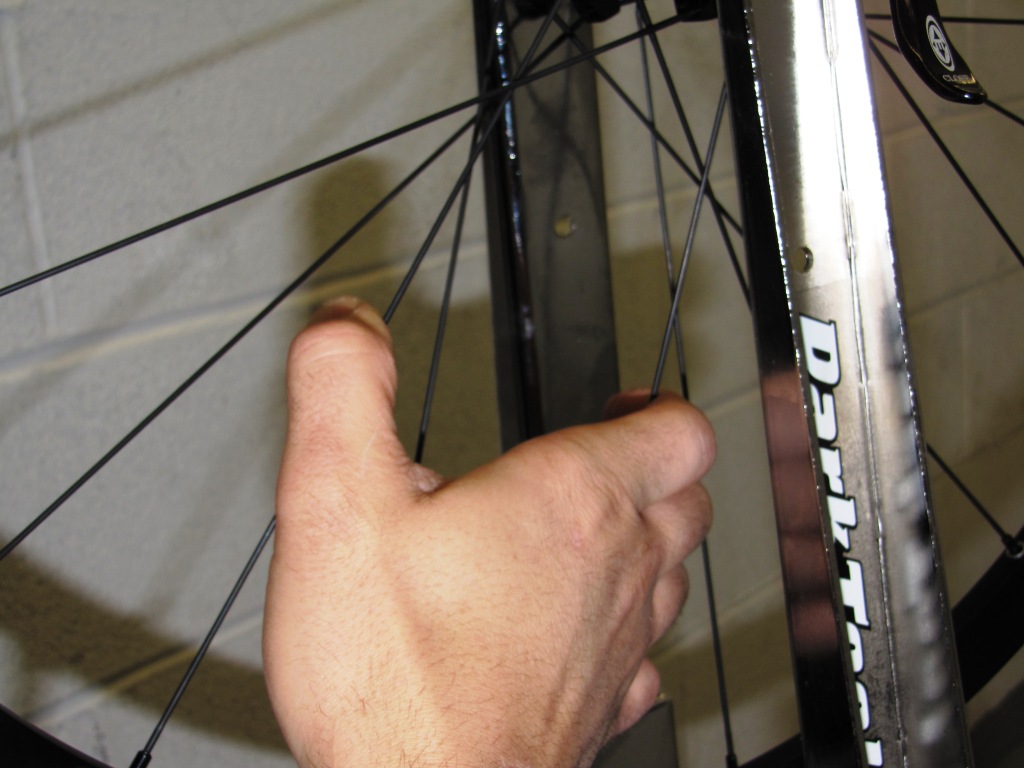
Check for tension often, clasping 4 spokes at a time (see photo). This will take out any wind-up and will set the spokes more quickly.

Place the wheel in a truing stand and take slack off the spokes evenly. If you have the spoke lengths just right you should be able to wind up all the spokes in the nipples until the there is one thread left.
True and tension the wheel
Always start at the valve hole for reference when truing and adding tension to your wheel.
Continue bringing up the spoke tension one half turn at a time until the wheel begins to firm up. Once you begin to feel a little bit of resistance, start bringing the wheel into shape. There are four things that you need to control to complete the job: lateral truing (side to side movement), vertical truing (up and down or hop), dishing (keeping the wheel centered), and tensioning (more tension = stiffer wheel).
Try to make your truing adjustments independent of one another. For lateral truing, spin the wheel in the stand and find the place on the rim that is farthest away from where most of the rim is. If the rim is off to the left, tighten spokes that go to the right flange and loosen those that go to the left flange. If you do the same amount of tightening and loosening, you can move the rim to the side without affecting the roundness of the wheel.
A word of caution: When truing and using the example below, go around the entire wheel once while trying to improve the overall wheel. Do not concentrate only on one spot. After each time around the wheel, relieve the stress by squeezing the set of four spokes as mentioned before.


As an example, if the rim is leaning to the left and the center of the bend is between two spokes, tighten the spoke that goes to the right flange a quarter turn and loosen the spoke that goes left a quarter turn. If the center of the left bend is next to a spoke that goes to the right flange, tighten that spoke a quarter turn and loosen each of the two spokes to the left 1/8 turn. If the center of the left bend is next to a spoke that goes to the left flange, loosen that spoke a quarter turn and tighten each of the two right spokes next to it 1/8 turn. After adjusting the worst bend to the left, find the worst bend to the right, and adjust it.
Keep alternating sides. Don’t try to make each bent area perfect – just make it better, then go on to the next. The wheel will gradually get truer and truer as you go. When you’re near the end of this job you should have a wheel where the spoke tension is fairly even. When truing a wheel I often pluck each spoke and listen to the tone to find any irregularities. Keep in mind that the left and right side spoke tensions will be different – the disc side tone will be higher than the other side. On a rear wheel with disc, the tone will be almost dead even between the two sides.
Finishing up and riding!
Once you feel like you’re done, give the wheel a once over again by compressing sets of 4 spokes and double check the state of true. If all is good and you’re happy with the amount of tension, place rim tape over the spoke ends and mount up your tires. Install your discs and you’re off! Go for a good ride then re-check your tension. Your wheels should last you a good long while.
A quick note about tension: Typically as spoke tension rises, the wheel becomes more stiff which allows it to react more quickly. So for an XC rider who’s into technical events, he or she may want to consider building a tighter wheel. For someone who is into endurance events and likes a “softer” riding wheel, less tension may be the way to go. That being said, too much tension can damage a wheel. If you have a tension meter, shoot for tensions from about 70 – 90 kgf to a maximum of 130 kgf depending on your rim and spoke selection.
Once your wheel is true and set and you have ridden your bike, if you feel the wheel is reacting slowly or feeling “mushy,” place your wheel in the truing stand and add a quarter turn counter-clockwise (tightening) to each spoke (start at the valve stem). Then re-check, true, and go for a ride. Repeat ’til you’re happy.
Cheers!
Syd