I recently worked with my buddy Chris to pimp out his 2010 Fox 40 to 2012 specs and it was a big success. Well, Fox decided to send down a brand new 2012 Fox 40 FIT RC2 for us to compare and review as well.
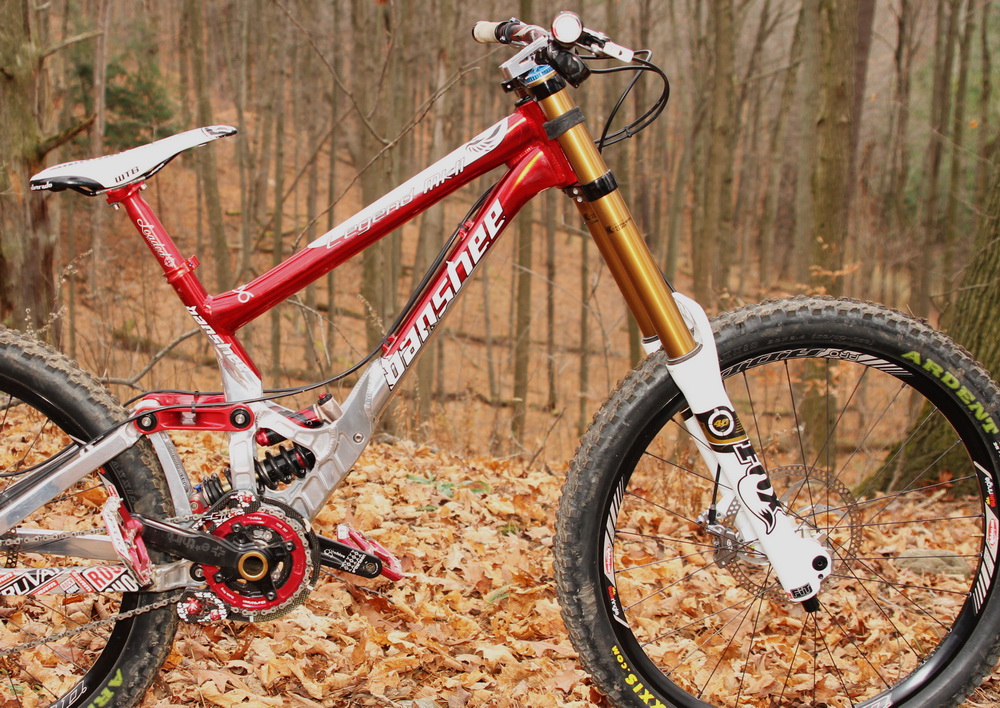
I was pretty stoked to give the 2012 Fox 40 a thrashing after fixing up the 2010. The new 40 incorporates all of the prior knowledge that Fox has gleaned from their other forks into a beautiful 6.81 pound package.
Intended for serious downhill service, the 40 is not for the budget-minded rider. Rather, the 40 is intended for the person who puts a premium on performance. With riders like Aaron Gwin running the 40 and winning world championships on it, I am sure we can all agree that it is definitely race-proven.
Specs

The 2012 Fox 40 comes in either white or black diamond (a slightly metallic black), with a 1 1/8 steering tube and a full 8″ (203mm) of travel. The fork travel can be reduced by changing up the shim height on the coil side in 1/2 inch (12mm) increments, potentially dropping it all the way down to 6.5″ (165mm) of travel.
As I previously mentioned on the Pimp My 40 article, this 40 comes with all the goodies: Kashima coated stanchions and low friction SKF seals are standard. On the spring side of things, a standard titanium coil (blue for 150-180lb) comes installed, and two extra steel coils (purple and green) are provided if you’re on the lighter or heavier end of the scale.
Dampening is handled by the new inverted FIT damper, which I have already had experience with. The damper takes care of high and low speed compression (up top) and rebound (down at the axle), which makes it easier for a rider to tune the bike. The FIT damper has been in existence since 2005, but this time around Fox re-engineered it by inverting it and changing up the controls, which effectively kills two birds with one stone.
For starters, the inverted damper removes un-sprung mass from around the axle, so that it is now supported by the spring. The second advantage is the improved placement of the compression dials. Previous versions had the compression dials at the axle, which made changing settings on the fly impossible. One would have to stop completely, dismount, and remove the protective cover in order to access the controls.
With the new damper there is also a reduction in internal friction, which further improves damper sensitivity. This is accomplished by low friction seals and a new bladder design.
Installation
Installing the Fox 40 requires a few tools:
- Saw guide
- Hacksaw
- Measuring tape
- Headset press (if this is a new installation)
- Star nut tool
- 4, 5, and 6mm hex keys
- Torque wrench
Installation of a dual-crown fork requires good measuring skills, correct tools, and a strong mechanical background. If you do not have all of these skills then just leave this job to a bike shop… there’s no shame in that. If you do have all of the aforementioned skills and want to do it on your own, here’s how:
Start off by installing the bearing cups in the frame with the headset press.
Follow that by installing the lower race on the fork (be careful not to damage the steering tube in any way).
Once the race and cups are installed, remove the upper crown from the fork using the 5mm hex tool.
Measure the head tube, and add the stack height of the headset. On the Fox 40 you must have a minimum stack height of 105mm and no greater than 166.8mm. If you fall on the short side, you’re adding spacers between the upper crown and headset. If you’re on the tall side, you need a shorter headset.
Install the fork, complete with bearings and spacers. Some people who run a direct-mount stem have the steering tube cut flush, as is the case in my situation. If you’re of like mind, place a mark on the steering tube where the top of the crown meets the steering tube. Remove the fork and then cut the steering tube 3mm shorter. It is critical that you get this right: anything greater than that gap, and you’re replacing the steering tube (measure twice, cut once).
Use a saw guide to cut the steering tube, making sure that you remove all the burs on the inside and outside of the tube. Install the star nut using the correct tool at a depth of 4-10mm.
Install the fork with all the spacers as you had it when you set it up the first time. Adjust the star nut tension to about 1.6Nm.
Once the fork is attached to the bike, installation is pretty much the same as all other forks. Installation of the stem, bars, and brakes is covered in this article. For more information, check out the Fox owner’s manual.

Setting up the fork does take a bit of time, but it is well-worth the trouble. You can check out our previous Pimp My 40 article for more information, but the procedure is essentially the same.

Start by setting up the sag, dialing it a turn or two on the left hand dial until you have 25-30% sag. After that, set your high speed compression, low speed compression, and rebound. We used the settings from our previous tests as a starting point (11 HSC, 12LSC, 10R clicks) and found them to be bang-on. In my case, I added +4 HSC and +2 Rebound and it worked great.
Review

The performance of the Fox 40 is tough to beat: the small bump sensitivity is right on par with other excellent forks such as the Dorado Pro. Like the Dorado, I found that the new 40 tracks wonderfully, even if the ground is full of ruts and roots.
The overall reduction in stiction is noticeable when doing back-to-back runs, compared to 2011 or older models without the Kashima coating and SKF seals. I felt that the wheel spent more time tracking the terrain than clipping objects.
On the rougher end of things like the bigger hits and gnarly square-edged rocks, the 40 exceeded my expectations. The 40mm stanchions really made sure that everything stayed straight. There was no hint of flex in the system, even glancing off rocks and roots.
The mastery over the front wheel that the 40 provides will be very hard to beat. Once the fork was tuned correctly, I didn’t notice any negative effects from either the compression or rebound controls. I loved the control layout with the compression dial up top and the rebound below. I also like how the dials on the Fox 40 have a very positive “click” to them, which didn’t leave me wondering if I had actually made a change or not.
Throughout the entire testing period the 40 worked flawlessly without a single issue.
To make this the ultimate fork, I would like to see independent rebound controls for both high and low-speed rebound. At this level, it would be nice to have the ability to further tune the fork rather than compromise. I felt that shredding stuff like rock gardens with intermittent roller sections taxed the single rebound setting.
Being a bit of a weight weenie, I would also love to see a bit of weight removed, bringing the fork closer to 6.0 lbs. I’m not sure if that would mean a compromise in stiffness (which I love), or the removal of a coil spring replaced with air (which might change the feel of the spring).

Bottom Line
This fork, complete with the new FIT RC2 damper, works flawlessly and will be hard to beat.
MSRP: $1,600.
I would like to thank the folks at Fox for sending down the 40 for a review.


0 Comments