Always striving to take better photos for Singletracks, I have spent a lot of time learning how to get the best shot possible in a specific situation. But to be honest, I’m always learning! Hopefully these techniques and tips will help you take better photos out on the trail as well.
I like to start off by saying: always shoot slightly underexposed (especially if you shoot JPEG only). A slightly underexposed shot is much easier to touch up than an overexposed shot. Once the image goes white, there is no way to get the color back.
RAW or JPEG?
There is an ongoing debate about what format to shoot. Depending on which camera you purchase, you will have a certain-sized buffer. The size of your buffer dictates how many continuous shots you can take at a time, before filling the camera’s memory as it tries to write.
A few other things come into play with how many shots one can take at a time. One is the memory card’s write speed, and another is the size of the file. A JPEG file is smaller than RAW. Typical RAW files are 20-40mb each, depending on your camera. A JPEG is about 1-4mb, and that depends on your image sensor size and image size setting. So if you’re trying to capture a bunch of photos and have a smallish card, JPEG may be the way to go. If you plan on doing some heavy editing or you aren’t sure if you will capture the exact shot, then RAW may be a better choice.
The big difference between JPEG and RAW is the amount of information (detail) that is lost when an image is written in JPEG. Think of RAW as its name implies: raw, un-edited. All of the image’s data is retained in a RAW file. The big thing? If your images are over or under exposed, most of that data can be brought back.
With cameras like a Canon 7D you can shoot 25 continuous shots. My 70D can only shoot 16 photos at a time before the buffer is filled and has to write to the SD card. This could be an issue for someone who wants to capture a large amount of shots all at once. But if you’re someone who can anticipate the shot and can hold off a bit on the shutter button, then a RAW image capture will more than likely be usable.

White Balance: Explained
I can’t tell you how much it bugs me when my images turn out wrong. Uggh… I am not blue! You should always keep in mind what camera settings you have at your disposal. The best thing about digital cameras is the ability to erase a shot or two that just sucks. Before you start taking photos of your intended subject, squeeze off a few and take a look at the image. Is it too blue or too yellow, or is it the color temp you want for effect? Most cameras have a white balance setting that you can change. Depending on your camera model, some quick settings could include: Tungsten, Fluorescent, Flash, Shade, Sun, Cloudy, Auto, and Custom. Most people tend to stick to auto, as they don’t have enough of an understanding of light. When shooting in the auto setting, each individual shot will be metered separately from one another, making each shot have a slightly-different white balance. Do yourself a favor: before you shoot, set the camera up for your conditions. You could even experiment with fixing your setting in the custom menu.
White light from camera light boxes is 5000K, and light that looks more yellow like a light bulb will have a lower K value, closer to 3000K. By adjusting the temperature you can take out the yellow in a shot when shooting indoors, for example. Say you’re shooting in a room filled with fluorescent light and the image subjects are too blue; if that’s the case, you will need to elevate the temperature value. For example, if the camera setting was at 4000K you would need to bring it up to 5500K or so.
In general, I find that when I am shooting outdoors, I take my cues from the weather. Is it cloudy? Is it sunny? Am I in the shade? Next I take a few shots, decide whether I need to change my white balance, and then shoot from there with a fixed value. All the shots then have the same balance.
One neat technique is to get a white balance card… but a simple piece of white paper will do in a pinch. Place the card where you will be shooting, and then take a pic. Save that one so that later on you can set the balance on your PC, and then group all your photo sessions to that balance.
Below are some simple but effective points that will cover most outdoor conditions:
- Cloudy day 6000-6500K

- Sunny day 4800-6000K
- Outdoor shade 7000-8000K
- Candle light 1850-1930K
- Tungsten light 2500-3000K
- Fluorescent light 3300-4700K

Playing with white balance can also be effective for adding drama or warming an image.
Picture Styling: Aperture and Focal Length
Depending on what you’re after in a photo, playing around with aperture and focal length can significantly change how an image is perceived.
Aperture is the size of the opening inside the lens. Changing aperture changes how much light enters the camera… but it also changes how much of the image is in focus for a given focal length.

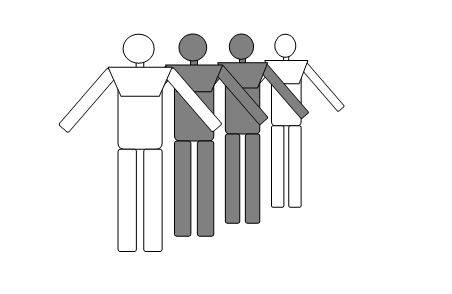
The image above gives you an idea of what aperture numbers represent. F/2.5, for example, is a very large aperture. This allows lots of light in, and also allows you to take quicker shots. But with larger apertures, you get a smaller depth of field. Less of the photo lies in the focal plain. Below is an illustration of depth of field with a camera set with a large f/stop like f/2.8.

You can see that this example shows one of the four people in focus while the others are not. The amount in focus changes depending on how far away the focal point is from the image sensor. The closer the subject gets to the camera, the shorter the depth of field becomes. For example, the image below was taken a few feet away from the subject:

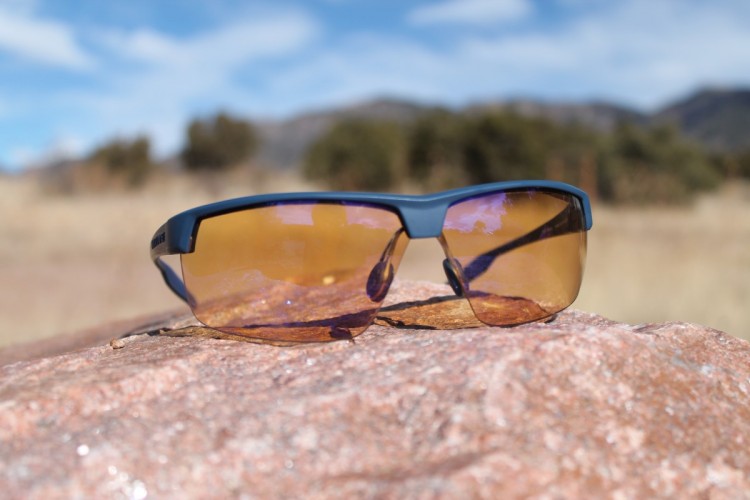
The front of the image is tack-sharp. But just an inch or so away, the image blurs. At this distance, you can see that the focal plain is very short–maybe an inch and a half (35mm). But for this image, it works. If you were shooting a portrait, you would be focusing on the eye of the subject. In the case below, the focus is on the edge of the sunglasses. The focal plane here is about a foot, so basically everything behind the model’s head is out of focus, drawing attention only to the model and not to the background. 
There are some very easy-to-use apps that allow you to calculate the depth of field for any given lens and camera combo.
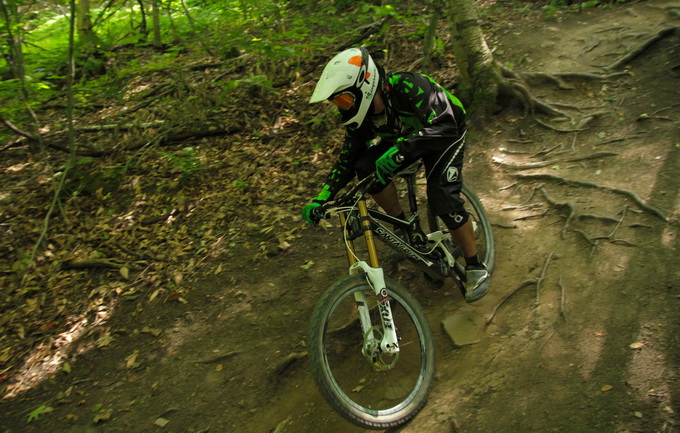
Above you can see that two of the four subjects are in focus. Depending on the distance you are from the subjects that you are shooting, this is a rough example of what a mid-sized aperture will have in focus. A mid-sized aperture would be around f/6.5 to f/11; curiously, the sharpest of shots for most cameras fall into this range. The down side to this is the slower shutter speeds or increased ISO settings that are needed to keep things exposed.

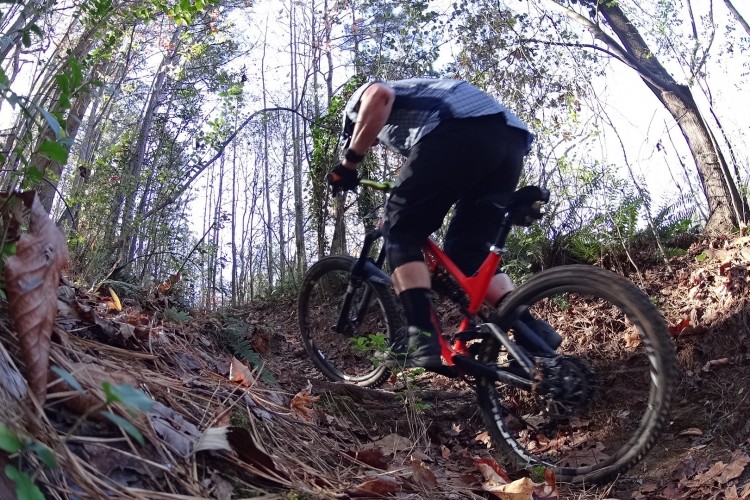
The above image was shot with a medium-sized 24-70mm lens, and the aperture here was set at f/6. I had to jack up the ISO to allow me to get a fast enough shutter speed to freeze the motion. You can see that this image is blurry a bit closer to the camera, and the rider in the back is also a bit on the blurry side. But in the middle of the image (or the focal plain) everything is tack-sharp. The original image, when blown up, would confirm that statement, but we have to cut things down to 620 pixels wide to fit our online format.

Using a narrow aperture, f/16-22 (or smaller), will place nearly everything in the image in focus. Again, that’s dependent on where you’re focusing, and how far away that focal point is.

The image above was shot at f/16, ISO 1600, 1/320 shutter speed, and using a wide 10mm lens. The shot is interesting because it breaks a few rules. I didn’t use a lens hood for one, and second I was shooting directly into the sun. This makes for a high-contrast shot, as well as what I was after: a natural lens flare. All these “mistakes” make for an interesting shot. You can see that from front to back, nearly the entire image is in focus. There is a bit of fringing out of focus, but that is more a byproduct of the lens.
Focal Length: How does it affect a shot?

The beautiful image above gives you a good idea of how the focal length of a lens changes how far in front of you you can capture. Simply put, the larger the value of focal length on the lens, the less field of view you can capture. Now if you’re using a point and shoot camera, you’re limited to what the camera will zoom in on. Some cameras will magnify an image to an equivalent focal length of a 24-450mm lens, but at a penalty of a f/6.9 aperture. If you’re using a iPhone or other smart phone, you’re stuck with a fixed focal length (35mm). Yes, they do zoom electronically, but you’ll lose picture quality as you zoom in.
Depending on what you’re shooting, you will want to have a lens that can vary its field of view. A wide angle (10-20mm) works great for shooting scenery, while something closer to 30-50mm works better for portraits, and 70-200mm or greater is better for close-up shots. That’s a general guideline: depending who you talk to, you can play with different lenses for different styles of photos. There’s nothing stopping you from using a 10-20mm lens for a close-up shot. It will tend to barrel-distort things, but sometimes that can look cool.

Both forest DH shots above were shot with a 10-20mm ultra-wide angle lens. But because the lens was put on a Canon 7D, the 7D uses what is considered an APS-C sensor, and not a full frame. APS-C is basically a smaller-sized image sensor. This smaller sensor changes up the focal distance. In the case of the Canon 7D, it is a multiplying factor of 1.6. So the two particular images above are essentially using an effective focal length of 17×1.6= 27.2mm, which is pretty wide. To get anything wider than this you’d have to use a fish eye lens. But you can see quickly that there is a lot of depth to this image.

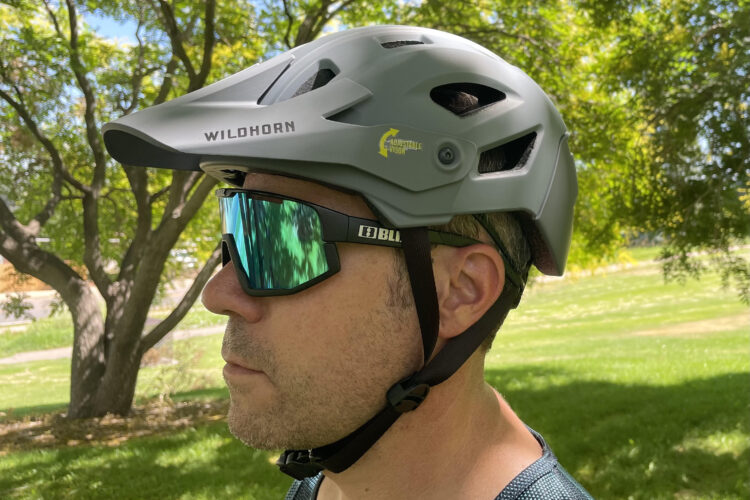
The depth effect is reversed with long focal lengths. This is perfect for taking photos of faces. Depending on the distance you are away from the subject, the focused image will have a shortish depth of field. The photo of my son, above, was taken using a long 70-200mm lens. You can see that the image in front and behind the subject are out of focus, but he is in the focal plane. Shooting with a long lens flattens the image, almost compressing everything together. This changes our depth perception.
Stay tuned for more photography tips and tricks on Singletracks in the future!