We’ve seen a recent surge of interest in trail building here on Singletracks and we just started a new forum for discussions about building mountain bike trails. But building the trail is only half of the equation; maintaining the trails is a long-term task that will never completely go away.
I’ve been dedicating more of my time lately to volunteering during trail work parties at my local trails. This blog post tells the story of our most recent work party, but also explains the why and the how behind basic trail maintenance.
De-berming and Nicking
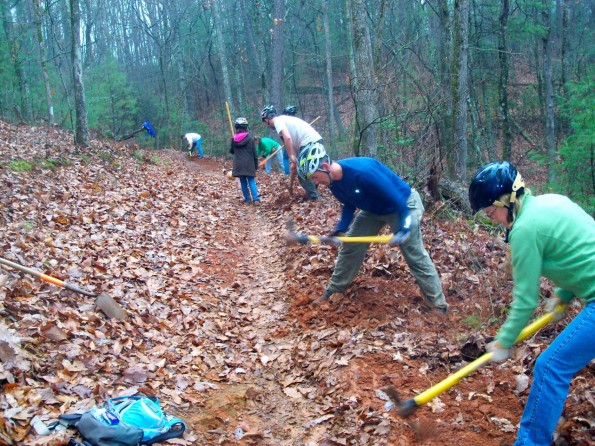
We spent four hours on a Saturday morning (1/7/12) working on de-berming and nicking the Jake-to-Bull connector trail out at Bull Mountain which runs from the lower Jake Mountain parking lot to the upper Bull Mountain lot. Our main focus was the first section, which drops down from the Jake Mountain lot to USFS road 28-1. In my opinion, the entire Jake-to-Bull connector is (or was) one of the worst-draining sections of trail in the entire trail system, so our focus here was well-deserved, and really, long overdue!
The basic design premise behind a bench-cut singletrack trail is that you want the water to flow off the trail/across the trail instead of following the trail down the mountain. There are various techniques you can use to make this happen, but the most important is to make sure that the trail is out-sloped.
Due to heavy use (or a haphazard initial build), the center of this trail tends to pack down more than the outside, creating an outer berm that holds the water on the trail. Our job was to de-berm the worst sections of the trail and to “nick” the low points by building drainage channels off of the side so that the lowest spots at the bottom and tops of the hills can drain properly.
De-bermed section of trail.
The tools of choice for this work are a pulaski and a McLeod. The pulaski is used for the main grunt work of chipping down the hardened outer berm and digging the nick in. But a pulaski isn’t capable of finishing the job. After the main digging is done, the McLeod comes out and is used to pull all the loosened dirt and other debris downhill, away from the trail. Generally, after pulling the loosened dirt away we’ll notice that the outer berm is still somewhat present, and then it’s back to the pulaski.
Pulaski, foreground. McLeod, background.
It can take a lot of switching back and forth between tools or people and a lot of time to satisfactorily de-berm and nick a low spot in the trail. Of course, you can do a quick once over… but if you don’t put in adequate time to do the job properly, it will either not make any difference at all, or the small drainages that you’ve made will fill right up in a few months. The best plan: do it right the first time so you won’t have to be back for another decade or so!
De-berming of a low spot, before and after:
Note: the low spot pictured above was rather minor compared to some of the muck holes we tackled that day!
The final test to determine whether or not the de-berming or nick will succeed at diverting the water off the trail requires a very specialized tool: a soccer ball.
Yes, a soccer ball. The ball is rolled down the trail and supposedly simulates the action of water with relative accuracy. If the ball rolls off the trail at your newly constructed nick or newly removed berm, then good: mission accomplished! If not, it’s back to the pulaski until it does.
Dave Muse testing the trail with the soccer ball.
Get Involved
With these trail design philosophies, tools, and techniques at your disposal, you are ready to start giving your trails the TLC they deserve! Before you head out and start moving dirt, though, make sure you have permission to perform the maintenance, and make sure you are working in line with the general philosophy of the trail system. For instance, out here in the National Forest we aren’t allowed to just go out and put tools to trail old day we please. We have to arrange pre-scheduled work days, document all the hours we work, sign waivers, and follow quirky safety procedures such as wearing helmets while we dig.
If you are interested in helping maintain your local trails, one of the best things you can do is become a member of your local trail advocacy group (check out this list of mountain bike clubs and organizations). They will probably have tools you can use, instruction and guidance on where and how to maintain the trails, and it’s a great way to meet like-minded riders, too! And if you aren’t convinced that you should help out yet, here are 7 Reasons to Start Doing Trail Work.
Get Digging!
Your turn: Are you involved in maintaining your local mountain bike trails?


