At this point in the MTB season you’ve been out dozens of times and may be experiencing “ghost shifting” or your shifting just isn’t what it used to be following a nasty crash. Now is a good time to check your gears.
Before we get started there are a few derailleur parts I’d like to illustrate and explain.
Limit Screws
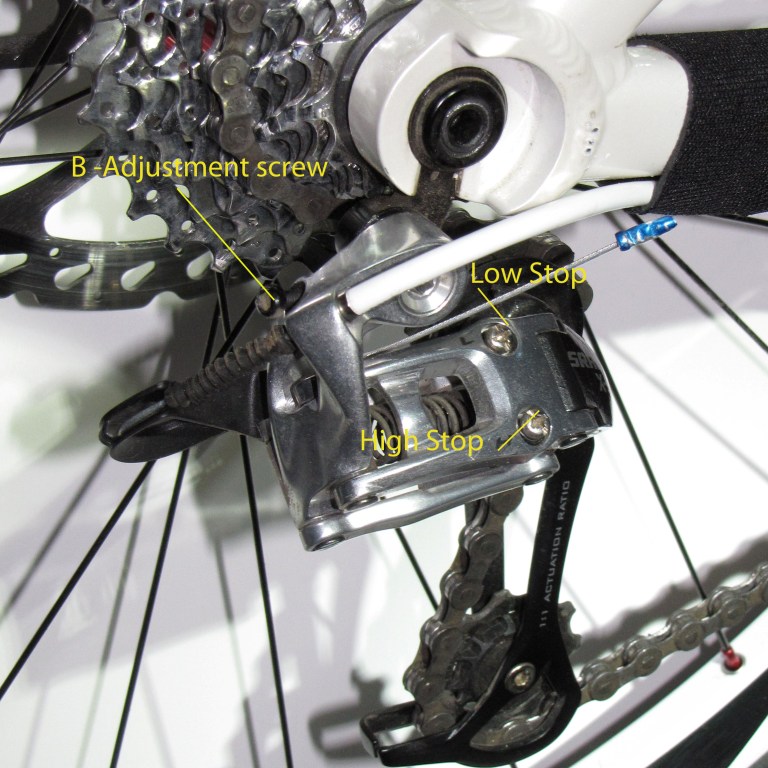
There are three limit screws (shown above): the B-screw (B-tension adjustment) found on both Shimano and SRAM rear derailleurs, the H-screw (high gear limit stop), and the L-screw (low gear limit stop).
B-tension Adjustment
The B-screw controls the derailleur bodys angle in relation to the sprocket-set. Shift to the largest sprocket and check the distance between the guide pulley and the large sprocket. Adjust the B-screw until the pulley rubs the large sprocket, and then tighten the screw until it barely clears and the chain does not bind.
High Gear Limit Stop

The H-limit screw high gear limit stop prevents the guide pulley from shifting any further past the highest gear and into the axle. In order to adjust it properly there must be zero tension on the lower inner cable. If you feel tension, loosen the cable adjuster until there is none. Now check from behind to see how the chain is riding on the smallest sprocket. If it looks like it wants ride off into the axle, tighten the H-screw clockwise until it lines up. If it looks like it is rubbing on the next gear, loosen the screw until the chain is nicely centered on the sprocket. Now re-adjust the cable tension until the derailleur shifts smoothly down to the next gear.
Low Gear Limit Stop

The L-limit screw prevents the guide pulley from shifting any further past the lowest gear and into the wheel spokes. Shift down to the lowest gear, step behind the bike, and check how the chain rides on the sprocket. If it looks like it wants to ride into the spokes, tighten the L-screw clockwise until it is centered on the sprocket. If it looks like it wants to shift down, loosen the screw until it lines up. As an extra precaution you can use your thumb to gently push the derailleur body and make sure the chain will not run into the spokes, as this could obviously have a nasty effect on both you and your bike.
Now that we have the limit screws figured out, let’s start adjusting your gears. This article assumes you’re using a conventional derailleur where the default, no-tension state places the chain in high gear (smallest cog in the back).
NOTE: Stop here and read this first. Check your chain to make sure it isn’t bent. Look down the chainline as you back pedal and look for twisting. If anything looks wonky, replace the chain first.
NOTE 2: Check the cassette and chain rings to make sure the teeth are straight and none are missing or bent. Both these items will make smooth shifting impossible.
Replacing Cables and Housing
Starting from the top, shift all the way into high gear. From here, if you want to replace the cable (’tis the season), you would release the bolt that holds the cable at the rear derailleur and remove the old cable. After opening up your shifter pod, (SRAM X.0, x-9, x-7) it’s just a matter of loosening up the single screw on the pod, pulling the cable out, and inserting a new cable (replace cap). For Shimano shifters there is a plastic cover to remove (near the thumb shifter); pull out the old cable and insert the new one (replace plug).
Check out your cable housing and remove the housing caps to get a better look. If the ends look frayed it may be time to replace the cable housing as well. If you do decide to change the housing, use the existing pieces to match the lengths. Cutting shifter cable housing requires a proper cutter (not a side cutter as it squishes the housing and increases drag on the cable); try the Park CN-10 cutter. Using a proper cutter also ensures a nice clean, straight cut essential for proper shifting. Once the housing is all cut and installed with cable ends, feed the shifting cable through and down to your derailleur. Do not attach the cable at this point.
Alignment and Tensioning
Check out the alignment of your derailleur in two spatial planes. From behind the bike, first check to see if your derailleur hanger is straight. Next, look at the two jockey pulleys and the cassette body to make sure they all line up – there shouldn’t be an angle between them. If there is and it’s small, you can try to bend it back by hand. Looking top down at the derailleur, check out the pulley positions again, this time relative to the cassette body. They should be straight from this angle as well; if not, you may be able to tweak the derailleur hanger to get them in line.
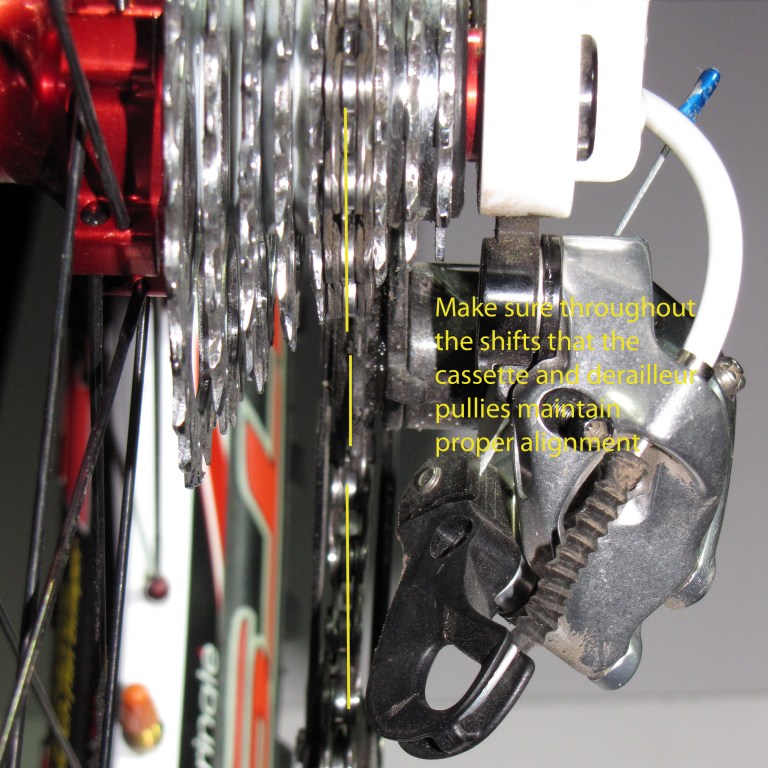
After all the limits are set, let’s get the chain in place and install the shifting cable. Both Shimano and SRAM derailleurs have a small detent with mounting bolt where the cable goes. Before you tighten down the cable, double check that everything is routed properly and you have turned the adjuster screw all the way in and then out two turns (more on this later). Pull the cable and tighten it in. Turn the pedals and pay attention to the rear cassette as you go and shift up one gear. If the derailleur hesitates then you need to turn out the adjuster screw on the shifter pod (half turns) until it shifts. Shift down and back up again checking to see you get a clean shift. If you’re satisfied, try shifting up again; if the shift is jumping almost two gears at a time, you went to far. Check to see (viewed from behind) that in any given gear, everything is in line as you shift. The chain line on each gear should be dead on.
Once you have the derailleur shifting smoothly on the stand, get out there and test it out! Adjusting a rear derailleur takes patience but in the end it’s a great skill for any mountain biker to have.