NO BRUNCH!!!
We’ll come back to that in a minute…
If you’re reading this article chances are good you’ve heard your buddies raving about how awesome it is to ride at night or perhaps you want to check out 24 hour racing. Whatever the reason, you’re intrigued and you want to give real, “on purpose” night riding a try.

![]() photocredit:jp3d2k
photocredit:jp3d2k
As the days get shorter, night rides can be a great way to extend the season as long as the weather allows. Hitting the trails in complete darkness also creates a completely different viewpoint of the trail. While daytime lends to seeing the scenery and other big picture stuff, darkness narrows your focus to just what’s in the beam of your light. It becomes just you and the trail. Obstacles look different, the smells are more noticeable, and occasionally the night looks back at you…
Gearing up
Clothing: Once the sun drops, even if the ambient temperature says 60 or warmer,it will feel colder. The cold will be most noticeable in your extremities, so if you have some warmer gloves and shoes, you’ll want them. A vest or light jacket will round out your night-time clothing needs. It’s also a good idea to wear reflective clothing if you’ll be sharing part of your route with cars.
Eyewear: The first time I rode at night with decent lighting I was shocked at how much gravel my front tire kicked up! If your regular riding shades have clear or yellow lenses, you can use those. Otherwise look at getting some clear protective eyewear. Home Depot carries safety glasses in the $5 – $20 range or you can get modestly priced shooting glasses at sporting goods retailers.

![]() photocredit:xJason.Rogersx
photocredit:xJason.Rogersx
Lights: A decent light is a must-have for serious after dark riding. The first few times I tried night riding I used a 70 lumen Princeton Tec head lamp that happened to snap into my helmet visor. I convinced myself it was good enough and I was able to muddle along the trail without killing myself. Later, when I raced in a 24 hour race for the first time, I borrowed two 350 lumens lights; one for my handlebars, and one on my helmet. I was blown away by the difference! Suddenly I could ride at full speed over technical terrain – in the middle of the night! The point is, for serious night riding, you need a serious light. The cycling light market has exploded recently, with advances in LED and battery tech making them brighter and more affordable than ever. Here are a handful of suggestions to get you started, but definitely ask around at the LBS and among other night riders. Like all things bike related, there are as manyopinionsas there are consumers.
Magic Shine 900. This is the light I have and I love it. It’s under 100 bucks and mounts in seconds. My light has held up well and its 700 actual lumens are perfect as a single light for recreational riding. My only complaint is that when it’s helmet mounted it’s noticeably heavy and sticks up in a way that can snag on overhead branches. (It comes with a bar mount, helmet mount is an extra $10).
Spoke Grenade SG-1000. A little more money, a fair amount brighter. They also ding you for the helmet mount. Come on guys, really?
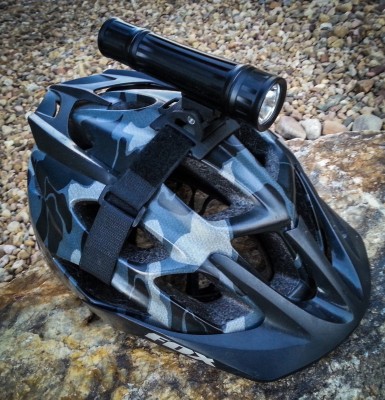
 Amoeba. These are hand-made by a fellow mountain biker right here in Colorado. The light, battery, and charger will set you back $220, and it sticks to your helmet with velcro. He also sells car chargers, bar mounts and upgraded batteries, and he may even create a custom light for you if you have lots of money and a convincing personality. Several of my riding buddies have this model and its biggest advantage is how it mounts. It lays pretty much flat on your helmet (see photo left), with the light head in front and the battery in back for a compact and counterbalanced fit that won’t weigh you down or catch on branches. Brilliant!
Light & Motion Seca 1400. This is an example from the high end of the scale. It may cost $560, but picture the headlights from a German sports sedan mounted on your handlebars. Yeah, it’s that bright.
Whatever model you choose, if you get just one, you’ll want it on your helmet, so that it points where you’re looking. The ultimate setup is two lights, one on the bars and one on the helmet, but for non-racing use, one light in the 600+ lumen range is fine.
Although it’s not strictly necessary, a small tail light can be handy to prevent getting rear-ended if you stop suddenly. This model is small, inexpensive and mounts easily to a hydration pack or jersey pocket.
Choosing a trail
For your first ever night ride, you may not want to go on that black diamond gnar-fest that you shred during the day. Lights tend to flatten trail obstacles, making it hard to judge the height of drops and the size of rocks. Assume that every obstacle is bigger than it looks and practice riding by ‘feel’ until your eyes adjust to the way things look under the lights. Starting out with an easier trail that you know really well will help. Once you get more practice, head back to the technical stuff and go nuts.
One thing to keep in mind is that not every trail or park area is open at night. A lot of trails where I live are in county open space parks that close an hour after sunset. Park Rangers are usually ok with rides ending later than that, but they can and will write you a ticket for heading out after the park is closed. Just do a little research and make sure it’s legal.
That’s it! Put on some warm clothes, get a decent light, practice on some easy trails, and soon you’ll be a seasoned night rider. You might even find yourself preferring it over daytime riding!
Oh, as for that opening comment, enjoy this video about Ben Stiller’s first nightmountainbike ride.