Four years ago, Corey shared his excellent plans for an inexpensive and simple standing bike rack. I built my own version, and it worked great. But after using it daily for MTB rides and bike commutes, I started noticing some problems. Sliding the bikes in and out of the rack seemed to be damaging my tire sidewalls, each bike slot had to be customized based on tire size (our family has road bikes, kids bikes, regular mountain bikes, and plus bikes), and the thing just took up a bit too much room in our garage. So I decided to find another solution.

If you’ve been to any kind of bike expo or demo event, you’ve seen the hanging bike, hitching post-style racks like the one above that can accommodate a lot of bikes in a small space. Hanging racks make it easy to grab and replace bikes, and just about any bike will fit. Unfortunately, these racks aren’t cheap, with high quality, portable versions selling for $250 or so.
Materials

To build this bike storage rack, all you need are three, 8-foot 2×4 boards, a piece of pipe, and some screws. I was able to scavenge two of the 2x4s from my old bike rack, and I even found a suitable length of pipe in my backyard!
- 3, 2x4x8′ boards ($3.52 each at Home Depot)
- 1, 1-1/4 in. x 10 ft. section of black pipe ($26.59 at Home Depot)
- Screws
Assuming you already have some screws, this project should cost less than $40. The boards I linked above are pressure treated, which isn’t necessary if the rack will be kept indoors. Untreated boards should cost slightly less.
Black pipe is expensive (as Colton found out when building his work stand), so one could cut costs by using a smaller diameter pipe. However, keep in mind that the smaller diameter pipe will be more flexible, and therefore the width of the rack may need to be reduced. Go to your local home improvement store and use your judgment as to what size pipe you need.
Note: I used a couple of the leftover 2×6 boards I had from my previous rack, but the plans and instructions use 2×4 boards exclusively.
Tools

Like all DIY projects, having the right tools makes things much easier and more enjoyable. I’ll note which tools are necessary below, and also recommend some optional tools that will make the job easier.
- A wood saw. Sure, a hand saw will work, but a circular saw is even better. The best saw for this job is an electric miter saw like the one shown above.
- Measuring tape
- Pen
- Drill
- Driver bit for the screws. (I like deck screws, which require a torx driver head.)
- 1/8″ drill bit suitable for drilling through metal
- 1-1/4″ wood drill bit
- Hacksaw with a blade for cutting metal. Even better: a reciprocating saw with a metal cutting blade. The best: a pipe cutter, suitable for black pipe.
Rough Cut List
First, use two of the 2x4s to cut a total of four, 48″ pieces. (Make sure you buy 8ft and not stud-length boards, which are shorter than 8 feet.) With the remaining 2×4, cut two 36″ pieces and two 12″ pieces.
Cut the pipe to the desired width for the rack. A good size is 6-8 feet, which should fit lengthwise in a standard garage bay with room to walk around either side.
- 4 – 48″ boards
- 2 – 36″ boards
- 2 – 12″ boards
- 1 – 6-8ft pipe
Layout and Angle Cut List

Now, this is the part where a miter saw comes in handy, but it’s not required. In fact, these instructions will assume you don’t have one. (If you do, the key angle you’ll want to use for each of these cuts is 13°.)

Start by marking a span of 21.5″ on one of the 36″ boards, laid out roughly in the middle of the board. In other words, make a mark at 7.25″ from one end, and another at 28.75″.

Now, lay out two of the 48″ boards (the legs) on the ground, with the tops touching at one end similar to the diagram and photos above. Roughly center the 12″ board on top of the 48″ boards. Now, place the marked 36″ board at the other end and perpendicular to the 48″ boards. Move the 36″ board down until the bottom of the board is even with the outside edge of each leg. Finally, move the two legs apart until the inside edges are touching the 7.25″ and 28.75″ marks.

Move back up to the top and make sure the legs are still touching as shown, and position the 12″ board so the top of the board is even with the inside top of each leg. Trace the legs as shown by the dotted lines on the left side of the diagram at the beginning of this section.

Now, flip the layout over. Line up all the boards just as you did in the step above, but this time trace along the 36″ and 12″ boards, as shown by the dotted lines.
Repeat this two-step layout and marking process for the second set of boards. Once all the boards have been marked, cut along the traced lines.

Cut the pipe to the desired length.
Assembly

Now that the hard part is done, it’s time to put the pieces together. By now it should be fairly obvious how the pieces fit together. Place two screws at each board intersection to make sure nothing rotates or spins around.


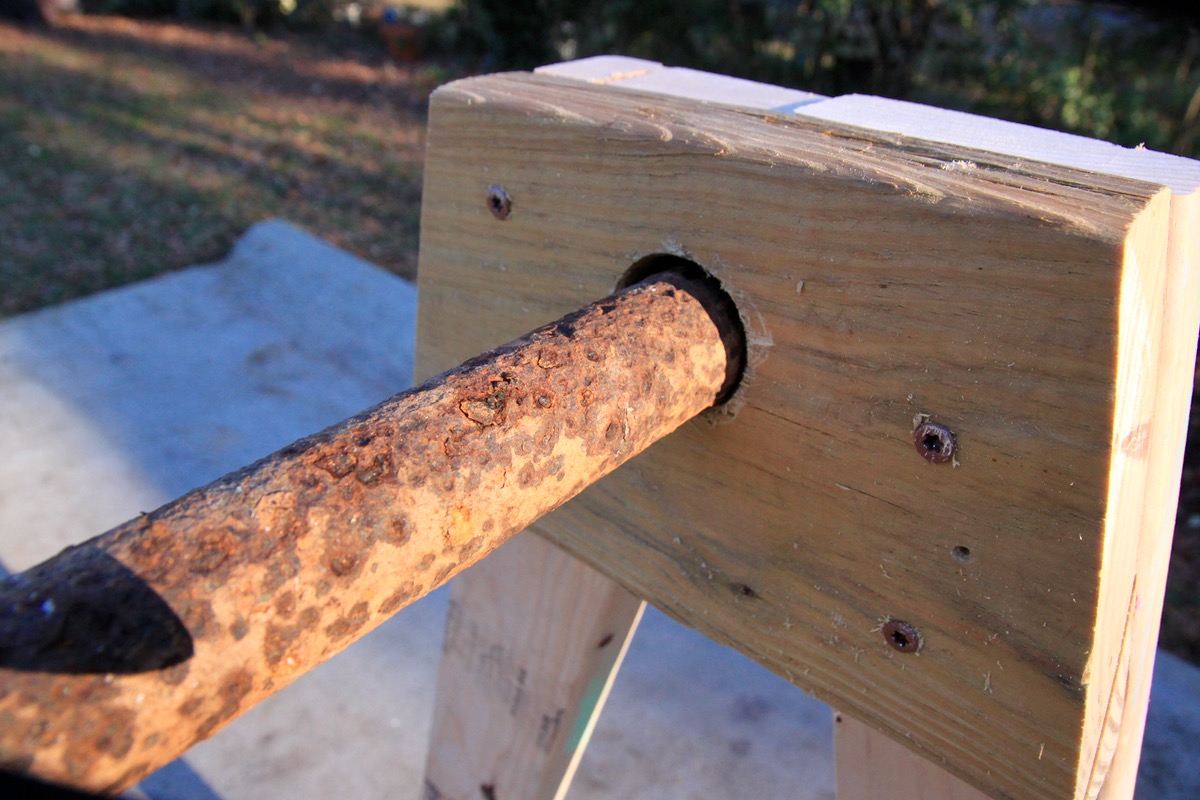
Drill a 1-1/4″ hole for the pipe at the top of either leg, about 1.5″ down and centered on the top of each leg assembly. Be careful if you’re using a spade bit as you drill through the top board; the bit may catch on the angled boards below!

Slip the pipe into the holes in each leg. You may need to widen the holes a bit to make things fit, but a tight connection is a good thing. Push the pipe through until it is flush with the outer end of each leg assembly.

Finally, drill a 1/8″ hole through the top (looking down) of each leg assembly and into the pipe. Set a screw into this hole through the top of each leg and into the pipe to keep it secure and to keep the pipe from rotating. I actually broke off the top of one of my screws when I did this, so you may want to just get the screw in enough to pinch the pipe.
How does it work?
It works great, if I do say so myself. Compared to the old rack, I can fit more bikes in less space, and the rack works with any bike I might want to throw on it. Not only that, the rack with bikes takes up less floor space since each bike is hanging at an angle instead of flat on the floor. It’s easy to slide bikes we don’t use as often close together, while leaving more room for bikes that go in and out more often.
One potential drawback with this rack is it probably isn’t great for bikes with dropper posts. Still, I’ve seen plenty of bikes with droppers used with this type of rack at demo events, and because one wheel is on the ground, at least the full weight of the bike isn’t being held by the post. Still, I plan to make sure my dropper posts are fully extended whenever the bikes are on the rack in hopes that this will minimize any potential damage.
Because I wanted to get away with using just three, 8ft 2×4 boards, I compromised a bit on the height of the rack. In the end, my bar sits about 44 inches off the ground, compared to 48″ for some of the commercial racks I’ve seen. At first I thought I might have a problem fitting some of my own bikes since I ride XL frames and jack the seat way up, but even my tallest bike (with dropper extended) sits with its rear wheel about an inch off the ground.

I was also worried small kids’ bikes might not work on the rack, but so far, so good! True, small bikes look weird just dangling in the wind, but they are held fairly securely. Still, little kids will probably need help getting their bikes off the rack so they don’t get hurt.
Your turn: Have you built a similar rack, or do you have any suggested modifications?